background image


VITRA 


P u r e   t r a n s p a r e n t   r e f r i g e r a t i o n   t e c h n o l o g y      


LONGONI  DIVISIONE  FREDDO  SRL 


Via Bongiasca,762/1 - 21020 

– COMABBIO/VA – ITALY- Tel.++39/0331/968741 – Fax +39/0331/968721  

www.longoni.it 

– longoni@longoni.it 

GB 

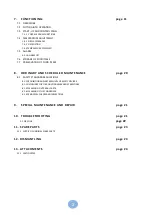
Summary of Contents for VITRA

Page 1: ...t r a n s p a r e n t r e f r i g e r a t i o n t e c h n o l o g y LONGONI DIVISIONE FREDDO SRL Via Bongiasca 762 1 21020 COMABBIO VA ITALY Tel 39 0331 968741 Fax 39 0331 968721 www longoni it longoni longoni it GB ...

Page 2: ...ONING page 5 2 1 DESCRIPTION 2 2 FUNCTIONING 3 PREARRANGEMENTS page 5 3 1 LIGHTING 3 2 VIBRATIONS 3 3 NOISE EMISSIONS 3 3 SUPPLIES UPON REQUEST 3 4 ELECTROMAGNETIC ENVIRONMENT 4 SAFETY page 6 4 1 GENERAL WARNINGS 4 2 RECOMMENDED USE 4 3 CONTRAINDICATIONS AND PRECAUTIONS FOR USE 4 4 HAZARDOUS AREAS 4 5 SHUT DOWN PROCEDURE 4 6 LABEL PLATES 5 SHIPPING AND HANDLING page 8 5 1 SHIPPING AND HANDLING 5 2...

Page 3: ...TEMS 8 ORDINARY AND SCHEDULED MAINTENANCE page 20 8 1 SAFETY STANDARD REGULATIONS 8 1 1 PROHIBITION AGAINST REMOVAL OF SAFETY DEVICES 8 1 2 GUIDELINES FOR FIRE FIGHTING EMERGENCY RESPONSE 8 1 3 CLEANING OF INTERNAL PARTS 8 1 4 CLEANING OF THE CONDENSER 8 1 5 PERIODICAL CHECKS AND INSPECTIONS 9 SPECIAL MAINTENANCE AND REPAIR page 21 10 TROUBLESHOOTING page 21 1 1 QR CODE page 22 11 SPARE PARTS page...

Page 4: ...S Our refrigerated display cases and air condensed refrigerator units are manufactured in conformity with the relevant UE Directives applicable at the moment these products are released into the market Since the refrigerator under consideration is not covered by ATTACHMENT IV of Directive 98 37 EEC it is up to the manufacturer to provide the CE marking self certification 1 4 WARRANTY The new appar...

Page 5: ...qualified technicians must carefully read the instructions contained in this user and maintenance manual Please refer to your dealer to clarify any doubts you may have with regards to the proper interpretation of the instructions 1 6 2 INTENDED READERS This manual is intended for use by dealers users and authorized maintenance staff End users are strictly forbidden from performing any operations t...

Page 6: ... evaporator the vapours are absorbed by a compressor and sent to the condenser If the latter along with the heat that the gaseous refrigerant accumulates during the evaporation process evaporation enthalpy also absorbs the calorific equivalent released during the compression process the refrigerant returns to a liquid state Given that liquefaction is an endothermic process heat is produced and the...

Page 7: ...s when hands or feet are wet or damp Do not touch the apparatus when barefoot Do not introduce screw drivers or any other object in between guards or parts in motion Do not disconnect the apparatus by pulling the supply cable out from the outlet Before performing any cleaning and or maintenance work disconnect the apparatus from the power line To do this turn off the master switch and disconnect t...

Page 8: ... switch and disconnecting the power supply cable from the power line It is absolutely mandatory to put the guards back into place upon completion of the maintenance and or repair work 4 5 SHUT DOWN PROCEDURE To shut down the refrigerator proceed as follows Turn off the master switch Unplug the power supply cable 4 6 LABEL PLATES Modello Model Matricola Series N Gas R452 A gr Cap Volt Hz Watt Class...

Page 9: ...ssional and qualified staff only The display case must be handled in such a way as to avoid unnecessary damage to any of its parts Depending on the transport method the display case must be protected from accidental bumping and stress Before shipping the refrigerator may either be packaged or not according to the means of transportation used The refrigerator is packaged in cardboard boxes The refr...

Page 10: ...as occurred to the refrigerator during installation Carefully check the integrity of electric cables and tubing Check accuracy of all connections to external power sources Make sure all movable parts are able to rotate and move freely 6 I N S T A L L A T I O N To achieve optimal functionality of your refrigerated display case it should be placed in a well ventilated spot as far as possible from he...

Page 11: ...nd all interior parts with an anti bacterial detergent easy to find at any store Wash away the detergent with a soft sponge soaked with water and dry with a soft clean cloth Do not use abrasive cleaners and or powders that may dull the surface finishes When carrying out the operations above be careful not to use too much water as it may damage electric parts a sponge soaked in water will be enough...

Page 12: ...ed below 6 3 1 ELECTRICAL CONNECTIONS The Client is in charge of making the necessary electrical connections Connections to the power line must be made in compliance with the regulations in force in the country where the refrigerator is being installed Make sure the power supply voltage corresponds exactly to the indications stated on the label plate affixed to the refrigerator see Label Plate A M...

Page 13: ...or so before putting it into operation 7 3 START UP AND CONTROL PANEL Tools needed Screwdriver Philips Head Use the screwdriver to remove the 4 screws located on the rear panel Fig 7 Run the power supply cable underneath the refrigerator and close the rear panel again 8 Connect the plug to the relevant socket Fig 7 Fig 8 ...

Page 14: ...rigerated display case can be switched on Fig 9 Fig 9 To turn on the display refrigerated cabinet hold the center red for a few seconds If the internal battery it will be discharge clock icon appears to adjust the date and time follow these instructions 1 Press the central button Upper button Central button Right button Left button Down button 2 Press the upper button to increase the value and dow...

Page 15: ...wn button to decrease press the right Button to move to the hour 5 Press the upper button to increase the value the down button to decrease press the right Button to move to the minutes 6 Press for four second the central button until confirm the values KEYBOARD DATE HOUR ROOM TEMPERATURE LIGHT EVAP TEMP SET POINT COND TEMP Press the button Left to switch on the led light ...

Page 16: ...with the Button UPPER AND DOWN press the central button until confirm the value 7 4 2 DEFROSTING The refrigerated display case defrost is automatically In case if necessity manual defrosts follow these instructions Press the central button the home page appeared Press five time the button right until the defrost icon press the central button until the defrost start The defrost water is conveyed to...

Page 17: ...wo ways EASY and SCIETIFIC To Select the easy or scientific press two times the central button SWITCH OFF REFRIGERATED CABINET Press the central button the home page appeared press one time the right button the OFF icon Appeared press the central button until the refrigerated cabinet switch off ...

Page 18: ...ss the central button and the alarm list appeared If there are a failure the failure icon appeared and the central button flashing Press the Central button the failure list appeared When alarm ends red envelope appeared pressing the central button to check the alarm Type and cancel the red envelope Open door ...

Page 19: ...18 7 5 1 ALLARM LIST ...

Page 20: ...ic substances in general is caused by the multiplication of bacteria that are found inside the cells of food items Such bacterial proliferation may be delayed considerably by lowering the temperature of the food As a matter of fact food items according to their organoleptic properties require specific temperatures and environmental conditions for optimal preservation To achieve the best performanc...

Page 21: ...n abrasive detergents DO NOT USE SOLVENTS Cleaning methods wash with soft cloth or sponge Cleaning should be performed on a weekly schedule 8 1 4 CLEANING OF THE CONDENSER Tools needed Screwdriver Philips Head A clogged condenser may compromise the overall performance of the condenser unit and for this reason it should be cleaned on a weekly basis Proceed as described below Shut down and unplug th...

Page 22: ...ir vent present on the upper part of the display case Display case exposed to direct sunlight Insufficient refrigerant Condenser fan not running Add more ventilation to the room Clean the condenser Move display case to another spot Move display case to another spot Contact technical support Contact technical support Block of ice on evaporator coil Refrigerator door left open inadvertently Failure ...

Page 23: ...22 ...

Page 24: ...plate A Component identification number see attachment 13 2 3 Any malfunction due to use of non original spare parts will not be recognized by our technicians and will cause the warranty to be null 12 D I S M A N T L I N G The gas present in the system must be removed by authorized staff only As regards the metal body it is sufficient to separate steel parts from other materials before sending the...

Page 25: ...ion pour utilisation commerciale auquel cette déclaration se réfère est conforme aux directives suivantes E El suscrito nombrado representante legal de la LONGONI DIVISIONE FREDDO Srl Via Bongiasca 762 1 COMABBIO VA ITALIA declara que el aparato de refrigeración para uso comercial al cual se refiere esta declaración cumple las siguientas directivas D Der Unterzeichner rechtlicher Vertreter der LON...

Reviews: