
I
NSTRUCTION
M
ANUAL
CAL. YK50(R23 SERIES)
NREYK50
6-2003
The display mode changes over in the following
order by pressing button B.
D a y o f t h e W e e k
A
D u a l
T i m e
m o d e
A l a r m
m o d e
T i m e / C a l e n d a r
m o d e
S t o p w a t c h
m o d e
C o u n t d o w n
T i m e r
m o d e
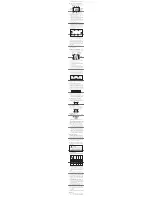
1. Press button B to go to the Time/Calendar
Mode. Mode indicator “T1” appears.
2. Press button A for 3 to 4 seconds to change the
display to the Time/Calendar Setting Mode.
The second digits start flashing.
3. Press button C simultaneously with a time signal
to adjust the second digits. The second digits
are reset to “00” and start immediately.
When button C is pressed while the second
digits are between “30” to “59”, one minute is
added at the same time the second digits are
reset to “00”.
4. Press button B to confirm the second setting and
move on to the hour setting.
5. Adjust the hour digits and other items. Press
button C to adjust an item, and then press button
B to confirm it’s setting and move on to the next
item.
Each press of button C advances the digit by one.
To advance the digits quickly, keep button C
pressed.
•
The item to be adjusted changes over in the
following order.
S e c o n d
H o u r
D a t e
M i n u t e
D a y o f t h e
W e e k
■
HOW TO SET THE TIME/CALENDAR
6. After all the adjustments are completed, press
button A to go back to the Time/Calendar
Display.
Choice of 12-Hour/24-Hour indication
•
The time display format in either 12-hour
indication or in 24-hour indication can be
selected alternatively by pressing button C.
Under the 12-hour indication format, “P” mark
appears in the afternoon, but no AM mark
appears in the morning. Under the 24-hour
indication format, no mark appears on the
display.
Chime setting
The chime can be set to sound on the hour.
Press button D to set the chime. The chime mark
appears on the display.
■
C H A R A C T E R I S T I C S
1. T i m e / C a l e n d a r D i s p l a y :
Hour, minute,
second, month, date and day of the week
Automatic Calendar:
The calendar adjusts
automatically for odd and even months including
February of leap years from 1990 to 2089.
Time Display Format:
12-hour display format
with PM indicator and 24-hour display format are
available.
2. S t o p w a t c h :
Measures up to 99 hours 59
m i n u t e s 5 9 . 9 9 s e c o n d s i n 1 / 1 0 0 - s e c o n d
increments for the first 1 hour, and in one-second
increments thereafter. Lap and split time
measurement is also available.
3. Countdown Timer:
The timer time can be set
up to 23 hours 59 minutes and 59 seconds in one-
second increments.
4. Dual Time:
Time in a different time zone can
be set and displayed.
5. Alarm:
The alarm can be set to sound on a 24-
hour basis. Two individual daily alarms that can
be set to the time of Time/Calendar or Dual
Time display.
6. I l l u m i n a t i n g l i g h t :
T h e b u i l t - i n
electroluminescent backlight illuminates the
display for viewing in the dark.
■
B U T T O N S A N D D I S P L AY S
P M
indicator
H o u r
B
M O D E
M o n t h
M i n u t e
D a t e
S T A R T /
L A P
C
D
A l a r m
m a r k
C h i m e
m a r k
S e c o n d
S T A R T /
R E S E T
A
B
C
M o n t h
P M m a r k
( f o r 1 2 - h o u r
d i s p l a y o n l y )
C h i m e
Y e a r
M o n t h
S e c o n d
H o u r
D a y o f t h e
w e e k
M i n u t e
D a t e
Chime is ON.
Chime is OFF.
■
H O W T O U S E T H E S T O P WAT C H
The stopwatch can measure up to 99 hours 59
minutes and 59. 99 seconds. For the first one hour,
minute, second, and 1/100 second are displayed.
A f t e r 1 h o u r , h o u r , m i n u t e , a n d s e c o n d a r e
displayed. When the measurement is over 99 hours
59 minutes and 59. 99 seconds, the stopwatch stops
automatically.
A
B
C
D
S t o p w a t c h M o d e
I n d i c a t o r
L a p n o . /
S p l i t n o .
M i n u t e
S e c o n d
1 / 1 0 0
s e c o n d
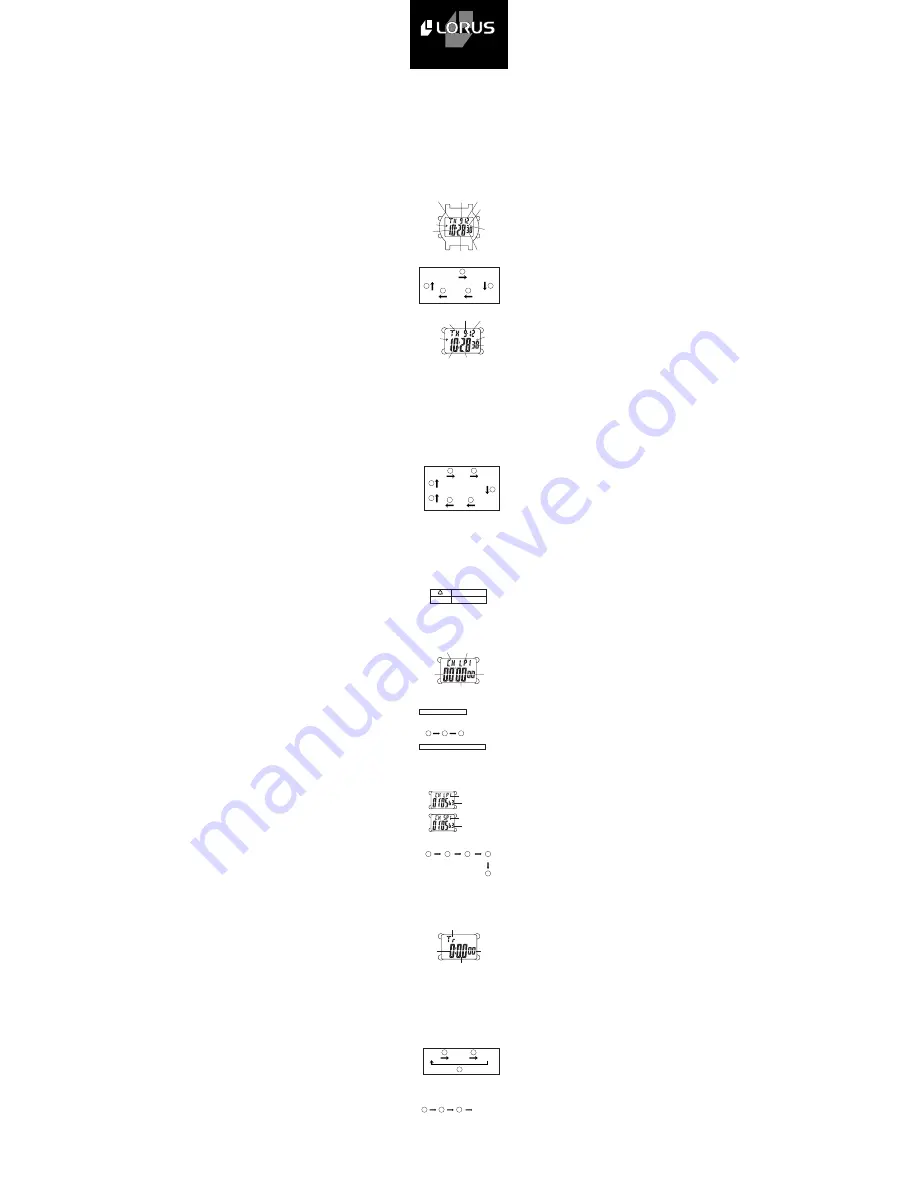
Stopwatch operation
Press button B to go to the Stopwatch Mode. Mode
indicator “CH” appears.
Standard Measurement
1. Press button C to start the stopwatch.
2. Press button D to stop.
3. Press button D to reset the stopwatch.
S t a r t
S t o p
R e s e t
Lap and Split Time Measurement
1. Press button C to start the stopwatch.
2. Press button C during the measurement to
display the lap and split time.
W h i l e t h e m e a s u r e m e n t i s s t i l l i n p r o g r e s s
internally, the lap number (LP) and lap time will be
displayed for 4 to 5 seconds, and then the split
number (SP) and split time will be displayed. After
4 to 5 seconds, the display will automatically go back
to the measurement in progress.
L a p n u m b e r ( L P )
S p l i t n u m b e r ( S P )
3. Press button C to take the next lap and split time.
4. Press button D to stop the stopwatch.
5. Press button D to reset.
S t a r t
Display
L a p 1 /
S p l i t 1
D i s p l a y
L a p 2 /
S p l i t 2
S t o p
R e s e t
* The lap and split time can be measured
repeatedly by pressing button C.
** Up to 9 lap and split times can be
displayed.
■
H O W T O U S E T H E C O U N T D O W N
T I M E R
•
The Countdown Timer can be set up to 23 hours,
59 minutes and 59 seconds in one-second
increments.
Timer Setting
A
B
C
C o u n t d o w n T i m e r
M o d e I n d i c a t o r
H o u r
M i n u t e
1. Press button B to go to the Countdown Timer
Mode. Mode indicator “Tr” appears.
2. Press button A for 3 to 4 seconds to change the
display to the Timer Setting Mode. The hour
digits start flashing.
3. Press button C to adjust the hour digits.
Each press of button C advances the digit by one.
To advance the digits quickly, keep button C
pressed.
4. Press button B to confirm the hour setting and
move on to the minute setting.
5. Adjust the minute and second digits in the same
way as Step 3 & 4. Press button C to adjust the
digits, and press button B to confirm the setting
and move on to the next digits.
•
The item to be adjusted is shown in the following
order with each press of button B.
S e c o n d
6. After all the adjustments are completed, press
button A to go back to the Countdown Timer
Mode.
7. Press button B to go back to the Time/Calendar
Display.
Timer Operation
✼✼
Warning sound
beeps for 10 seconds
T i m e U p
S t a r t
S t o p
R e s t a r t
✼
1. Press button C to start the Timer.
2. Press button D to stop the Timer.
3. Press button C to restart. In order to display
the preset time again, press button A.
✼
The watch will beep for 1 second at 5minutes,
3 minutes, and 1 minute before the timer time is
up. Press any button to stop the sound manually.
✼✼
When the timer time is up, the warning sound
beeps for 9 to 10 seconds, and automatically
reset. Press any button to stop the warning
sound manually.
S E T /
L I G H T
L a p t i m e
S p l i t t i m e
H o u r
M i n u t e
S e c o n d
B
B
B
B
B
B
B
B
B
B
B
B
C
D
D
C
C
C
D
D
B
B
B
C
D
C


