background image

ENGLISH

ELITE Ti

Operator Manual

lowrance.com

Summary of Contents for ELITE TI

Page 1: ...ENGLISH ELITETi Operator Manual lowrance com...
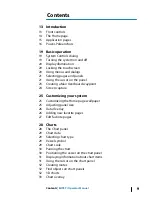
Page 2: ......

Page 3: ...slated to or has been translated from another language Translation In the event of any conflict between any Translation of the Documentation the English language version of the Documentation will be t...

Page 4: ...HD StructureScan HD Copyright Copyright 2016 Navico Holding AS Warranty The warranty card is supplied as a separate document In case of any queries refer to the brand website of your display or system...

Page 5: ...he reader s attention to a comment or some important information Warning Used when it is necessary to warn personnel that they should proceed carefully to prevent risk of injury and or damage to equip...

Page 6: ...Page Up and Down Select the relevant panel button Scroll pages Drag finger on the screen in any direction Panning on the page Drag finger on the screen in any direction Zoom In Out Key operation Use t...

Page 7: ...y on this unit can be found in the About dialog The About dialog is available in the System Settings For more information refer to About on page 110 For upgrading your software refer to Softwareupgrad...

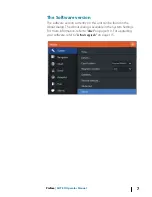
Page 8: ...8 Preface ELITE Ti Operator Manual...

Page 9: ...waypoint 24 Screen capture 25 Customizing your system 25 Customizing the Home page wallpaper 25 Adjusting panel size 26 Data Overlay 26 Adding new favorite pages 27 Edit favorite pages 28 Charts 28 Th...

Page 10: ...Zooming the image 59 Using the cursor on the image 59 Viewing history 60 Setting up the image 62 Stop sonar 62 Advanced options 63 Start recording log data 64 Stop recording log data 65 Viewing the r...

Page 11: ...automatic navigation to standby mode 85 Autopilot interface 86 Autopilot control of the trolling motor 90 Autopilot settings 92 Wireless connection 92 Connect and disconnect from a wireless hotspot 93...

Page 12: ...111 Vessels 111 Sun Moon 112 Trip calculator 112 Files 112 Find 112 GoFree Shop 114 Maintenance 114 Preventive maintenance 114 Checking the connectors 114 Touchscreen calibration 114 NMEA Data logging...

Page 13: ...Pages 3 Zoom out Zoom in combined press MOB 4 New waypoint long press Find dialogue 5 Power button Press and hold to turn the unit ON OFF Press once to display the System Controls dialog 6 Card reade...

Page 14: ...3 Applications Select a button to display the application as a full page panel Press and hold a button to display pre configured split page options for the application 4 Close button Select to exit th...

Page 15: ...m the Home page 1 Application panel 2 Menu Panel specific menu 3 System Controls dialog Quick access to basic system settings Display the dialog by a short press on the Power key 4 Dialog Information...

Page 16: ...ation button on the Home page Favorite pages All preconfigured favorite pages can be modified and deleted and you can create your own You can have a total of 12 favorite pages For more information ref...

Page 17: ...ed out until the system connects with the Power Poles Once connected and functional the arrows in the dialog turn white The Power Pole controller displays control buttons for each Power Pole that is p...

Page 18: ...where you can select to stay connected to all paired Power Pole anchors Note Selecting to Stay connected speeds up access to the controls but the anchors cannot be controlled from another display whe...

Page 19: ...erlay icon above Turning the system on and off You turn the system on and off by pressing and holding the Power key You can also turn the unit off from the System Controls dialog If the Power key is r...

Page 20: ...heavy seas and weather This feature is also useful when cleaning the screen while the unit is turned on When the touch lock is active you can only operate the unit from the keys You lock the touchscre...

Page 21: ...Selecting pages and panels Selecting a page Select a full page panel by selecting the relevant application button on the Home page Select a favorite page by selecting the relevant favorite button Sel...

Page 22: ...placement of the cursor without covering details with your finger Press and hold your finger on the screen to switch the cursor symbol to a selection circle appearing above your finger Without removin...

Page 23: ...ur you can save a Man Overboard MOB waypoint at the vessel s current position by pressing the Zoom In and Zoom out keys simultaneously When you activate the MOB function the following actions are auto...

Page 24: ...el Edit its attributes Delete it Goto it When you select the Edit menu option the Edit Waypoint dialog opens Screen capture Simultaneously press the Pages and Power keys to take a screen capture Scree...

Page 25: ...en as the wallpaper it is automatically copied to the Wallpaper folder Adjusting panel size You can change the panel size for an active split page The panel size can be adjusted for both favorite page...

Page 26: ...orange bar appears above the icon Edit overlay data Use the Edit overlay option on the System Controls dialog to access edit menu options to Add a new data overlay to the active panel Delete a select...

Page 27: ...luded in the list of favorite pages on the Home page Edit favorite pages 1 Select the edit icon in the Favorite panel Select the X icon on a favorite icon to remove the page Select the tool icon on a...

Page 28: ...lace waypoints and display AIS targets You can also overlay a StructureScan image The Chart panel 1 Waypoint 2 Vessel with extension line extension line is optional 3 Route 4 North indicator 5 Grid li...

Page 29: ...ing on the chart you are using Note The system does not automatically switch to embedded cartography if the chart card is removed A low resolution chart will be displayed until you re insert the card...

Page 30: ...vailable for how the chart is rotated in the panel The chart orientation symbol in the panel s upper right corner indicates the north direction Northup Headingup Courseup North up Displays the chart w...

Page 31: ...tos associated with the location or object Note Pop up information has to be enabled in chart settings to see basic item information Using the cursor on the chart panel By default the cursor is not sh...

Page 32: ...ls or various chart items from a chart panel Activate the cursor on the panel to search from the cursor position If the cursor is not active the system searches for items from the vessel s position No...

Page 33: ...cally Note When centered on the vessel position only the tilt angle can be adjusted The view direction is controlled by the chart orientation setting See Positioningthevesselonthechart panel on page 3...

Page 34: ...art detail Full All available information for the chart in use Medium Minimum information sufficient for navigation Low Basic level of information that cannot be removed and includes information that...

Page 35: ...t types Community edits Toggles on the chart layer including Navionics edits These are user information or edits uploaded to Navionics Community by users and made available in Navionics charts For mor...

Page 36: ...contours you see on the chart down to the selected safety depth value Rock filter level Hides rock identification on the chart beneath a given depth This helps you to declutter charts in areas where...

Page 37: ...the evaluated day The red arrow is used when tide is rising and the blue arrow is used when tide is falling Note All numeric values are shown in the relevant system units unit of measurement set by u...

Page 38: ...rts Navionics Fish N Chip U S only chart feature For more information see www navionics com Depth highlight range Select a range of depths between which Navionics fills with a different color This all...

Page 39: ...ppesen tides and currents The system can display Jeppesen tides and currents With this information it is possible to predict the time level direction and strength of currents and tides This is an impo...

Page 40: ...to or less than 1 knot depending on the current in that location If there is no current 0 knots this will be shown as a white square icon StaticCurrentandTideicons DynamicCurrenticons Jeppesen specif...

Page 41: ...ur lines Jeppesen view options Chart detail Full All available information for the chart in use Medium Minimum information sufficient for navigation Low Basic level of information that cannot be remov...

Page 42: ...and cartography versions You can view photo overlays in either 2D or 3D modes NoPhotooverlay Photooverlay landonly FullPhotooverlay Photo transparency The Photo transparency sets the opaqueness of the...

Page 43: ...ts the limit at which depths will be drawn without blue shading Depth filter Filters out depth values shallower than the selected depth filter limit Shading Shades different areas of the seabed depend...

Page 44: ...drawn height of hills on land and troughs in water to make them look taller or deeper Note This option is grayed out if the data is not available in the map card inserted Chart settings Settings and d...

Page 45: ...extension lines are either set as a fixed distance or to indicate the distance the vessel moves in the selected time period If no options are turned on for the vessel then no extension lines are shown...

Page 46: ...ot displayed and only the vessel extensions waypoints and routes are displayed on a white background Waypoints Routes Trails Turns on off displaying of these items on chart panels Also opens the Waypo...

Page 47: ...ts A waypoint is a user generated mark positioned on a chart or on the Sonar image Each waypoint has an exact position with latitude and longitude coordinates A waypoint positioned on the Sonar image...

Page 48: ...ctive the waypoint is saved at your vessel s position Moving a waypoint 1 Select the waypoint you want to move The waypoint icon expands to indicate that it is active 2 Activate the menu and select th...

Page 49: ...alarm when your vessel comes within the defined radius For more information refer to Alarmsdialog on page 106 Routes A route consists of a series of routepoints entered in the order that you want to...

Page 50: ...a new position 5 Save the route by selecting the save option in the menu Note The menu changes depending on the selected edit option All edits are confirmed or cancelled from the menu Delete a route Y...

Page 51: ...option The Edit Trails dialog can also be accessed by selecting the Trails tool on the Home page The Edit Route dialog You can add and remove routepoints from the Edit Route dialog This dialog is acti...

Page 52: ...The automatic tracking function can be turned off from the Trails dialog Creating new Trails You can start a new trail from the Trails dialog activated by using the Trails tool on the Home page Trail...

Page 53: ...cally navigate the vessel For information about positioning waypoints and creating routes refer to Waypoints Routes andTrails on page 47 Steer panel The Steer panel can be used to display information...

Page 54: ...ted with a red arrow including the distance from the track line Data Fields The Steer panel provides the following information XTE Cross track error SOG Speed over ground COG Course over ground POS Po...

Page 55: ...e Route dialog You can start navigating from the Route dialog activated by Selecting the Route tool from the Home page Selecting the route details from the menu Navigating with the autopilot Navigatin...

Page 56: ...is within this radius XTE limit This setting defines how far the vessel can deviate from the selected route if the vessel goes beyond this limit an alarm is activated XTE alarm Cross track error Turns...

Page 57: ...gistered Distance select the Distance field and enter the distance you want to record Time select the Time field and enter the time you want to record Phantom Loran Enables use of Phantom Loran positi...

Page 58: ...the structure of the sea floor The Sonar image 1 Fish arches 2 History preview 3 Temperature graph 4 Depth at cursor 5 Amplitude scope 6 Zoom range buttons 7 Water depth and Water temperature at curso...

Page 59: ...mark a position and to select targets By default the cursor is not shown on the image When you position the cursor on the image the screen pauses the depth at the cursor position is shown and the inf...

Page 60: ...cursor to return to the normal Sonar menu The range The range setting determines the water depth that is visible on the screen Auto range By default the range is set to Auto With Auto the system auto...

Page 61: ...screen Conversely desired echoes may not be displayed if Sensitivity is set too low Note Auto Sensitivity is the preferred mode for most conditions Auto sensitivity Auto sensitivity automatically adj...

Page 62: ...face The surface clarity option reduces surface clutter by decreasing the sensitivity of the receiver near the surface Scroll speed You can select the scrolling speed of the image on the screen A high...

Page 63: ...you might receive incorrect depth information Start recording log data You can start recording log data and save the file internally in the unit or save it onto a card inserted into the unit s card r...

Page 64: ...network you can convert the sl2 logs to StructureMap format smf when recording completes The log file can also be converted to StructureMap format from the Files option Upload to Insight Genesis Files...

Page 65: ...n is selected in the Sonar settings dialog Refer to Sonarsettings on page 68 The log file is displayed as a paused image and you control the scrolling and display from the replay menu option You can u...

Page 66: ...ange that is magnified If you increase the zooming factor the range is reduced You see this as reduced distance between the zoom bars Bottom lock The bottom lock mode is useful when you want to view e...

Page 67: ...s are shown on the Sonar image Depth line A depth line can be added to the bottom surface to make it easier to distinguish the bottom from fish and structures Amplitude scope The Amplitude scope is a...

Page 68: ...lso select if you want to be notified by a beep when a fish ID appears on the panel Traditionalfishechoes Fishsymbols Fishsymbolsanddepth indication Note Not all fish symbols are actual fish Sonar set...

Page 69: ...already been selected Fishing mode Depth Palette General Use 1 000 ft White background Shallow Water 60 ft White background Fresh Water 400 ft White background Deep Water 5 000 ft Deep Blue Slow Troll...

Page 70: ...e image measure distance and set view options as on a live Sonar image If more than one channel was recorded in the selected Sonar file you can select which channel to display You exit the view functi...

Page 71: ...is accessed from the Home page when the TotalScan transducer is connected Note This unit cannot operate CHIRP frequencies and SideScan at the same time If you turn on StructureScan Left Right view yo...

Page 72: ...reScan image When you position the cursor on a DownScan image the screen pauses the cursor information window and the history bar are activated On a DownScan image the depth is shown at cursor positio...

Page 73: ...r cursor Setting up the StructureScan image Use the StructureScan menu to set up the image When the cursor is active some options in the menu are replaced with cursor mode features Select Clear cursor...

Page 74: ...st icon or activate the contrast option in the menu to display the color adjustment bar 2 Drag the bar up or down to get the desired contrast setting or select Auto contrast Note We recommend that you...

Page 75: ...ages can be flipped to match the direction of the transducer installation Range Lines Range lines can be added to the image to make it easier to estimate depth Downscan and distance SideScan Preview Y...

Page 76: ...u have a Structure overlay Touch operation zoom the chart and the scanned image by using the zoom or buttons Drag on the panel to view the scanned image Key operation zoom the chart and the scanned im...

Page 77: ...as new data is added When increasing the search range the ping speed of the StructureScan transducer is reduced but the width and the length of the image history is increased Note Live mode does not s...

Page 78: ...uctureScan data StructureScan data can be recorded from a chart panel with Structure overlay enabled StructureScan recordings can also be started from a StructureScan panel When StructureScan data is...

Page 79: ...ion Using StructureMap with mapping cards StructureMap allows you to maintain full chart capability and can be used with embedded cartography as well as Navionics Insight and other third party chartin...

Page 80: ...Palette Selects Structure palette Contrast Determines the brightness ratio between light and dark areas of the screen Water column Shows hides the water column in Live mode If turned OFF schools of ba...

Page 81: ...Log Sonar data Records StructureScan data Source Selects StructureMap source StructureMap ELITE Ti Operator Manual 81...

Page 82: ...eft and right arrow buttons on the panel You can also select the dashboard from the menu Vesseldashboard Navigationdashboard Anglerdashboard Note Additional dashboards can be activated from the menu i...

Page 83: ...ion 3 Select the gauge you want to change Selected gauge is indicated with a colored background 4 Select information to be displayed configure limits and eventually change the source for the informati...

Page 84: ...manuals that come with the equipment The Autopilot can automatically control the trolling motor to Maintain a set heading Maintain the vessel s position Navigate to the cursor position to a waypoint...

Page 85: ...ller The autopilot is controlled from the Autopilot Controller activated from the System Controls dialog displayed by pressing the Power key You can select the position of the Autopilot Controller on...

Page 86: ...ot switches from navigation mode to the selected arrival mode when your vessel reaches the destination Arrival mode is set to Standby by default Before starting a navigation mode or a turn pattern it...

Page 87: ...nal waypoint When the vessel reaches the final waypoint the vessel goes into arrival mode Refer to Arrivalmode on page 90 Setting up a turn pattern 1 Select a turn pattern 2 Enter the desired value s...

Page 88: ...you start navigating from an application chart steering etc you are prompted to engage the autopilot in Nav mode You can also initiate Nav mode from the Autopilot Controller after navigation is starte...

Page 89: ...dialogs by selecting the Spd up and Spd down buttons or by selecting the Set Spd or Set prop option and entering your desired speed or propeller rate Recording and converting a trail to a route The R...

Page 90: ...ilot controller on the panel Auto hide autopilot bar Controls whether the Autopilot information bar is shown when the autopilot is in Standby mode Arrival mode The trolling motor autopilot switches fr...

Page 91: ...ent destination Note We recommend only using heading lock in open water Anchor point setup Anchor points can be saved as a new waypoint replaced with an existing waypoint or set as your current coordi...

Page 92: ...in Bluetooth wireless technology gives you the ability to connect the unit to Bluetooth enabled devices For more information refer to Bluetoothwirelesstechnology on page 94 Connect and disconnect from...

Page 93: ...smartphone and tablet and control the system tablet only The system is viewed and controlled from the wireless device by the GoFree Controller Viewer Apps downloaded from their relevant Application st...

Page 94: ...enabled device so that it is able to send and receive Bluetooth signals 2 Open the Wireless settings dialog in the ELITE Ti and turn on Bluetooth if it is not already enabled 3 Select Bluetooth device...

Page 95: ...rt and the second is set to Starboard in the Power Pole controls To swap them around unpair the connected Power Poles And then toggle off and on Bluetooth in the Wireless settings dialog to reset the...

Page 96: ...a device to view additional information about it Network Name and Network Key can be edited for security and Channel can be changed if the connection to your unit is compromised due to interference M...

Page 97: ...oth wireless technology functionality Bluetooth devices Displays the Bluetooth Device list dialog Use the Bluetooth Device List dialog to pair or remove pairing to Bluetooth enabled devices Wireless c...

Page 98: ...for safe travelling and collision avoidance You can set alarms to notify you if an AIS target gets too close or if the target is lost AIS target symbols The system uses the AIS target symbols shown b...

Page 99: ...the Find option in the Tools panel From a chart panel you can search for AIS targets by using the Find option in the menu If the cursor is active the system searches for vessels around the cursor posi...

Page 100: ...s panel From the Call dialog you can change channel or cancel the call The Call dialog is closed when the connection is established AIS SART When an AIS SART Search and Rescue beacon is activated it s...

Page 101: ...SART s unique MMSI number and its position distance and bearing from your vessel You have the following options Ignore the alarm The alarm is muted and the message closed The alarm does not reappear N...

Page 102: ...the chart panel then you can see the AIS MOB details Vessel alarms You can define several alarms to alert you if a target shows up within predefined range limits or if a previously identified target i...

Page 103: ...s MMSI number You need to have your own MMSI Maritime Mobile Service Identity number entered in the system to receive addressed messages from AIS and DSC vessels It is also important to have the MMSI...

Page 104: ...to indicate the distance the vessel will move in the selected time period If Off is selected then no COG extension lines are shown for the vessel For information about extension lines for your vessel...

Page 105: ...messages The messages are classified according to how the reported situation affects your vessel The following color codes are used Color Importance Red Critical Orange Important Yellow Standard Blue...

Page 106: ...or the alarm has been removed Disable Disables the current alarm setting The alarm does not show again unless you turn it back on in the Alarms dialog There is no time out on the alarm message or sire...

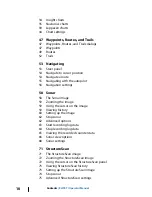
Page 107: ...Alarms ELITE Ti Operator Manual 107...

Page 108: ...tation nearest to your vessel Select the arrow panel buttons to change the date or select the date field to access the calendar function Available tide stations can be selected from the menu Alarms Ac...

Page 109: ...on Magnetic variation is the difference between true bearings and magnetic bearings caused by different locations of the Geographic and the Magnetic north poles Any local anomalies such as iron deposi...

Page 110: ...play options made in the Chart settings page are common for all chart panels Refer to Chartsettings on page 44 Sonar Provides options and dialogs where you specify settings for your sonar Refer to Son...

Page 111: ...el s MMSI set icon filters set course extension length and specify dangerous vessels settings of closest point of approach and time to closest point of approach For more information about using this p...

Page 112: ...System Settings Waypoints Routes and Trails to a card Exporting files is covered in the section Maintenance on page 114 Find Search function for chart items waypoints routes trails etc GoFree Shop No...

Page 113: ...an update is available you can download it to a card slot or defer the download until later Tools ELITE Ti Operator Manual 113...

Page 114: ...do the following 1 Turn the unit off 2 Press and hold the Waypoint key and turn the unit on 3 Continue to press in the Waypoint key during power on until the calibration utility screen comes up 4 Foll...

Page 115: ...select the Log database you are prompted to select a destination folder and filename Once accepted the log file is written to the chosen location Software upgrades The latest software is available fo...

Page 116: ...and easy to use The data includes such information as the time and date when a route was created User Data File version 4 This is best used when transferring data from one system to another since it c...

Page 117: ...here you want to export data 1 Select Export region 2 Drag the boundary box to define the desired region 3 Select the export option from the menu 4 Select the appropriate file format 5 Select the seri...

Page 118: ...Purging Waypoints Routes and Trails Note When user data is purged from the memory it cannot be recovered 118 Maintenance ELITE Ti Operator Manual...

Page 119: ...menus etc If you tap on a touchscreen or press a key when demo mode is running the demonstration pauses After a time out period demo mode resumes and any changed settings are restored to default Note...

Page 120: ...and Route Used for manually entering values when GPS source is set to Simulated course or Simulated route Otherwise GPS data including speed and course come from the selected source file Set start pos...

Page 121: ...m Toggle a checkbox option on or off Show basic information for a selected item Press and hold On any panel with a cursor to activate the cursor assist feature On a panel button to see available split...

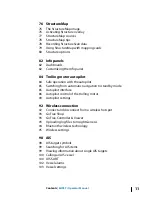
Page 122: ...122 Touchscreen operation ELITE Ti Operator Manual...

Page 123: ...sensitivity Sonar 61 Autopilot Anchor mode 86 Anchor point setup 91 Arrival mode 86 90 Chart compass 90 Control location setting 90 Control of the trolling motor 86 Controller 85 Heading Lock mode 87...

Page 124: ...hoto transparency Jeppesen 42 Photo transparency Navionics 38 Positioning the vessel on the chart panel 30 Selecting chart type 29 Settings 44 Symbol 30 Using the cursor 31 Vessel symbol 29 Zooming 29...

Page 125: ...ackground 25 I Illumination 20 Improving system performance 118 Info panels 82 K Key beeps 109 L Language 108 Locking the touchscreen 20 Log sonar 69 Log sonar data 75 Logging type Navigating settings...

Page 126: ...wer Poles 16 Controls 17 Dual pairing with 95 Preventive maintenance 114 Preview history Sonar 67 Purging 118 Q Quick split pages 16 R Range 60 Recording Start recording log data 63 Start recording so...

Page 127: ...e 76 Image 76 Live source 77 Mapping cards 79 Options 80 Saved files 77 Sources 77 Tips 78 StructureScan 71 Advanced settings 75 Auto range 73 Contrast 74 Convert data to StructureMap format 78 Flippi...

Page 128: ...8 Turn off automatic navigation 85 Turn pattern steering Trolling autopilot 87 Turning the unit on and off 19 U Units of measure setting 111 V Vessel alarms 102 Vessel settings 103 View Echosounder lo...

Page 129: ......

Page 130: ...988 11048 001 0980...

Reviews:

Related manuals for ELITE TI