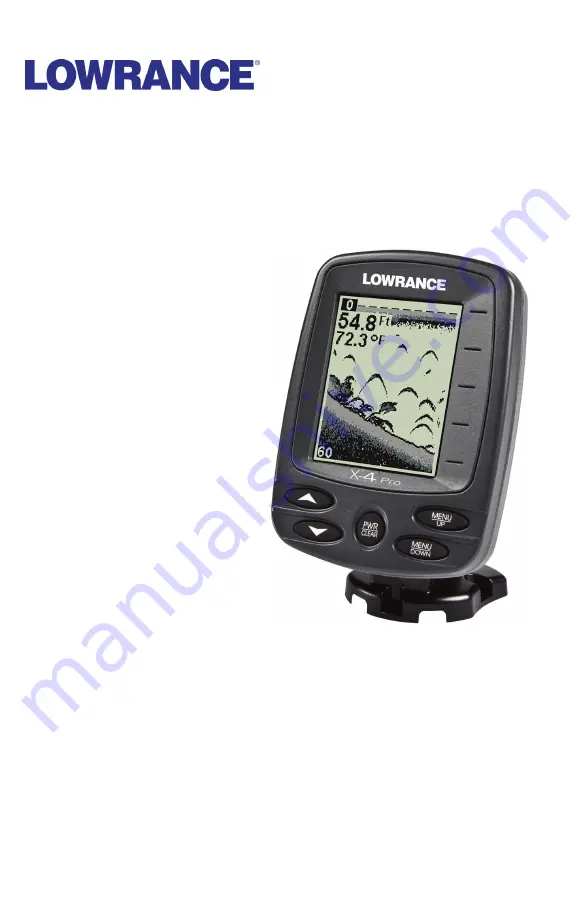
background image


X-4 Pro 

Fish-Finding Sonar 

Installation and Operation


Instructions


Summary of Contents for X-4 Pro

Page 1: ...X 4 Pro Fish Finding Sonar Installation and Operation Instructions ...

Page 2: ...tion of this manual is strictly prohibited Lowrance is a registered trademark of Navico Navico may find it necessary to change or end our policies regulations and special offers at any time We reserve the right to do so without notice All features and specifications subject to change without notice All screens in this manual are simulated For free owner s manuals and other information visit our we...

Page 3: ...termines Best Location 13 Shoot Thru Hull Installation 14 Power Connections permanent mount only 15 Mounting the Sonar Unit In Dash Bracket or Portable 16 Bracket Installation 17 Portable Sonar Installation 19 Installing the Batteries 20 Mounting the Unit 20 Portable Transducer Assembly 21 Portable Transducer Storage 23 Operation 24 Keyboard Basics 24 Memory 24 Menus 24 Display 25 Full Chart 26 De...

Page 4: ...ii Noise Rejection and ASP 37 Depth Display 39 Temperature Display 39 Voltage 40 Backlight 40 Contrast 40 Simulator 40 Set Language 41 Software Information 41 Reset Options 41 Troubleshooting 42 ...

Page 5: ...arch Skimmer transducer with built in temperature sensor is packed with your unit It has a wide fish detection area of up to 60º 120º with high sensitivity settings Operates at boat speeds up to 70 mph 61 kts Transmitter 1 500 watts peak to peak power typical 188 watts RMS power typical Sonar sounding depth capability 1 000 feet 305 meters Actual capability de pends on transducer configuration and...

Page 6: ...the location for the transducer and its cable route 3 Determine the location of your battery or other power connection along with the power cable route 4 Install the transducer and route the transducer cable to the sonar unit 5 Route the power cable from the unit s location to an appropriate power source and connect it there 6 Connect the transducer power cable to the unit and mount the sonar unit...

Page 7: ...d NOTE The following installation types also call for these recommended tools and required supplies supplies are not included Single frequency transom installations Tools include two adjustable wrenches drill 29 0 136 drill bit flat head screwdriver for mounting screws and their pilot holes Supplies none Single frequency trolling motor installations Tools two adjustable wrenches flat head screwdri...

Page 8: ...e but the principle is the same for Skimmers inside a hull 4 If the transducer is mounted on the transom make sure it doesn t interfere with the trailer or hauling of the boat Also don t mount it closer than approximately one foot from the engine s lower unit This will prevent cavitation bubble interference with propeller operation 5 If possible route the transducer cable away from other wiring on...

Page 9: ...otection There are two extremes you should avoid Never let the edge of the mounting bracket extend below the bottom of the hull Never let the bottom the face of the transducer rise above the bottom of the hull Shoot Thru Hull vs Transom Mounting In a shoot thru hull installation the transducer is bonded to the inside of the hull with epoxy The sonar ping signal actually passes through the hull and...

Page 10: ...first place the transducer s bracket against the transom and see if you can move the transducer so that it s parallel with the ground 1 Assembling the bracket Press the two small plastic ratchets into the sides of the metal bracket as shown in the following illustration Notice there are letters molded into each ratchet Place each ratchet into the bracket with the letter A aligned with the dot stam...

Page 11: ...he transducer as shown in the following figure Don t tighten the lock nut at this time Assemble transducer and bracket 4 Drilling mounting holes Hold the transducer and bracket assem bly against the transom The transducer should be roughly parallel to the ground The transducer s centerline should be in line with the bot tom of the hull Don t let the bracket extend below the hull Mark the center of...

Page 12: ... view shown left and seen from above right Attach the transducer to the transom Slide the transducer up or down until it s aligned properly with the bottom of the hull as shown in the preceding and following figures Tighten the bracket s mounting screws sealing them with the caulking compound Adjust the transducer so that it s parallel to the ground and tighten the nut until it touches the outer w...

Page 13: ...need to drill a hole in the transom to pass the connector through the required hole size is 5 8 If you intend to route an additional speed or temp sensor cable through the same hole you will need a 1 25 4 mm drill bit instead Caution If you drill a hole in the transom for the cable make sure it is located above the waterline After installation be sure to seal the hole with the same marine grade ab...

Page 14: ...nsducer bracket and wrap it around the trolling motor Position the transducer to aim straight down when the motor is in the water Tighten the strap securely 3 Route the transducer cable alongside the trolling motor shaft Use plastic ties not included to attach the transducer cable to the trolling motor shaft Make sure there is enough slack in the cable for the motor to turn freely Route the cable ...

Page 15: ... half of the arch is printed then the nose of the transducer is angled too far down and needs to be raised NOTE Periodically wash the transducer s face with soap and water to re move any oil film Oil and dirt on the face will reduce the sensitivi ty or may even prevent operation Shoot Thru Hull Preparation Hulls with Flotation Materials The transducer installation inside a fiberglass hull must be ...

Page 16: ...acturers use a layer of fiberglass then a core of balsa wood finishing with an outer layer of fiberglass Removing the inner layer of fiberglass and the balsa wood core exposes the outer layer of fiberglass The transducer can then be epoxied direct ly to the outer layer of fiberglass After the epoxy cures for 24 hours fill the remaining space with polyester resin When the job is finished the hull i...

Page 17: ...tom signal Unit is in 30 feet of water with range set at 80 feet and sensitivity set at 87 percent 2 Next take the transducer out of the water and place it in the water in the sump of the boat face down The transducer face is shown in the figure on the following page Notice how the signal strength decreases The second bottom signal will probably disappear and the bottom signal intensity will likel...

Page 18: ...ot Thru Hull Installation 1 Make sure the area is clean dry and free of oil or grease then sand both the inside surface of the hull and the face of the transducer with 100 grit sandpaper The sanded hull area should be about 1 1 2 times the diameter of the transducer The surface of the hull must be flat so the entire transducer face is in contact with the hull prior to bonding After sanding clean t...

Page 19: ...ve the weight in place for a minimum of three hours Allow the epoxy to cure for 24 hours before moving the boat 5 After the epoxy has cured route the cable to the sonar unit and it s ready to use Power Connections permanent mount only The unit works from a 12 volt battery system You can attach the pow er cable to your boat s accessory or power buss or directly to the bat tery If you use an accesso...

Page 20: ...e end of the fuse holder directly to the battery or power buss This will protect both the unit and the power cable in the event of a short It uses a 3 amp fuse Caution Do not use this product without a 3 amp fuse wired into the power cable Failure to use a 3 amp fuse will void your warran ty This unit has reverse polarity protection No damage will occur if the power wires are reversed However the ...

Page 21: ...mounted X 4 Pro sonar unit Holes in the bracket s base allow wood screw or through bolt mounting You may need to place a piece of plywood on the back side of thin pa nels to reinforce the panel and secure the mounting hardware Front view left and side view right showing dimensions of the X 4 Pro when mounted on quick release bracket Drill a 1 25 4 mm hole in the dash for the power transducer and a...

Page 22: ...ble through one of the slots Fasten the bracket to the dash using the three screw holes X 4 Pro quick release mounting bracket Slots in the base allow routing the cable from beneath the mount Attach the unit to the bracket by first connecting the power transducer and accessory cables Then hold the sonar unit vertically and slide it onto the bracket from above The back of the unit should be touchin...

Page 23: ...rtable transducers expand the uses for your sonar You can use your unit on your boat or take it to the dock on a float tube on an ice fishing trip or use it as a second sonar in a friend s boat The PPP 12 package includes the power pack battery adapter and a port able transducer The transducer can be stored inside the power pack The PPP 12 requires eight AA alkaline batteries Batteries are not inc...

Page 24: ...se bottom using the slot in the case wall to avoid pinching the cable Turn the unit over to mount the sonar CAUTION When using the sonar in a saltwater environment we strongly recommend that you unplug the power connector from the bat tery socket when the unit is not in use When the unit is turned off but still connected to a power supply electrolysis can occur in the power cable plug This may res...

Page 25: ...e battery adapter If it still doesn t work check the battery voltage Most complaints we hear about portable units result from stale batteries Make sure you buy fresh ones Always remove batteries from the compartment when storing the unit because dead batteries can leak and corrode the contacts In cold weather the efficiency of dry cell batteries drops with the tem perature We find it a good idea t...

Page 26: ... attaching the suction cup Lo cate the transducer on the hull as shown in the following figure Don t let the bracket extend below the hull because water pressure against it can cause the suction cup to come off at speed NOTE For optimum operation the portable transducer should be adjusted so that it is parallel to the ground For more information on this see the segment in the unit s operation manu...

Page 27: ...d fishing tilt the sonar down to the storage position Open the case and lay it flat Unplug the power connector from the battery compartment socket Wrap the transducer cable around the suction cup then stow the transducer on top of the battery compartment cover Close the case and your equipment is ready for transport Stow transducer on top of battery cover Hull ...

Page 28: ...gh the menus The MENU DOWN key moves backward through the menus To check out the menus re peatedly press a MENU key to scroll through them UP DOWN ARROWS These Up and Down arrow keys are referred to as DOWN or UP in this manual You will use these keys to adjust most features and functions on the X 4 Pro Memory This unit has permanent memory that saves the following user settings when power is turn...

Page 29: ...from the screen The unit will show the Full Chart Page or mode The Fish I D fish symbol feature is on by default The depth range is displayed as the upper and lower limit on the left side of the screen In the following figure the screen shows a depth range from 0 to 80 feet and the bottom depth is 36 9 feet shown by the digital sonar The water temperature is 34 5 F Opening screen Full Chart page o...

Page 30: ...Depth Range When turned on the unit automatically adjusts the depth range ac cording to water conditions When in auto range mode it always keeps the bottom displayed in the lower portion of the screen You can over ride the automatic depth range control and manually select a depth range To do this repeatedly press MENU until the DEPTH RANGE menu appears Press to select MANUAL then press MENU UP to ...

Page 31: ...et always keeping the bottom in view To zoom in the display repeatedly press MENU until the ZOOM menu appears Press to select ON then press PWR to clear the menu Zoom feature turned off left Zoom turned on right You can tell when the display is in Zoom mode when the top of the depth scale on the left of the screen no longer shows zero For example if the current range is 0 to 80 feet with zoom off ...

Page 32: ... menu appears Press to select ON then press MENU UP to display the ZOOM RANGE menu Use the arrow keys to select a desired zoom size When you are finished press PWR to clear the menu from the display Zoom Range menu with the 40 80 foot zoom selected You can select from these zoom size ranges 0 10 5 15 10 20 15 30 20 40 30 60 40 80 50 100 75 150 100 200 150 300 200 400 300 600 400 800 500 1000 750 1...

Page 33: ...access the sensitivity scroll bar Press to increase the sensitivity to decrease it When it is set at the desired level press PWR to clear the menu If you reach the maxi mum or minimum sensitivity level a tone sounds alerting you to the limits To adjust sensitivity in Manual Mode If you want to change the sensitivity in Manual Mode turn off Auto Sensitivity Repeatedly press MENU until the SENSITIVI...

Page 34: ... a soft muddy or weedy bottom returns a weaker signal which is shown with a narrow line or no gray line at all A hard bottom returns a strong signal which will be displayed as a wide gray line Grayline scroll bar If you have two signals of equal size one with gray and the other with out then the target with gray is the stronger signal This helps distin guish weeds from trees on the bottom or fish ...

Page 35: ...olling on the screen will show the effects of the Grayline adjustment If you reach the maximum or minimum level a tone sounds alerting you to the limits Press PWR to clear the menu Chart Speed The speed at which echoes scroll across the screen is called the chart speed The default for this unit is max 100 percent We recommend you leave the scroll speed setting there for most all fishing conditions...

Page 36: ...t the speed to 100 before clearing the menu Frequency Your sonar unit can transmit signals at 83 kHz and 200 kHz The de fault frequency is 200 kHz best used in shallow water about 300 feet or less This frequency is the best choice for about 80 percent of the fresh and salt water sport fishing applications When you get into very deep salt water up to 1 000 feet the 83 kHz frequency will work best T...

Page 37: ...such as trotlines turtles submerged floats air bubbles etc Individual tree limbs extending outward from a group of limbs are the hardest objects for the Fish I D feature to distinguish from fish Underwater scene in normal fish arch mode left Fish I D menu with the feature turned on right To see what is under your boat in maximum detail we recommend you turn off Fish I D and begin learning to inter...

Page 38: ...elect OFF then press PWR To turn it back on repeat the above steps but press to select ON FishTrack The FishTrack feature shows the depth of a fish symbol when it ap pears on the display To turn it on repeatedly press MENU until the FISH ID menu appears Press to select TRACK ON then press PWR To turn it off repeat the steps above but press to select OFF If you want to turn off FishTrack depths but...

Page 39: ...th Alarms The depth alarms are triggered only by the bottom signal No other echoes will activate these alarms The depth alarms consist of a shal low and a deep alarm The shallow alarm sounds an alarm tone when the bottom goes shallower than the alarm s setting The deep alarm sounds a tone when the bottom goes deeper than its setting Both alarms adjust the same way although through different menus ...

Page 40: ...rig gered again To turn off the alarm repeatedly press MENU until the SHALLOW ALARM menu appears Press to OFF then press PWR to clear the menu Deep Alarm To set the deep alarm depth repeatedly press MENU until DEEP ALARM appears Deep Alarm menu left Deep Alarm dialog box right Press the to SET VALUE The Deep Alarm Value dialog box will appear Use to enter the first number in the dialog box then pr...

Page 41: ...will turn on the alarm then press PWR to clear the menu If the voltage value falls be low the alarm s setting the alarm will sound and a message will ap pear on the screen Noise Rejection and ASP The ASP Advanced Signal Processing feature is a noise rejection system built into the sonar unit It constantly evaluates the effects of boat speed water conditions and electrical interference and automati...

Page 42: ...ng If however you are having trouble with noise we suggest you take steps to find the interference source and fix it rather than continually using the unit with the high ASP setting There are times when you may want to turn off ASP This al lows you to view all incoming echoes before they are processed by the ASP feature To change the ASP setting repeatedly press MENU until the NOISE REJECTION menu...

Page 43: ...menu Temperature Display Temperature may be displayed on the screen in a small or medium size or can be turned off completely Temperature menu left Temperature display set to small size right To display Temperature Repeatedly press MENU until the TEMPERATURE menu appears Use to select the size of the temperature display Press PWR to clear the menu Voltage menu with the voltage display turned off l...

Page 44: ... clear the backlight menu from the display Contrast The unit s display contrast is adjustable to suit different lighting condi tions It will help you see the screen from different angles or at various times of the day To adjust the contrast repeatedly press MENU until the CONTRAST scroll bar appears To decrease screen contrast press or press to increase the contrast If you reach the maximum or min...

Page 45: ... to select the desired language All menus now appear in the language you selected Press PWR to clear the menu from the screen Software Information To show the unit s software system information repeatedly press MENU until the SOFTWARE INFORMATION screen appears Press PWR to clear the screen Reset Options This command is used to reset all features options and settings to their original factory defa...

Page 46: ...trical noise from the boat s motor trolling motor or an accessory may be interfering with the sonar unit Rerouting the power and trans ducer cables away from other electrical wiring on the boat may help Route the sonar unit s power cable directly to the battery instead of through a fuse block or ignition switch 2 Inspect the transducer cable for breaks cuts or pinched wires 3 Check both the transd...

Page 47: ...rimination or noise rejection feature This can cause the unit to eliminate weaker sig nals such as fish or even structure from the display Try using resistor spark plugs or routing the sonar unit s power and transducer cables away from other electrical wiring on the boat No fish arches when the Fish I D feature is off 1 Make certain the transducer is pointing straight down This is the most common ...

Page 48: ... radio antenna cables radiate noise when transmitting so be certain to keep the sonar s wires away from it You may need to route the sonar unit s power cable directly to the battery to isolate it from other wiring on the boat If no noise displays on the sonar unit from electrical equipment then make certain everything except the sonar unit is turned off then start the engine Increase the RPM with ...

Page 49: ...45 Notes ...

Page 50: ... to change or end our ship ping policies regulations and special offers at any time We reserve the right to do so without notice in Canada If you re in Canada and you have technical return or repair questions please contact the Factory Customer Service Department Before any product can be returned you must call customer service to determine if a return is necessary Many times customer service can ...

Page 51: ...tras com 3 Canadian customers can write Lowrance Eagle Canada 919 Matheson Blvd E Mississauga Ontario L4W2R7 or fax 905 629 3118 Shipping Information If it becomes necessary to send a product for repair or replacement you must first receive a return authorization number from Customer Service Products shipped without a return authorization will not be accepted When shipping we recommend you do the ...

Page 52: ... 988 10015 001 Visit our web site www lowrance com ...

Reviews: