LUXE
Bidet
LUXE
Bidet
LUXE
Bidet
LUXE
Bidet
LUXE
Bidet
LUXE
LUXE
LUXE
LUXE
LUXE
Assembly Instruction
LUXE
Bidet
R
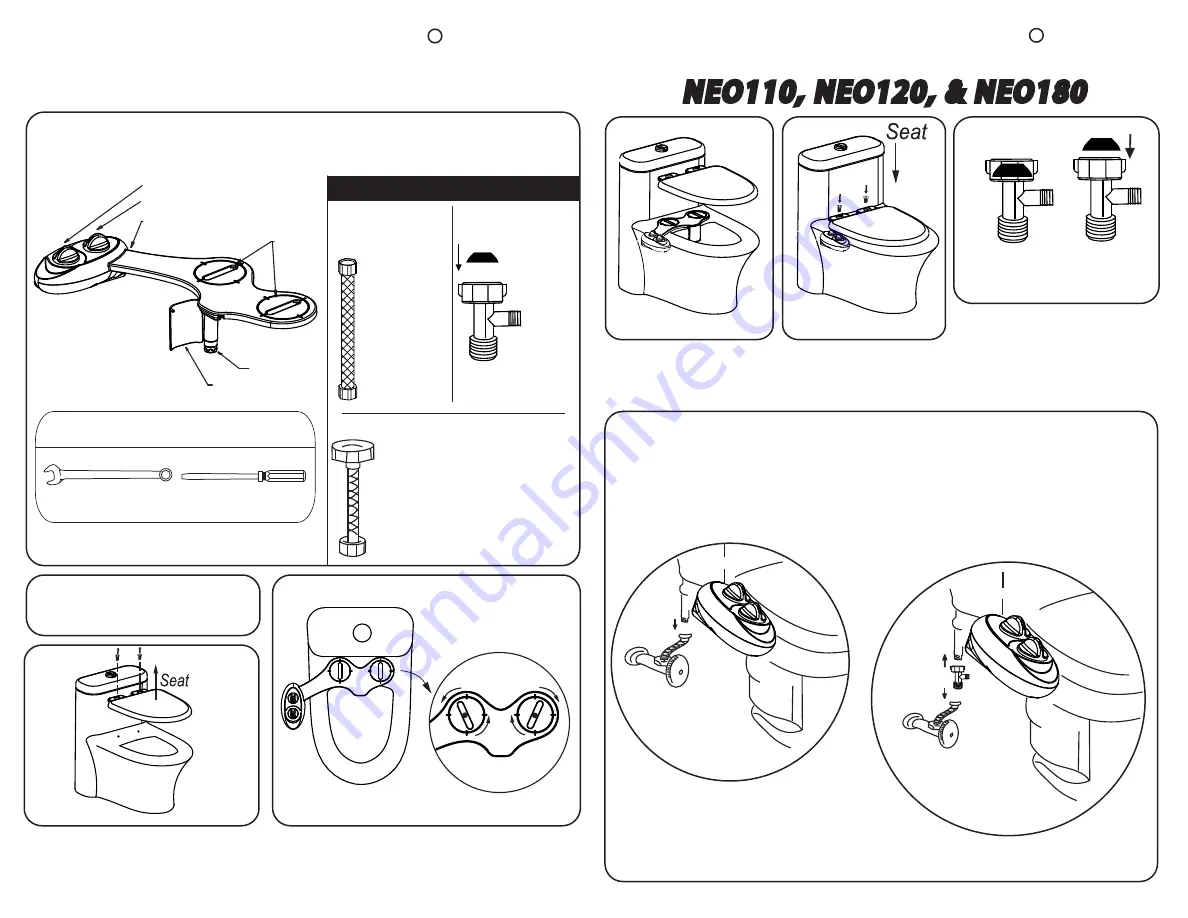
NAMES AND FUNCTIONS OF PARTS
*Please note: illustrations may vary depending on the model
Note:
You may
not need
to use this
part from the kit since a typical water
connection is a flexible metal hose with
a15/16” toilet tank connection and
9/16” wall connection.
Flexible Water Supply Hose
1/2” T-Adapter
Connection
1/4” Bidet
Connection
22” Length
TM
TM
TM
NEO110, NEO120, & NEO180
1
2
Remove the seat by
unscrewing the seat.
Place the bidet on the toilet. Plates may be
adjusted depending on where the two holes
in the back of the toilet are.
Bidet should now be
aligned with the
coupling holes.
3
Screw the seat back
on to the bidet and
the toilet.
4
5
7a
Installation Tools You May Need
Wrench
Screwdriver(flat)
The top of the t-adapter
connects with the water tank.
15/16”
15/16”
1/2”
Rubber Washer
Toilet Tank
Connection
Bidet Hose
Connection
Toilet Hose
Connection
Water Inlet
Water Flow Control Knob
Adjustable Plates
Nozzle Guard Gate
Nozzle Mode Knob
Wash Nozzle
Plastic T-Adapter
Top View of Toilet
Shut off the toilet water supply.
Flush toilet to empty the tank.
6a
6b
6a:
Make sure that there is a
black rubber washer inserted
at the top of the t-adapter.
6b:
If it is not already there,
insert it as shown in figure 6b.
Toilet
Water
Supply
Valve
Toilet
Water
Supply
Valve
15/16” Toilet Tank Connection
9/16” Toilet Water Supply Connection
LUXE
Bidet
R
7
7b
7a: Make sure you have shut off the toilet water supply and flushed the
toilet to empty the tank.
Disconnect the water connection from the tank.
7b:
Connect the plastic T-adapter to the water supply as shown in figure 7b.
PARTS
Flexible Metal
Braided Hose
Connecting Water Supply
Tip:
Do not use excessive force while tightening the connection. Hand tighten
then use a wrench to gently tighten one quarter or half-turn more.