background image


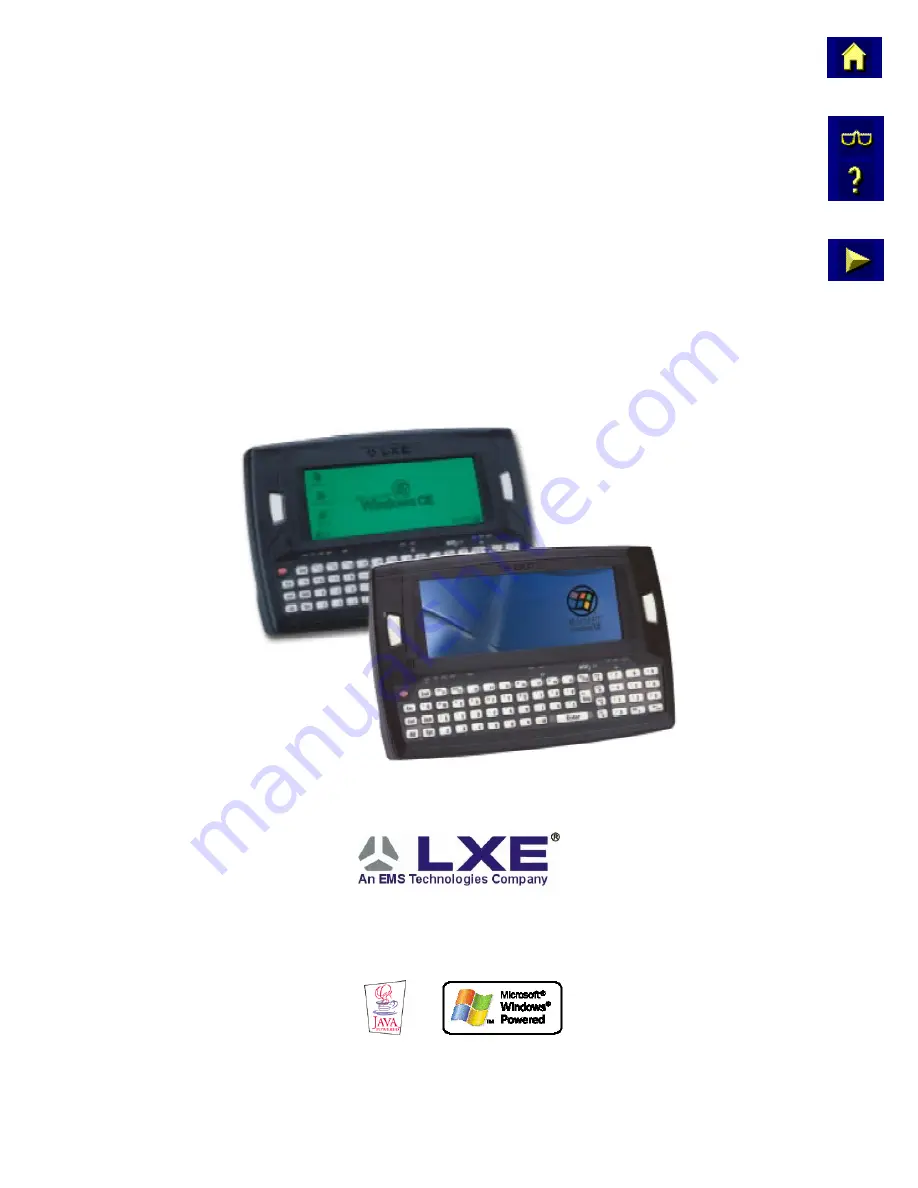
MX3-CE Reference Guide 


Copyright © Nov, 2003 by LXE Inc. 

All Rights Reserved 

MX3CEA137REFGD 

E-EQ-MX3CERG-E


Summary of Contents for MX3-CE

Page 1: ...MX3 CE Reference Guide Copyright Nov 2003 by LXE Inc All Rights Reserved MX3CEA137REFGD E EQ MX3CERG E ...

Page 2: ...arks or registered trademarks of Sun Microsystems Inc in the U S or other countries and are used under license All other brand or product names are trademarks or registered trademarks of their respective companies or organizations When this manual is in PDF format Acrobat Reader Copyright 1987 2002 Adobe Systems Incorporated All rights reserved Adobe the Adobe logo Acrobat and the Acrobat logo are...

Page 3: ...trap Optional 11 Attach to Hip Flip Optional 12 Connect External Power Supply Optional 13 Connect Audio Jack Optional 14 Power Button 14 Troubleshooting 14 Touch Screen Calibration 15 Set The Display Contrast 15 Set the Display Backlight Timer 16 Set the Display Blanking Timer 17 Set the MX3 CE Power Off Timer 18 Saving Settings 18 Set The Audio Speaker Volume 19 Using the Keypad 19 Using the Touc...

Page 4: ...l Processing Unit 36 Core Logic 36 System Memory 36 Video Subsystem 36 Power Supply 37 COM Ports 37 Audio Interface 37 PCMCIA Slots 38 Physical Controls 39 Power Button 39 Reboot Sequence 39 Endcaps 40 Integrated Scanner Port 40 Serial Port 41 USB Port 42 Tethered Scanners 42 Scan Buttons 43 Scan Buttons and the SCNR LED 43 Button Settings 44 Keypad 45 Touch Screen and Keypad Shortcuts 45 Scan Key...

Page 5: ...al Suspend State 55 Backup Battery 55 About Lithium Ion Batteries 55 Maintenance 56 Battery Maintenance Publication 56 Battery Chargers 57 MX3 Multi Charger 57 External Power Supply Optional 58 CHAPTER 4 SYSTEM CONFIGURATION 59 Introduction 59 WinCE 3 0 59 Installed Software 59 Software Load 60 Intel Persistent Memory Folder IPSM 60 Persistent Registry 61 Java Virtual Machine Optional 61 Desktop 6...

Page 6: ...Menu 68 IP Config Menu 68 Power Menu 68 Options Menu 68 Encryption 68 Ping Menu 69 Signal Menu 69 AP Menu 69 Windows Explorer 69 Taskbar 70 Clear Contents of Document Folder 70 Proxim Radio Options From Taskbar 71 Configuration 71 Site Survey Tools 71 Advanced 71 About 71 About 72 Control Panel Options 72 Communication 73 Device Name 73 PC Connection 73 Date Time 74 Display 74 Background 74 Appear...

Page 7: ...rial Port Transfer 86 Infrared Port Transfer 86 USB Transfer 86 Configure the MX3 CE 86 Serial Connection 86 IrDA Connection 87 USB Connection 87 Radio 87 Connect 87 Explore 88 Disconnect 88 Serial Connection 88 IRDA Connection 88 USB Connection 88 Radio Connection 88 Troubleshooting 89 Create a Communication Option 90 Technical Specifications Connection Cable 91 MX3 CE Utilities 92 Graphic Utilit...

Page 8: ...Type II 105 PCMCIA Cisco 2 4GHz Type II 105 PCMCIA Symbol 11Mb 2 4GHz Type II 105 APPENDIX C API CALLS 107 Introduction 107 API Calls 107 Battery API 107 LXEBatteryChargeBackup 107 LXEBatteryDischargeBackup 108 LXEBatteryIsACPower 108 LXEBatteryReadVoltage 108 LXEBatteryReadPercent 108 PCMCIA API 109 LXEPcmciaHasCard 109 LXEPcmciaDisableSlot 109 LXEPcmciaEnableSlot 109 LXEPcmciaWriteProtect 110 Po...

Page 9: ...17 LXEScannerPowerOn 117 LXEScannerForcePower 117 LXEScannerAttachPort 118 LXEScannerSetKey 118 LXEScannerSetSerial 119 LXEScannerSetPower 119 LXEScannerSetWindow 120 Serial Ports API 121 Endcap Right Serial Port 121 Endcap Left Serial Port Dual Serial Port Endcaps Only 121 IRDA Port 121 USB Port USB Endcaps Only 121 Version Control API 122 LXEVersionOS 122 LXEVersionOAL 122 LXEVersionBoot 122 LXE...

Page 10: ...oduction 131 Setup a New Device 131 Administration Mode 132 End User Mode 132 Administration and Configuration 133 Configuration 133 Control Panel 133 End User Internet Explorer 134 Security Panel 134 Status Panel 136 Passwords 137 Error Messages 138 AppLock Registry Settings 147 INDEX 149 ...

Page 11: ...8 Figure 2 1 System Hardware 35 Figure 2 2 Location of the Power PWR Button 39 Figure 2 3 RS 232 Pinouts 41 Figure 2 4 9 Pin RS 232 Description 41 Figure 2 5 MX3 CE Serial Port 42 Figure 2 6 USB Serial Cable Pinouts 42 Figure 2 7 Programmable Buttons 43 Figure 2 8 Left and Right Scan Button Programming 44 Figure 2 9 The QWERTY Keypad 45 Figure 2 10 Function LEDs 47 Figure 2 11 MX3 CE Display 48 Fi...

Page 12: ...ies Power Off Tab 79 Figure 4 15 Scanner Properties Main Tab 81 Figure 4 16 Scanner Properties Keys Tab 82 Figure 4 17 Scanner Properties COM Port Settings 82 Figure 4 18 Stylus Properties Recalibration Start 83 Figure 4 19 Stylus Properties Recalibration 83 Figure 4 20 System Properties General Tab 84 Figure 4 21 System Properties Memory Tab 84 Figure 4 22 Volume and Sounds Properties Volume Tab ...

Page 13: ...hat can be scaled from a limited function batch computer to an integrated RF scanning computer A stylus is enclosed with the MX3 CE to assist in entering data and configuring the unit Note Until the Main Battery and Backup Battery are completely depleted the MX3 CE is always drawing power from the batteries On Related Manuals The MX3 CE Installation and Operator s Guide contains MX3 CE installatio...

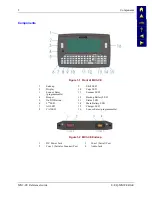
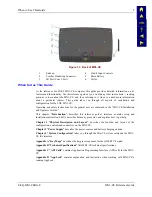
Page 14: ...y 10 Caps LED 3 Scan or Enter programmable 11 Scanner LED 4 Beeper 12 Backup Battery LED 5 On Off Button 13 Status LED 6 2nd LED 14 Main Battery LED 7 Alt LED 15 Charger LED 8 Ctrl LED 16 Scan or Enter programmable Figure 1 2 MX3 CE Endcap 1 DC Power Jack 3 Com 1 Serial Port 2 Com 3 Serial or Scanner Port 4 Audio Jack ...

Page 15: ...d in the MX3 CE Installation and Operator s Guide This chapter Introduction describes this reference guide s structure contains setup and installation instruction briefly describes data entry processes and explains how to get help Chapter 2 Physical Description and Layout describes the function and layout of the configuration controls and connectors on the MX3 CE Chapter 3 Power Supply describes t...

Page 16: ... vital or pivotal information to follow Attention symbol that indicates vital or pivotal information to follow Also when marked on product means to refer to the manual or operator s guide International fuse replacement symbol When marked on the product the label includes fuse ratings in volts v and amperes a for the product Note Keyword that indicates immediately relevant information CAUTION Keywo...

Page 17: ...Hardware Configuration Use this guide as you would any other source book reading portions to learn about the MX3 CE and then referring to it when you need more information about a particular subject This guide takes you through an introduction to and operation of the LXE MX3 CE In general the sequence of events is 1 Insert a fully charged battery and press the Power button 2 Connect an external po...

Page 18: ...de menu and enter the 802 11 ESSID number The default is 101 2 Select the IP Config menu and select either DHCP or input a static IP address 3 If your network uses encryption select the Encryption menu option and select the value that matches your network Lucent ORiNOCO Access Start Settings Control Panel Wireless Icon OR select Start Programs ORiNOCO Client Edit Wireless Profiles 1 Select a Confi...

Page 19: ... your mobile client is communicating with the Access Point 2 From the Start Program run LXE RFTerm or tap the RFTerm icon on the desktop 3 Select Session Configure from the application menu and select the host type that you require This will depend on the type of host system that you are going to connect to i e 3270 mainframe AS 400 5250 server or VT host 4 Enter the Host Address of the host syste...

Page 20: ...of the stylus for tapping or making strokes on the display Never use an actual pen pencil or sharp object to write on the touch screen Hold the stylus as if it were a pen or pencil Touch an element on the screen with the tip of the stylus then remove the stylus from the screen Firmly press the stylus into the stylus holder on the MX3 CE when the stylus is not in use Like using a mouse to left clic...

Page 21: ...CE Note New batteries must be charged prior to first use This process takes up to four hours in an LXE Multi Charger and eight hours with an external power source attached to the MX3 CE Figure 1 5 Main Battery 1 Front Side 2 Contacts Main Battery 3 Contacts Cradle Output 4 Retaining Clip 5 Top Side 6 Back Side 7 Contacts External Cradle Input ...

Page 22: ...e point to the battery contacts in the computer Figure 1 7 Main Battery Place the battery in the compartment making sure the side of the battery with six contacts matches up with the battery contacts in the computer battery compartment Do not slide the battery sideways into the compartment Firmly press the battery into the compartment until it clicks The battery is now securely fastened to the MX3...

Page 23: ...and does not interfere with battery charging when the MX3 CE is in a docking station Figure 1 8 MX3 CE With Handstrap Installed Tool Required 1 Phillips Screwdriver Installation 1 Remove the MX3 CE from the docking station 2 Place the MX3 CE with the screen facing down on a flat stable surface 3 Attach the handstrap to the MX3 CE with the screws and washers provided 4 Test the strap s connection m...

Page 24: ...efore being placed in a docking station Caution Never use the MX3 CE in the hip flip without first securing the unit to the hip flip with the screws Installation 1 If the MX3 CE has a handstrap remove the handstrap and set it aside along with the handstrap screws and washers 2 Slide the MX3 CE into the pocket in the hip flip making sure the keypad is up and the endcap ports are visible in the open...

Page 25: ...The MX3 CE DC power jack is located on the endcap The cradle power jack is located on the back of the cradle Figure 1 12 Connect External Power Supply 1 Insert the barrel connector into the MX3 CE power jack and push in firmly 2 The CHGR LED above the keypad illuminates when the MX3 CE is receiving external power through the power jack The Main Battery recharges when the MX3 CE is connected to an ...

Page 26: ...bove the ESC key on the keypad When a battery is inserted in the MX3 CE press the Power button Quickly tapping the Power button places the MX3 CE immediately in Suspend mode Quickly tapping the Power button again or touching the screen immediately returns the MX3 CE from Suspend When the WinCE desktop is displayed or an application begins the power up or reboot sequence is complete Please refer to...

Page 27: ... Follow the instructions on the screen and press the Enter key to save the new calibration settings or press Esc to cancel or quit Set The Display Contrast Adjusting screen contrast lightens or darkens the characters to make them visible at a comfortable level The contrast is incremented or decremented one step each time the contrast key is pressed To adjust screen contrast locate the F6 key at th...

Page 28: ...ault value for the external power timer is 2 minutes The backlight will remain on all the time when both checkboxes are blank Display Properties To save battery life you can adjust when the backlight automatically shuts off Automatically turn off backlight while on battery power Automatically turn off backlight while on external power Turn off after of continuous idle time Background Appearance Ba...

Page 29: ...ng on battery power only The second option may be set when the MX3 CE will be running on external power e g AC adapter cigarette adapter powered cradle The default value for the battery power timer is 15 seconds The default value for the external power timer is 2 minutes The display will remain on all the time when both checkboxes are blank Display Properties To save battery life you can adjust wh...

Page 30: ... Power Off timer expires the computer enters Suspend Mode Power Properties Save battery power and prevent unauthorized use in conjunction with a password by having your device turn off when not in use Battery Power Off Backlight Blanking Charge Enable suspend while on battery power Enable suspend while on external power Suspend after of continuous idle time Suspend after of continuous idle time Fi...

Page 31: ...olume by pressing the 2nd key2 then the F8 key to enter Volume change mode Use the Up Arrow and Down Arrow keys to adjust volume until the speaker volume is satisfactory Press the Enter key to exit this mode Using the Touch Screen Select Start Settings Control Panel Volume Sounds Volume tab Change the volume setting and tap OK to save the change Enable sounds for Events warnings beeps and system e...

Page 32: ... safety information before using the scanner The MX3 CE supports three COM port options Two external serial ports are dependent on the end cap chosen A third serial port is used to support an infrared transceiver barcode reader An additional endcap configuration supports serial input output at 1 5 MBps Scanner Port RS 232 Port Serial Port DC Power Jack Audio Jack ...

Page 33: ...of endcap installed On the Standard Range Scanner Serial Port endcap COM 3 is the Integrated Scanner port On the Dual Serial Port endcap the COM1 port is the serial port on the right side of the endcap when the display is facing you The process used to enable the MX3 CE COM1 port for use with a tethered scanner has three steps Note Use the scanner control panel to setup using both the integrated s...

Page 34: ... scanner COM3 is greyed out if there is no internal scanner Internal is greyed out On units without an internal scanner radio buttons on Port 1 and Port 2 are greyed out the COM3 external radio button is the only one that can be selected To assign baud rate parity stop bits and data bits to Com 1 Com 2 or Com3 select Start Settings Control Panel Scanner COM tab Main COM1 COM2 COM3 Scanner Control ...

Page 35: ... powers a radio PC card PC SRAM card ATA Flash card or a linear Flash card The slots hold only one card at a time Slot 0 supplies 75 of an amp at 5V or 3 3V The second slot Slot 1 is designed to support a Type I or II Compact Flash disk Figure 1 22 Slot Locations Note As there is no PC Card management software loaded on the MX3 CE LXE recommends purchasing preformatted PC SRAM and Flash cards as w...

Page 36: ...at in the slot remove the card turn it around and re install Removal 1 Grasp the top of the PC Card and pull it straight upward to remove 2 Use caution not to pull or snag the antenna connector on the Radio card if installed If you anticipate keeping the PC card out of the MX3 CE for a long period of time place it in an enclosed storage container Store in an area that is protected from dirt moistu...

Page 37: ...t of the MX3 CE near the display If the PCMCIA Radio is difficult to seat remove the Radio card turn it around and re install 3 Gently snap the antenna cable into the connector on the PCMCIA Radio Use caution not to damage either the antenna cable connector or the connector on the radio Note A 6400 System radio has one antenna cable 6500 and 6700 System radios have two antenna cables Connect all a...

Page 38: ...s to access all keypad functions Stylus and the Touch Screen Note Always use the point of the stylus for tapping or making strokes on the display Never use an actual pen pencil or sharp object to write on the touch screen The stylus performs the same function as a mouse that is used to point to and click elements on a desk top computer The stylus is used in the same manner as a mouse single tap or...

Page 39: ... barcode is centered within the beam The laser beam must cross the entire barcode Move the MX3 CE towards or away from the barcode so that the barcode takes up approximately two thirds the width of the beam Following a barcode scan and read the SCNR LED turns green and the MX3 CE beeps indicating a successful scan Beeps are heard during the barcode reading The laser and SCNR LED automatically turn...

Page 40: ...oration of power 9 Backup battery and main battery dead 10 Power applied New main battery installed or external power applied Figure 1 23 Power Modes On Suspend Critical Suspend and Off Primary Events and Power Modes Any key on the keypad PC card activity Stylus touch on the touch screen Serial connection Power button tap External device connection e g cradle COM1 CTS Display activity USB connecti...

Page 41: ...a 2nd keypress Blinks until key sequence is complete ALT Orange The next keypress is an ALT keypress CTRL Orange The next keypress is a CTRL keypress SHFT Orange The next letter is the uppercase letter on alpha keys and the shifted character on the numeric keypad keys CAPS Orange Uppercase letters are active until the CAPS key sequence is pressed again SCNR Integrated barcode scanner function Red ...

Page 42: ...r to the timers expiring the timers begin the countdown again The first wakeup key press or touch are not sent to the operating system or running application the first keypress or touch are only used to turn the display and backlight On Once the display or backlight is On the keyboard and touch screen function normally The MX3 CE The Suspend mode is entered when the unit is inactive for a predeter...

Page 43: ... Backup Battery the display turns off the BATT M LED begins to flash red all peripherals are shut down the CPU clock is stopped and power is removed from the PCMCIA card The MX3 CE is saving the state prior to the Main Battery failing and cannot be used If a new fully charged main battery is installed before the Backup Battery is depleted approximately 5 minutes the MX3 CE transitions to the Suspe...

Page 44: ...C07DWW Scanner 530092IP 15 Cbl US 8110IP530092C15DUS Scanner P302FZY 8 Cbl WW 8200A326SCNRP3028DA9F Scanner P302FZY 20 Cbl US 8200A327SCNRP30220DA9F Scanner P304PRO 8 Cbl WW 8210A326SCNRP3048DA9F Scanner P304PRO 8 Cbl US 8210A327SCNRP30420DA9F Scanner Powerscan SR 8 Cbl WW 8300A326SCNRPWRSR8DA9F Scanner Powerscan SR 12 Cbl US 8300A327SCNRPWRSR12DA9F Scanner Powerscan LR 8 Cbl WW 8310A326SCNRPWRLR8...

Page 45: ...r Supply Vehicle Cradle 30 80VDC 2381A055CRDLDCPWR80V AC Power Supply External US 9000A301PSACUS AC Power Supply External AC International 9000A302PSACWW Power Cord AC US 9000A066CBLPWRAC P S External Cigarette Lighter Adapter 9000A303PSCIGLTADPT Power Adapter Bare Wire 12 VDC 1300A053CBL12ML3 Power Adapter 24 72 VDC 20 Watts 1300A301PS24WW Power Adapter 110 240 VAC 1300A303PSACWW Cables for Cradl...

Page 46: ...34 Getting Help MX3 CE Reference Guide E EQ MX3CERG E ...

Page 47: ...e Chapter 2 Physical Description and Layout Hardware Configuration System Hardware The MX3 CE hardware configuration is shown in the following figure Slot 0 D C C PCMCIA Card Slot 1 Compact Flash Card Type I II Figure 2 1 System Hardware ...

Page 48: ...Currently the persistent memory drive partition is from 3 7 to 21 MB in size depending on the amount of flash available and options in the Windows CE image The computer has one Type II CF slot The MX3 CE supports and auto detects up to 256MB of Type I compact flash memory Video Subsystem The display has a 640 pixel horizontal by 240 pixel vertical format The display contrast is adjustable with key...

Page 49: ...y by the main battery when it is installed Full charging of the backup battery may take several hours The recharging of the backup battery is automatically controlled by the MX3 CE The backup battery must be replaced by qualified service personnel Optional AC adapters are available external AC power supplies US and International and a cigarette lighter adapter COM Ports The MX3 CE has two serial p...

Page 50: ...olts Battery voltage is supplied through unused pin 35 to support WAN radio in the slot The PC slot is accessible by the use of a Phillips screwdriver to first remove the endcap It accepts Type II or III cards only Slot 0 accepts PCMCIA 2 4GHz radio cards or SRAM Flash memory cards Slot 1 The MX3 CE has one internal compact Flash card port that supports Type I and II CF cards The slot is accessibl...

Page 51: ...tton again or touching the screen immediately returns the MX3 CE from Suspend Reboot Sequence Hold the Power key down until the display goes out then release the Power button The display goes out in 5 seconds when the MX3 CE is in optimal condition When there is a hardware failure the display goes out in 15 seconds In either case the MX3 CE will reboot When the WinCE desktop is displayed or an app...

Page 52: ...n the right side of the endcap when the display is facing up Integrated Scanner Port The MX3 CE Barcode Scanner is used to collect barcode data from any nearby compatible barcode label Depending on the size of the barcode size of bars and spacing and quality of the barcode the scanner is used to read barcodes between 3 and 30 The barcode scanner reads UPC EAN Code 39 Code 93 I 2 of 5 Discrete 2 of...

Page 53: ...d RS 232 The connector includes a PC AT standard 9 pin D male connector Figure 2 3 RS 232 Pinouts PIN SIGNAL DESCRIPTION 1 DCD Carrier Detect 2 RXD Receive Data Input 3 TXD Transmit Data Output 4 DTR Data Terminal Ready 5 GND Signal Power Ground 6 DSR Data Set Ready 7 RTS Ready To Send 8 CTS Clear To Send 9 RI or 5V DC Ring Indicator Input Figure 2 4 9 Pin RS 232 Description ...

Page 54: ...To 3 D Green Wire 3 From 3 4 Not Used 4 From 5 5 To 4 Ground Black Wire 5 Not Used 6 Not Used 6 Not Used 7 To 2 D White Wire 7 Not Used 8 Not Used 8 Not Used 9 Not Used 9 Not Used Figure 2 6 USB Serial Cable Pinouts Tethered Scanners The MX3 CE Scan buttons have no effect on tethered barcode scanners connected to a serial port Tethered scanners read barcode scans only when the trigger on the tethe...

Page 55: ...ed to the MX3 CE When there is no integrated scanner installed both buttons default to Enter buttons Scan Buttons and the SCNR LED The SCNR LED located above the keypad illuminates during an integrated barcode scanner function It is affected by internal scanner algorithms Red scanning Green good scan Unlit scanner is inactive The MX3 CE Scan buttons have no effect on tethered barcode scanners conn...

Page 56: ...ab key Virtual key Right Scan Key Left Scan Key Figure 2 8 Left and Right Scan Button Programming The default setting for the right button is Enter The default setting for the left button is Scan When the MX3 CE does not have an integrated scanner both buttons default to Enter keys and the Scan selection is greyed out Each button can be setup as Disabled no response when pressed Scan initiate a ba...

Page 57: ...nner when a scanner endcap is installed and the Scan button is pressed The internal scanner scans only when the Scan button is pressed A Scan button press has no effect on externally attached scanners When there is no integrated scanner endcap the Scan keys function as Enter keys Enter Key Function The Enter key is used to confirm a forms entry or to transmit information How it is used is determin...

Page 58: ...ey Note that the Shift key only stays active for one keystroke Each time you need to use a Shifted function you need to press the Shft key before pressing the desired key When the Shft function is active the Shft LED illuminates When the Shft key is pressed the next key is determined by the major key legends i e the alpha keys display lower case letters when CAPS is On alpha characters are capital...

Page 59: ...APS Orange Uppercase letters are active until the CAPS key sequence is pressed again SCNR Integrated barcode scanner function Red scanning Green good scan BATT B Red Backup Battery When illuminated the backup battery is charging STAT Status Indicator Blinking Green when Display and or Blank timer expires Not illuminated when the MX3 CE is in Suspend Mode BATT M Main Battery When illuminated main b...

Page 60: ...tion Display Appearance Font size selection may be overridden by a user supplied application The display is automatically turned off when the MX3 CE enters the Suspend state Critical Suspend or the Display Blanking timer expires Display Blanking default is 15 seconds Display and Display Backlight Timer When the Display Blanking timer expires the display is turned off The default value for the batt...

Page 61: ...no touch data will be sent to the running application until the next touch Cleaning the Glass Display Scanner Aperture Keep fingers and rough or sharp objects away from the scan aperture and display If the glass becomes soiled or smudged clean only with a standard household cleaner such as Windex R without vinegar or use Isopropyl Alcohol Do not use paper towels or harsh chemical based cleaning fl...

Page 62: ...ough the use of an API call There are 8 distinct volume levels The minimum volume level is 0 no sound with a default setting of midrange The volume sticks at maximum and minimum levels The speaker is disabled when a headset is plugged into the Audio Jack on the endcap Speaker volume is enabled and adjusted using the Control Panel Volume Sounds option After the speaker has been enabled using the Co...

Page 63: ...5k It will support serial port emulation as well as IrDA and Winsock over IR protocols The IR operating envelope has a distance range of 2 cm 79 inches to 1 meter 3 2 feet with a viewing angle of 30 degrees The MX3 CE uses IrDA protocol to send data in both directions but not simultaneously When sending data through the IR port make sure the IR port on the first MX3 CE and the IR port on the secon...

Page 64: ...ability to communicate with a host computer and other equipment In addition using wall AC adapters or DC DC converters the cradle transfers power to the internal charging circuitry of the MX3 CE and the MX3 CE in turn recharges the Main Battery The MX3 CE can be either on or off while in the cradle Cables are available from LXE for connecting the cradle to a printer a personal computer or a barcod...

Page 65: ... external power through it s power jack Handling Batteries Safely Never dispose of a battery in a fire This may cause an explosion Do not replace individual cells in a battery pack Do not attempt to pry open the battery pack shell Be careful when handling any battery If a battery is broken or shows signs of leakage do not attempt to charge it Dispose of it using proper procedures Caution Nickel ba...

Page 66: ...arged battery within a five minute time limit or before the backup battery depletes When the Main Battery is removed the MX3 CE automatically transitions to the Critical Suspend state During Critical Suspend the MX3 CE s backup battery will continue to power the unit for at least five minutes Though data is retained the MX3 CE cannot be used until a new main battery pack is installed After install...

Page 67: ...the backup battery comes from the Main Battery It takes several hours of operation before the Backup Battery is capable of supporting the operation of the computer The duration of Backup Battery life is dependent upon operation of the MX3 CE it s features and any operating applications The backup battery is replaced by LXE Note An uninterrupted external power source wall AC adapters or DC DC conve...

Page 68: ... button The discharge utility shows the progress of the discharging At this time the program can be exited while continuing the discharge process Normal use of the MX3 CE can resume during the discharge with the exception of Hot Swapping the Main Battery When the backup battery is fully discharged the MX3 CE will automatically stop the discharge process and begin to recharge the backup battery DO ...

Page 69: ...us Figure 3 3 Insert Main Battery in Charge Pocket Lower the battery pack straight into the battery charger pocket and push it down firmly until the retaining clip catches on the retaining pins Do not slam the battery into the charging cup or slide it in sideways Failure to follow these instructions can result in damage to the main battery or the charger Please refer to the specific battery charge...

Page 70: ...e back of the cradle The MX3 CE and the Desktop Cradle connect to any of the following power supplies through the DC Power Jack Figure 3 4 US AC DC 12V Power Supply and Cigarette Lighter Adapter Figure 3 5 International AC DC 12V Power Supply Note When the MX3 CE is receiving external power through a cradle the cradle s Status LED and the CHGR LED on the MX3 CE are illuminated ...

Page 71: ...nd capabilities loaded on most standard Windows 95 98 NT XP or 2000 desktop computers Therefore the sections that follow describe only those Windows capabilities that are unique to the MX3 CE and it s WinCE environment Installed Software Note Some standard Windows options require an external modem connection Modems are not available from LXE nor supported by LXE When you order an MX3 CE you receiv...

Page 72: ... power fail even during installation of a new system image Normally installed applications go into DRAM which is lost on battery fail or cold boot The Windows CE application path includes the directories IPSM and IPSM bin Thus any applications or DLLs put in these folders will execute directly from these directories without specifying any additional path information This method does not however wo...

Page 73: ...stry settings are removed it is then necessary to save the registry again If you don t save it and reboot or get a battery failure the settings for the application are still present and it may even try to run which can crash the system if the application does not exist RegClear can help in these situations When an application is installed from a CAB file or via ActiveSync the installer automatical...

Page 74: ... Shutdown option found on most desktop PC s has been replaced with a single command Suspend because the MX3 CE is always powered On when a fully charged Main Battery and Backup Battery are present Click the Suspend button to blank the screen or tap the red Power button to blank the screen and place the MX3 CE into Suspend mode Tap the screen once more or tap the Power button to wake the unit up De...

Page 75: ...g changes to the Pocket Registry parameters CISCO Aironet Client Utility Parameter Default SSID Blank Client Name Blank Infrastructure Mode Yes Power Save Mode CAM WEP Disabled Authentication Types Open LEAP Disabled Mixed Mode Disabled World Mode Disabled Data Rates Auto Transmit Power MAX Cisco Link Status Immediately runs status on signal strength signal quality and overall link quality Client ...

Page 76: ...ups are included in the factory setup COM1 direct connect at 57600 or 115200 baud Infrared connect at 57600 or 115200 baud COM3 direct connect at 57600 or 115200 baud USB direct connect The default connect setup is COM1 at 57600 baud After a connect setup is selected Start Communications Connect will start to connect to a host After this connection is made and an ActiveSync relationship establishe...

Page 77: ...lation Select Make New Session and follow the instructions on the screen to create a Terminal Session Terminal Client Terminal Client allows a connection to be made to a Microsoft Terminal Server or a compatible Citrix Terminal Server over the radio card It will support RDP 4 or RDP 5 protocols This allows an application to be run on the server and display on the MX3 CE computer Refer to Microsoft...

Page 78: ... CE inbox and a desktop inbox Internet Explorer This option requires a radio card and an Internet Service Provider There are a few changes in the WinCE version of Internet Explorer as it relates to the general desktop Windows PC Internet Explorer options Click the button to access Internet Explorer Help Microsoft Pocket Word There are a few changes in the WinCE version of Microsoft Word as it rela...

Page 79: ... configuration profiles Version Info Displays the version levels of the radio MX3 CE hardware and software Load Unload Automatically The default is Load Automatically Use this option to load the radio drivers when the MX3 CE is rebooted Suspend While Connected Do not use this option when Lucent radio is installed in the MX3 CE Exit Advanced Link Test Test the link between the Access Point and the ...

Page 80: ...Country Operating Mode Encryption Mode Transmit Power IP Config Menu Use DHCP or input a static IP address Power Menu Adjust power management Factory Default Settings Infrastructure Automatic Automatic Power Save Mode Enabled Options Menu Default for the following options is Disabled Enable sounds International roaming These settings are only temporary Allow handheld PC to suspend when wireless ne...

Page 81: ...lity that displays the signal quality between the MX3 CE and the connected access point AP Menu To connect to the host select an access point from the list Windows Explorer There are a few changes in the WinCE version of Windows Explorer as it relates to the general desktop PC Windows Explorer options Click the button to access Windows Explorer Help ...

Page 82: ...n Top Enabled Auto hide Disabled Show Clock Enabled There are a few changes in the WinCE version of Taskbar as it relates to the general desktop PC Windows Taskbar options When the taskbar is auto hidden press the Ctrl key then the Esc key to make the Start button appear Figure 4 3 Taskbar Properties Clear Contents of Document Folder Select the Start Settings Taskbar Start Menu tab and tap the Cle...

Page 83: ...ult value is null Site Survey Tools Master Search This tool locates all Master stations within range of the computer Upon clicking the Masters button a listing of all masters found is displayed Using the options on the list screen link quality testing can be performed Select a master and click the Directed Link button Select Done to exit Master Search tool Advanced Parameter Default Description In...

Page 84: ... driver properties and network access properties Owner Set MX3 CE owner details Password Set MX3 CE access password properties Power Set Power Off Backlight Blanking properties Review battery status and perform backup battery charging discharging Regional Settings Set appearance of numbers currency time and date based on regional and language settings Remove Programs Remove programs in their entir...

Page 85: ...Allow Connection Enabled Connect Using Serial 1 57600 Device Name Figure 4 4 Communications Device Name Tab Adjust the settings and click the OK box to save the changes The changes take effect immediately PC Connection Please refer to the Backup MX3 CE Files section later in this chapter for parameter setting recommendations Figure 4 5 Communication PC Connection Tab ...

Page 86: ...s The changes take effect immediately Display Access Start Settings Control Panel Display Icon Factory Default Settings Background None Tile Enable Appearance Scheme High Contrast White Backlight Battery Auto Turn Off Enabled Idle Time 3 Seconds External Auto Turn Off Enabled Idle Time 2 minutes Blanking Battery Auto Turn Off Enabled Idle Time 15 Seconds External Auto Turn Off Enabled Idle Time 2 ...

Page 87: ...Background Appearance Backlight Turn off after of continuous idle time Blanking Figure 4 7 Display Properties Backlight Tab Adjust the settings and click the OK box to save the changes The changes take effect immediately This option is also available in Power When the backlight timer expires the transflective screens are turned off the color transmissive backlight is dimmed not turned off Blanking...

Page 88: ...ngs Control Panel Keyboard Icon Factory Default Settings Repeat Enable Delay Short Rate Slow Figure 4 9 Keyboard Properties There is no change from general desktop PC Keyboard Properties options Adjust the settings and click the OK box to save the changes The changes take effect immediately ...

Page 89: ...nd reinsert the radio card in the MX3 CE The new radio parameters will then be in effect Adapters Figure 4 10 Network Configuration Adapters Tab Upon selecting a driver click the Properties button The next screen displayed is used to set the IP Address and Name Server Address parameters Adjust the settings and click the OK box to save the changes Identification Figure 4 11 Network Configuration Id...

Page 90: ...ess Start Settings Control Panel Password Icon Factory Default Settings Password Blank At Power On Disabled Note Once a password is assigned each Control Panel option requires the password be entered before the Control Panel option can be accessed If you forget the password it cannot be restored without performing a cold boot on the unit which erases all memory There is no change from general desk...

Page 91: ...A Please refer to Chapter 1 Introduction section titled Power Modes Battery The Battery tab shows the status and the percentage of power left in the Main Battery external It also shows the status of the Backup Battery The listed values cannot be changed by the user Power Off Power Properties Save battery power and prevent unauthorized use in conjunction with a password by having your device turn o...

Page 92: ...Charge This option presents the Voltage and Status of the Main and Backup batteries The option to charge and discharge the backup battery is available on this Power Properties Charge tab Once the backup battery is completely discharged the MX3 CE automatically begins the Recharge process Regional Settings Access Start Settings Control Panel Regional Settings Icon No change from general desktop PC ...

Page 93: ...her than 9600 N 8 1 and the computer either loses power or a cold boot command is entered the Scanner applet must be reconfigured to match the scanner communication settings Note ActiveSync will not work over the COM1 port if COM1 external is enabled in the Scanner applet as a scanner input Main Send Key Messages WEDGE Power Port 1 while asleep Main COM1 COM2 COM3 Scanner Control Keys Port 2 Port ...

Page 94: ... COM1 COM2 COM3 Scanner Control Keys 19200 9600 4800 2400 1200 300 Parity Baud Rate Power on pin 9 5V Data Bits Stop Bits Figure 4 17 Scanner Properties COM Port Settings Adjust the settings and click the OK box to save the changes The changes take effect immediately The COM 1 display contains the same parameters as the COM 2 and COM 3 Tab Adjust the settings and click the OK box to save the chang...

Page 95: ...fault Settings N A Double Tap There is no change from general desktop PC Mouse Double Tap Properties display Follow the instructions on the screen and click the OK box to save the changes The changes take effect immediately Calibration Figure 4 18 Stylus Properties Recalibration Start Figure 4 19 Stylus Properties Recalibration ...

Page 96: ... Memory Bar General Figure 4 20 System Properties General Tab This screen is presented for information only The parameters cannot be changed by the user Memory Figure 4 21 System Properties Memory Tab There is no change from general desktop PC System Properties Memory options Adjust the settings and click the OK box to save the changes The changes take effect immediately ...

Page 97: ...ies Key clicks Screen taps Enable clicks and taps for Loud Loud Soft Soft Figure 4 22 Volume and Sounds Properties Volume Tab Sounds There is no change from general desktop PC Volume and Sound Properties Sounds options Adjust the settings and click the OK box to save the changes The changes take effect immediately Wireless only for Lucent Radios Access Start Settings Control Panel Wireless Icon Fa...

Page 98: ...B Transfer A desktop or laptop PC with an available USB port and an MX3 CE with a USB port The desktop or laptop PC must be running Windows 98 SR2 or Windows 2000 LXE specific USB cable as listed in Chapter 1 Introduction subsection Accessories Configure the MX3 CE The following instructions relate to initial setup of ActiveSync When there is a Connect icon on the MX3 CE desktop this section can b...

Page 99: ...elect Start Control Panel Communications PC Connection Click the Change button From the popup list choose USB This will set up the MX3 CE to use the USB port Click OK and ensure the check box for Allow connection with desktop computer when device is attached is checked Click OK to return to the Control Panel Radio Once the relationship is established using the serial port the ActiveSync link in th...

Page 100: ...e MX3 CE into suspend by tapping the red Suspend button Click the status bar icon in the lower right hand corner of the status bar Then click the Disconnect button IRDA Connection Move the MX3 CE so the infrared beam is broken Click the status bar icon in the lower right hand corner of the status bar Then click the Disconnect button USB Connection Disconnect the cable from the MX3 CE Click the sta...

Page 101: ...ins but connection never occurs Baud rate of connection is not supported or detected by host or Incorrect or broken data lines in cable ActiveSync indicator on the host remains gray The host doesn t know you are trying to connect May mean a bad cable with no control lines connected or an incompatible baud rate Try the connection again with a known good cable Testing connection with a terminal emul...

Page 102: ...Under the Call Options tab be sure to turn off Wait for dial tone since a direct connection will not have a dial tone Set the timeout parameter default is 90 seconds Click OK 8 TCP IP Settings should not need to change from defaults Click the Finish button to create the new connection 9 Close the Remote Networking window 10 To activate the new connection select Start Settings Control Panel Communi...

Page 103: ...cial null modem cables will not work LXE recommends the following cable Serial cable 9000A054CBL6D9D9 Pinout DB9 female DB9 female 1 6 4 2 3 3 2 4 1 6 5 5 7 8 8 7 9 no connection Figure 4 23 Pinout Serial Cable for Synchronization Some laptop devices do not properly implement all control lines on the serial port the laptop connection will not work ...

Page 104: ... of the file Then 3 values are added FileName is the name of the CAB file with the path usually IPSM Installed is a DWORD value of 0 which changes to 1 once auto launch installs the file FileCheck is the name of a file to look for to determine if the CAB file is installed This will be the name of one of the files with path installed by the CAB file Since the CAB file installs into DRAM when memory...

Page 105: ...d dword 0 FileCheck WINDOWS PVBLOAD EXE PREGEDIT EXE Pocket Registry Editor part of Microsoft Power Tools for Windows CE REGLOAD EXE Double tapping a registry settings file e g REG causes RegLoad to open the file and make the indicated settings in the registry This is similar to how RegEdit works on a desktop PC The REG file format is the same as on the desktop PC WARMBOOT EXE Double click to warm...

Page 106: ...s not erase the old registry settings which causes various puzzling problems running RegClear before installing the new image removes those problems While running 5 10 seconds it displays a message box saying clearing settings and at completion it displays a dialog box if the procedure fails Note that to return your MX3 CE completely to factory defaults you must perform RegClear to erase the store...

Page 107: ...ck is Off The Caps or CapsLock condition can be toggled with a 2nd F1 key sequence The CAPS LED is illuminated when CapsLock is On Press These Keys and Then To get this key 2nd Shift Ctrl Alt CapsLock Press this key Contrast x F6 Volume x F8 Backlight x F10 2 nd 2 nd Shift Shft Alt Alt Ctrl Ctrl Scan 4 Scan Esc Esc Space Spc Enter Enter CapsLock Toggle x F1 Back Space BkSp Tab Tab BackTab x Tab Br...

Page 108: ... this key Delete x DOT Home x Left Arrow End x Right Arrow Page Up x Up Arrow Page Down x Down Arrow ScrollLock x x F4 F1 F1 F2 F2 F3 F3 F4 F4 F5 F5 F6 F6 F7 F7 F8 F8 F9 F9 F10 F10 F11 x x F1 F12 x x F2 a Off A b Off B c Off C d Off D e Off E f Off F g Off G h Off H i Off I j Off J k Off K l Off L m Off M n Off N o Off O p Off P q Off Q ...

Page 109: ... To get this key 2nd Shift Ctrl Alt CapsLock Press this key r Off R s Off S t Off T u Off U v Off V w Off W x Off X y Off Y z Off Z A x A B x B C x C D x D E x E F x F G x G H x H I x I J x J K x K L x L M x M N x N O x O P x P Q x Q R x R S x S T x T U x U V x V W x W X x X Y x Y Z x Z ...

Page 110: ...se Keys and Then To get this key 2nd Shift Ctrl Alt CapsLock Press this key 1 1 2 2 3 3 4 4 5 5 6 6 7 7 8 8 9 9 0 0 DOT DOT x 0 x 1 x 2 x 3 x 4 x 5 x 6 x 7 x 8 x 9 x I colon x D semicolon x F x L x N _ underscore x M comma x J apostrophe x H tilde x B x S x A x G x Q x W ...

Page 111: ...Appendix A Key Maps 99 E EQ MX3CERG E MX3 CE Reference Guide Press These Keys and Then To get this key 2nd Shift Ctrl Alt CapsLock Press this key x E x R x T x Y x U x O x P ...

Page 112: ...100 Appendix A Key Maps MX3 CE Reference Guide E EQ MX3CERG E ...

Page 113: ...e SRAM PC Card ATA Flash PC Card or ATA Hard Drive PC Card PCMCIA Interface Slot 0 accepts Type I II and III Slot 1 accepts Type I and II CF Compatible with the PCMCIA version 2 1 standard Weights Unit with radio battery and scanner endcap Less than 30 oz 850g Battery 5 6 oz 157g Radio Card 2 4GHz Type II 1 0 oz 1 6 oz 28g 45g SRAM Card 1 oz 28g External Connectors Interface IrDA Connector COM 2 b...

Page 114: ...argeable or Externally Chargeable Backup CMOS Internal Nickel Cadmium NiCd 5 7V max Automatically charges from Main Battery during normal operation Memory operational for 5 minutes when Main Battery is depleted Display Specifications Feature Specification Type LCD Transflective Monochrome Transflective Color Transmissive Color Electroluminescent Backlighting Resolution 640x240 pixels Size VGA land...

Page 115: ... for 15 minutes Contamination Resistant to exposure to skin oil and other lubricants Vibration Based on MIL Std 810D ESD 8 KV air 4kV direct contact Shock Multiple 4 foot drops to concrete 6 foot with protective cover boot Power Supplies US AC Wall Adapter Feature Specification Input Power Switch None Power ON Indicator None Input Fusing Thermal Fuse Input Voltage 108VAC min 132VAC max Input Frequ...

Page 116: ... 47 63 Hz Input Connector Customer supplied Output Connector Barrel connector female 5 5 x 2 5 x 11mm Center Positive Output Voltage 12VDC regulated Output Voltage Regulation 5 Output Current 0 Amps min 1 00 Amps max Radio Specifications PCMCIA Proxim 2 4 GHz Type II Bus Interface PCMCIA 2 0 Type II slot Radio Frequencies 2 4 2 4835 GHz FH SS RF Data Rates 0 8 1 6 Mbps RF Power Level 100 mW varies...

Page 117: ... Bus Interface PCMCIA 2 0 Type II slot Radio Frequencies 2 4 2 4835 GHz IEEE 802 11b DS SS RF Data Rates 11 Mbps RF Power Level 100 mW max Channels 11 US 13 Europe 4 France 14 Japan Operating Temperature see MX3 CE Environmental Specs Storage Temperature see MX3 CE Environmental Specs Connectivity Novell TCP IP Ethernet ODI Antenna Internal PCMCIA Symbol 11Mb 2 4GHz Type II Bus Interface PCMCIA 2 ...

Page 118: ...106 Appendix B Technical Specifications MX3 CE Reference Guide E EQ MX3CERG E ...

Page 119: ...y Note that is DLL is installed in all images with a version number of 1 2 or higher as displayed on the screen during bootup On older images the DLL will have to be included in the application install These LXE specific API calls and registry settings cover the following Battery PCMCIA Power Management Scanner Serial Ports Version Control Miscellaneous Also included are instructions on reflashing...

Page 120: ... may be used to get a detailed error message LXEBatteryReadVoltage int LXEBatteryReadVoltage int vmain int vback This function returns the current voltage of both the main battery vmain and the backup battery vback in millivolts This will be the value read by the last poll of the battery driver which occurs by default every 10 seconds This function returns 0 on error or 1 on success GetLastError m...

Page 121: ...y the card would be detected by the PCMCIA driver and power restored to the slot the internal flag prevents this happening and the card is disabled The slot can still be powered and accessed by application or diagnostic software it is just inhibited from detection by the PCMCIA driver This function returns 0 on error or 1 on success GetLastError may be used to get a detailed error message LXEPcmci...

Page 122: ...n causes the card in the specified slot to be write protected This sets an internal flag which inhibits the PCMCIA driver from allowing writes to the card It is undefined what happens when a non memory card is write protected it is safe to assume the card will not function properly This function returns 0 on error or 1 on success GetLastError may be used to get a detailed error message ...

Page 123: ...ction generates a system event which causes the power management driver to start handling display on off timing and events normally usually after a DisplayAlwaysOn command below This function returns 0 on error or 1 on success GetLastError may be used to get a detailed error message LXEPowerMgrDisplayOn int LXEPowerMgrDisplayOn void This function generates a system event which causes the power man...

Page 124: ...ut int valbatt int valac This function changes the values of the backlight power management timeouts given in seconds and saves them to the registry The value valbatt is the timeout when running under battery power and the value valac is the timeout when running under external AC power The function then generates the event necessary to cause the driver to reload its registry information so that th...

Page 125: ...ssage LXEPowerMgrBacklightPrimaryEv ents int LXEPowerMgrBacklightPrimaryEvents unsigned long val This function changes the bitmask of primary events that affect backlight power on off and saves it to the registry The function then generates the event necessary to cause the driver to reload its registry information so that the new value takes effect immediately The values within the bitmask are giv...

Page 126: ...which simulates a keypress to the power management driver This is primarily of use in diagnostic software or to force a wakeup of the power management system Note that this event has no effect on the computer going into suspend only the display backlight controls This function returns 0 on error or 1 on success GetLastError may be used to get a detailed error message LXEForceTouchPrimaryEvent int ...

Page 127: ...Enable int LXEScannerEnable void This function generates a system event which causes the scanner driver to return to normal operation usually after a disable command When resuming operation it will reread all registry settings so any unsaved settings setup via API calls will revert to their permanent settings This function returns 0 on error or 1 on success GetLastError may be used to get a detail...

Page 128: ...d This function generates a system event which causes the scanner driver to terminate a scan operation on the internal scanner This function returns 0 on error or 1 on success GetLastError may be used to get a detailed error message LXEScannerKeysOff int LXEScannerKeysOff void This function generates a system event which causes the scanner driver to stop processing scanned data as keystroke messag...

Page 129: ...vices This function returns 0 on error or 1 on success GetLastError may be used to get a detailed error message LXEScannerForcePower values for scanner port define SCANPORT_COM1 1 define SCANPORT_COM3 3 define SCANPORT_INTERNAL4 int LXEScannerForcePower int port int value This function forces serial port to supply power to a scanner regardless of the registry setting or whether this is an active s...

Page 130: ...n be attached to any of the indicated ports by default the ports are disabled unless there is an internal scanner in which case WEDGEPORT1 is attached to the internal scanner This function returns 0 on error or 1 on success GetLastError may be used to get a detailed error message LXEScannerSetKey values for scan keys define SCANKEYLEFT 1 define SCANKEYRIGHT 2 values for key action define SCANKEY_D...

Page 131: ...erial ports are configured using the standard Win32 API calls This function returns 0 on error or 1 on success GetLastError may be used to get a detailed error message LXEScannerSetPower define SCANPORT_DISABLED0 define SCANPORT_COM1 1 define SCANPORT_COM2 2 define SCANPORT_COM3 3 define SCANPORT_INTERNAL4 int LXEScannerSetPower int port int val This function changes the value of the scanner seria...

Page 132: ...vice The message WM_LXE_SCANERR indicates a configuration error which prevents the scanner from processing data correctly There is no message generated on a failed scan Other messages may be added to this list in the future as new capabilities emerge This function may be called up to 8 times All 8 window handles are sent the message when the events occur The window handle is tested for validity be...

Page 133: ...lines that are present on a DB 9 connector are functional To apply 5 volt power via Ring Indicator see Power Management APIs IRDA Port This port can be used as a standard serial port when addressed as COM2 and supports all baud rates up to 115200 Because it is an infrared port no control lines are implemented The Win32 standard SETIR test for infrared ports works if EscapeCommFunction port SETIR p...

Page 134: ...ring like MX3 CE vn n n ARM SA1100 04 01 2002 12 35 The date and time specified are the actual date and time that the OAL was compiled The space for this string may be allocated using the global value from LXEAPI h as follows char VersionString VERSION_STRSIZE This function returns 0 on error or 1 on success GetLastError may be used to get a detailed error message LXEVersionBoot int LXEVersionBoot...

Page 135: ...XEAPI h as follows char VersionString VERSION_STRSIZE This function returns 0 on error or 1 on success GetLastError may be used to get a detailed error message LXEInfoCopyright int LXEInfoCopyright char str int len This function will return the image build copyright as a string The space for this string may be allocated using the global value from LXEAPI h as follows char CopyrightString COPYRIGHT...

Page 136: ...stryBase unsigned long RegistrySize unsigned long FilesysBase unsigned long FileSysSize ROMINFO int LXEInfoGetROMInfo ROMINFO rtn This function will return information about the ROM flash memory in the system in the data block specified Because this information is established at image compile time these values will not change BlockSize is the minimum erasable block size in bytes This is a function...

Page 137: ...n is read using standard Win32 APIs it represents the state of the system at the moment the API call is made BaseAddress is the memory address in mapped kernel space where the RAM starts This will not change TotalSize is the total detected RAM in the computer This is the sum of StorageSize and ProgramSize StorageSize and StorageFree return the total size and bytes free values for storage memory Th...

Page 138: ...IDentifier out of global memory and format the number into a string of the generic format of XXXXXXXX XXXX XXXX XXXX XXXXXXXXXXXX The space for this string may be allocated using the global value from LXEAPI h as follows Char UUIDString GUID_STRSIZE This function returns 0 on error or 1 on success GetLastError may be used to get a detailed error message ...

Page 139: ...tents of RAM and all configuration settings However any network sessions will be lost and any data in running applications that has not been specifically flushed to storage may be lost Note that it is up to the application making this call to validate the usage of it provide a warning ask for a password etc Calling this function arbitrarily can result in loss of data requiring a lot of time to cor...

Page 140: ...LXEShowTaskbar int flag Convenience function to show or hide the taskbar similar to PocketPC Flag is SW_SHOW or SW_HIDE like standard Win32 API calls HIDE must occur before main app window is created right after RegisterClass or similar SHOW should happen right before PostQuitMessage ...

Page 141: ... off release the power key The computer automatically loads the new BOOT loader This will take approximately 5 seconds 5 Next the computer automatically loads the new NK image and programs the flash This will take approximately 2 minutes 6 When the computer displays Remove card to Reboot remove the flash card and the MX3 CE will reboot 7 Replace the endcap being careful not to pinch any leads Trou...

Page 142: ... not occur if any of these files are missing since it has to write all the new ones to flash or else the computer will be dead on next startup in this state it will need to be returned to the factory to be reloaded In addition the FLASH ZAP file must not be zero bytes in size The data that it contains are unimportant only its existence matters It can be created by copying any small file to the Com...

Page 143: ...pLock feature are shipped to boot in Administration mode with no default password thus when the device is first booted the user has full access to the device and no password prompt is displayed After the administrator specifies an application to lock a password is assigned and the device is rebooted or the hotkey is pressed the device switches to end user mode Briefly the process to configure a ne...

Page 144: ...unched and runs in full screen mode when the MX3 CE boots up The user cannot unintentionally or intentionally exit the application nor can the end user execute any other applications Normal application exit or switching methods and all Microsoft defined Windows CE key combinations such as close X icon File Exit File Close Alt F4 Alt Tab etc are disabled The Windows CE desktop icons menu bars task ...

Page 145: ...ssword is not entered within 30 seconds the user is returned to the System Control Panel If a password has not been configured the Administrator Control panel is displayed Control Panel Application Command Line Control Status Security Administrator Control Internet Administrator Control panel Use the Control tab options to select the application to launch when the MX3 CE boots up Move the cursor t...

Page 146: ...n text box and the internet application should be entered in the command line In this case do not check the Internet checkbox Security Panel Control Status Security Hot Key Password Confirm Password Administrator Control Administrator Security panel Hotkey Specify the hotkey sequence that triggers AppLock to switch between administrator and user modes and the password required to enter Administrat...

Page 147: ... the SIP Password Move the cursor to the Password text box The passwords entered in the Password and Confirm Password fields must match Passwords are case sensitive When the user exits the Administrator Control panel the two passwords are compared to verify that they match If they do not match a dialog box is displayed notifying the user of the error After the user closes the dialog box the Securi...

Page 148: ...etermine why the specified application cannot be locked Process Processing status shows the flow control of AppLock components and is mainly intended for LXE Customer Service when helping customers troubleshoot problems with their AppLock program Extended Extended status provides more detailed information than that logged by Process Logging All All messages are displayed Tap the Refresh button aft...

Page 149: ...d the password prompt is displayed In this case the user has 30 seconds to enter a password If a valid password is not entered within 30 seconds the password prompt is dismissed and the device returns to end user mode All other situations that present the password prompt do not dismiss the prompt this is because the other situations result in invalid end user operation These conditions include 1 I...

Page 150: ...eading the hotkey the internal factory default is used LOG_ERROR App Command Line Command line Command line of the application being locked LOG_PROCESSING App Application name Name of the application being locked LOG_PROCESSING dwProcessID Device ID of the application being locked LOG_EX Encrypt exported key len Size of encrypt export key LOG_EX Encrypt password length The length of the encrypted ...

Page 151: ...ok dll If it exists delete it Also delete applock exe from the Windows directory and reboot the unit Deleting applock exe triggers the applock system to reload LOG_ERROR Converted Pwd Converted password from wide to mbs LOG_EX Could not create event EVT_HOTKEYCHG The keyboard filter uses this event at the Administrator Control panel The event could not be created LOG_ERROR Could not hook keyboard ...

Page 152: ...Encrypt failure The password encryption failed LOG_ERROR Encrypt gen key failure Unable to encrypt password LOG_ERROR Encrypt generate key failure Unable to encrypt password LOG_ERROR Encrypt get user key failure Unable to encrypt password LOG_ERROR Encrypt get user key ok Encrypt password process successful LOG_EX Encrypt hash data failure Unable to encrypt password LOG_ERROR Encrypt hash data fr...

Page 153: ...n mode and enable the taskbar LOG_PROCESSING Enter ToAdmin Entering the function that handles a mode switch into admin mode LOG_PROCESSING Enter ToUser Entering the function that handles the mode switch to user mode LOG_PROCESSING Enter verify password Entering the password verification processing LOG_PROCESSING Exit AppLockEnumWindows Found There are two exit paths from the enumeration function T...

Page 154: ... address of the keyboard hook LOG_PROCESSING Getting configuration from registry The AppLock configuration is being read from the registry This occurs at initialization and also at entry into user mode The registry must be re read at entry into user mode in case the administration changed the settings of the application being controlled LOG_PROCESSING Getting encrypt pwd length The length of the e...

Page 155: ...oard hook processing This message is logged prior to the load attempt LOG_PROCESSING Open failure The status information is being saved to a file and the file open has failed This could occur if the file is write protected If the file does not exist it is created LOG_ERROR Open registry failure If the Administration registry key does not exist the switch to user mode fails because the AppName valu...

Page 156: ...or command line LOG_ERROR Registry read failure at reenter user mode The registry has to be read when switching into user mode This is because the administrator can change the settings during administration mode The read of the registry failed which means the Administration key was not found or the AppName value was missing or empty LOG_ERROR Registry read failure The registry read failed The regi...

Page 157: ...y read and AppLock is starting the process to switch to user mode LOG_PROCESSING Switching to user hotkey press The system is currently in admin mode and is now switching to user mode The switch occurred because of a hotkey press by the administrator LOG_PROCESSING Taskbar hook failure Applock is unable to control the taskbar to prevent the locked application from re enabling it LOG_ERROR Taskbar ...

Page 158: ...oc failure AppLock could not remove the hook that allows monitoring of the application LOG_ERROR Unhooking taskbar In administration mode the taskbar should return to normal operation so AppLock s control of the taskbar should be removed LOG_EX Unhooking wndproc When the administrator leaves user mode the device is fully operational therefore AppLock must stop monitoring the locked application LOG...

Page 159: ...L_MACHINE Software LXE Persist FileCheck AppLock registry settings identify the application that is going to be locked and any parameters that are needed by the application These registry settings are as follows HKEY_LOCAL_MACHINE Software LXE Administration AppName HKEY_LOCAL_MACHINE Software LXE AppCommandLine In addition to the registry settings needed to specify the application additional regi...

Page 160: ...148 Appendix D AppLock MX3 CE Reference Guide E EQ MX3CERG E ...

Page 161: ...y 26 Barcode Scanner Integrated 40 Tethered 40 Batteries 102 Battery 79 Backup 55 Charge New 5 Charger 57 Charging 37 Handling Safely 53 Lithium Ion Li Ion 37 Low Warning timing 53 Nickel Cadmium NiCad 37 Battery Auto Turn Off 74 79 Battery Compartment 10 Battery Life Approximate 54 Battery charge before using 9 Battery How To 10 Baud Rate 81 Blanking 74 79 C Calibration 83 Caps mode function 46 C...

Page 162: ...26 Enter key function 45 Environmental Specifications 103 Error Messages 138 Events 85 External Auto Turn Off 74 79 External Connectors Interface 101 External Power 79 External Power Supplies 13 F Factory Default Settings Cisco Client 63 Communication 73 Date Time 74 Display 74 Keyboard 76 Network 77 Owner 78 Password 78 Power 79 Regional Settings 80 Scanner 81 Stylus 83 Symbol Client 68 System 84...

Page 163: ...nction 29 47 CTRL function 29 47 on keypads location 47 SCNR function 29 47 SHFT function 29 47 STAT function 29 47 Left 81 Li Ion 1400 mAh 37 Lithium Ion Li Ion 53 Location Components 2 3 21 Low Battery Warning 54 M Main 81 Main Battery and Critical Suspend state 54 components 9 Hot Swapping 54 Main Battery Pack 54 Main Battery Power Failure 55 Maintenance required Backup Battery 56 Make New Conn...

Page 164: ...t Instructions 5 R Radio Specifications 2 4 GHz 105 Rate 76 Reboot 39 Recalibrate 15 Recalibration 83 Reflash 129 REGCLEAR EXE 61 Regional Setting 80 Regional Settings 72 Registry 63 Registry database 61 REGSAVE EXE 61 Remote Networking 64 Remove programs 72 Repeat 76 Right 81 Roam Config 71 RS 232 Data Entry 26 RS 232 Pinouts 41 42 S Save settings to non volatile memory 18 Scan buttons and tether...

Page 165: ...en 49 Transflective Display 36 48 Transmissive Display 36 48 Troubleshooting ActiveSync 89 Power Off 14 Type II radio 25 U User Name 77 V Video Subsystem Display Characteristics 36 View Display 48 Volume 85 adjust audio volume 19 Volume and Sounds 72 W Wake the MX3CE Primary Events 28 Wake up action for display backlight 30 WARMBOOT EXE 93 Warning Low Battery beeps 54 Weights 101 When to use this ...

Page 166: ...154 Index MX3 CE Reference Guide E EQ MX3CERG E ...

Reviews: