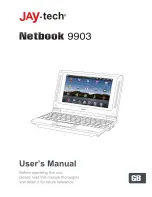
background image

U

U

s

s

e

e

r

r

s

s


M

M

a

a

n

n

u

u

a

a

l

l


© Copyright 2008 

All Rights Reserved. 

The information in this document is subject to change without prior notice in 
order to improve reliability, design and function and does not represent a 
commitment on the part of the manufacturer. 

In no event will the manufacturer be liable for direct, indirect, special, incidental, 
or consequential damages arising out of the use or inability to use the product 
or documentation, even if advised of the possibility of such damages. 

This document contains proprietary information protected by copyright. All 
rights are reserved. No part of this manual may be reproduced by any 
mechanical, electronic, or other means in any form without prior written 
permission of the manufacturer. 


Limitation of Liability 

While reasonable efforts have been made to ensure the accuracy of this manual, 
the manufacturer and distributor assume no liability resulting from errors or 
omissions in this manual, or from the use of the information contained herein. 


Summary of Contents for Notebook

Page 1: ...inability to use the product or documentation even if advised of the possibility of such damages This document contains proprietary information protected by copyright All rights are reserved No part...

Page 2: ...ions to Peripheral Devices 3 SAR Exposure 4 Declaration of Conformity 4 European Notice 4 Attachment Limitations Statement 5 5 Battery Pack Safety 6 Lithium battery warning Bridge battery warning Fron...

Page 3: ...y Panel Using the Built in Rotating Camera Conserving the Battery Power BIOS Setup Entering BIOS Setup Main Setup Advanced Setup Security Setup Boot Setup Exit Setup Troubleshooting Specifications Glo...

Page 4: ...cord Before students take the netbook home instruct students to keep power cords small accessories and loose parts away from younger children at all times Emphasize to students that any damage to the...

Page 5: ...ose to direct sunlight Do not place near fire or other sources of heat Do not expose to rain or moisture Do not leave the netbook turned on or plugged in when enclosed in a non ventilated container su...

Page 6: ...e to radio or television reception which can be determined by turning the equipment off and on the user is encouraged to try to correct the interference by one or more of the following measures Reorie...

Page 7: ...esired operation European Notice Products with the CE Marking comply with both the EMC Directive 2004 108 EC and the Low Voltage Directive 2006 95 EC and R TTE Directive 1999 5 EC issued by the Commis...

Page 8: ...e battery pack is intended to use only with this netbook The battery pack is not replaceable by the end user Only qualified service technicians should replace the battery pack Do not disassemble the p...

Page 9: ...oder einem vom Hersteller empfohlenem ahnlichen Typ Entsorgung gebrauchter Batterien navh Angaben des Herstellers Lithium battery warning Bridge battery warning This netbook contains a lithium batter...

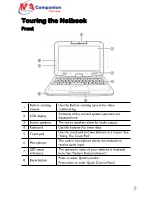
Page 10: ...stereo speakers allow for audio output 4 Keyboard Use the keyboard to enter data 5 Touch pad Use the touch pad and two buttons as a mouse See Using The Touch Pad 6 Microphone The built in microphone...

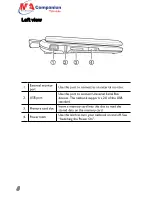
Page 11: ...rt Use this port to connect Universal Serial Bus devices The netbook supports v 2 0 of the USB standard 3 Memory card slot Insert a memory card into this slot to read the stored data on the memory car...

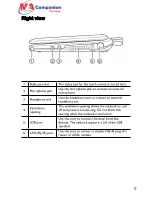
Page 12: ...o connect an external headphone set 4 Ventilation opening The ventilation opening allows the netbook to cool off and prevent overheating Do not block this opening when the netbook is turned on 5 USB p...

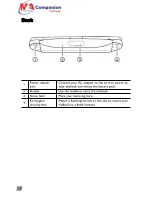
Page 13: ...his port to power up your netbook and charge the battery pack 2 Handle Use the handle to carry the netbook 3 Name field Place your name tag here 4 Kensington security slot Attach a Kensington lock to...

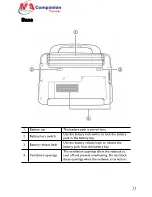
Page 14: ...ock the battery pack in the battery bay 3 Battery release latch Use the battery release latch to release the battery pack from the battery bay 4 Ventilation openings The ventilation openings allow the...

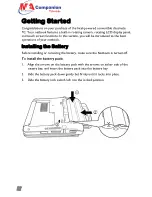
Page 15: ...ntroduced to the basic operations of your netbook Installing the Battery Before installing or removing the battery make sure the Netbook is turned off To install the battery pack 1 Align the arrows on...

Page 16: ...three hours to 100 while the netbook is powered off It will take about five hours to charge the battery to 100 capacity while the netbook is powered on If the system runs at heavy loads or in a high...

Page 17: ...tching the Power On Once you have connected your AC adapter or charged the battery pack you can power on your netbook When you power on your netbook the Power On Self Test POST runs automatically to c...

Page 18: ...r off 1 Make sure all applications are turned off 2 Slide the power latch towards you and release A Warning Never turn the netbook off during the POST or an unrecoverable error may occur Never turn th...

Page 19: ...es the system is reading writing data Green light indicates the system is on Green light indicates the battery is fully charged and the AC adapter is plugged in Orange light indicates the battery is c...

Page 20: ...LCD Fn F8 Increase the brightness of the LCD Fn F11 Num LK Lock and unlock the number pad Fn F12 Scr LK Turn the scroll lock function on or off Fn Ins PrtSc Capture the on screen display as a graphic...

Page 21: ...items and call up menus To move the cursor on the screen move the tip of your finger across the touch pad To left click press the left button once To double click quickly press the left button twice...

Page 22: ...ing the Display Panel The display panel of your notebook can rotate up to 180 degrees clockwise or counterclockwise You can fold it down with the display facing up and use it as a writing pad In the f...

Page 23: ...t try to turn the display panel more than 180 degrees Note If you rotate the display panel clockwise you must turn it counterclockwise to return to its original position If you rotate the display pane...

Page 24: ...display panel as a writing pad 1 Make sure the display panel has been rotated 180 degrees 2 Hold the display panel by one or both of the upper corners 3 Gently lower the display panel to the closed p...

Page 25: ...and forth to use on both sides of the display panel To rotate the built in rotating camera 1 Hold the edge of the built in rotating camera with your thumb and index finger 2 Use your thumb to push the...

Page 26: ...r or very little power is drawn from the battery module To enter the sleep mode Press and hold Fn F2 To enter the hibernation mode in Windows 1 Press the Windows logo key and then press U 2 When the p...

Page 27: ...may get a message prompting you to run the BIOS Setup Utility Entering BIOS Setup Turn on the power and press the DEL key quickly when the POST Power On Self Test is running Main Setup In this menu yo...

Page 28: ...al memory detected during boot Language Supports English Spanish and Portuguese for the BIOS Setup menu Advanced Setup In this menu you can configure advanced settings Wake On LAN When enabled turning...

Page 29: ...s Supervisor Password Is Displays the supervisor password User Password Is Displays the user password Set Supervisor Password Enter and confirm your new password You will be asked to enter this passwo...

Page 30: ...d Note Passwords are not case sensitive Write the passwords down and keep in a safe location If you forget the passwords the netbook may need to be sent back to the factory or to an authorized service...

Page 31: ...our changes to CMOS Exit Discarding Changes Exit system setup without saving changes to CMOS Load Setup Defaults Load default values for all setup items Discard Changes Load previous values from CMOS...

Page 32: ...AC adapter is properly plugged into the netbook and a wall outlet Check to see if the power indicator of the netbook is on Check to see if your keyboard is operational by pressing and holding any key...

Page 33: ...ch screen 5 wire 8 9 ITO resistive touch screen Graphics Embedded in Intel 945GSE Graphics Memory Share system memory I O ports USBx2 Headphone out Mic in DC in RJ 45 VGA Out Audio HD audio codec Audi...

Page 34: ...s 11 system K installing 14 settings 26 removing 15 keyboard status indicators 18 status indicators 15 18 controls 19 L T bezel button 9 LCD display touch pad 20 BIOS opening 16 touch screen 21 config...

Page 35: ......

Page 36: ......

Page 37: ......

Reviews: