background image

1

PLEASE READ THIS MANUAL CAREFULLY BEFORE USING 
YOUR DISHWASHER AND KEEP IT FOR FUTURE REFERENCE.

Dishwasher 

User’s Manual

Model  MCSDW7FC

B

 /MCSDW7FCW  

Summary of Contents for MCSDW7FCB

Page 1: ...1 PLEASE READ THIS MANUAL CAREFULLY BEFORE USING YOUR DISHWASHER AND KEEP IT FOR FUTURE REFERENCE Dishwasher User s Manual Model MCSDW7FCB MCSDW7FCW ...

Page 2: ...stering your product include the following 1 Registering your product will allow us to contact you regarding a safety notification or product update 2 Registering your product will allow for more efficient warranty service processing when warranty service is required 3 Registering your product could act as your proof of purchase in the event of insurance loss Once again thank you for purchasing a ...

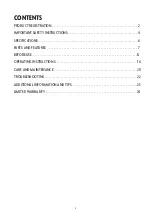
Page 3: ...REGISTRATION 2 IMPORTANT SAFETY INSTRUCTIONS 4 SPECIFICATIONS 6 PARTS AND FEATURES 7 BEFORE USE 8 OPERATING INSTRUCTIONS 16 CARE AND MAINTENANCE 20 TROUBLESHOOTING 22 LIMITED WARRANTY 24 ADDITIONAL INFORMATION AND TIPS 23 ...

Page 4: ...ll local codes and ordinances 10 WARNING Improper connection of the equipment grounding conductor can result in a risk of electric shock Check with a qualified electrician or service representative if you are in doubt whether the appliance is properly grounded Do not modify the plug provided with the appliance if it will not fit the outlet have a proper outlet installed by a qualified electrician ...

Page 5: ...WARNING When installing the dishwasher follow basic precautions including the following Please check the standards and local codes for placement of machine 1 Installation maintenance and repair should be performed by a qualified installer Work by unqualified persons could be dangerous and may void the warranty 2 DO NOT operate the appliance if damaged malfunctioning partially disassembled or if it...

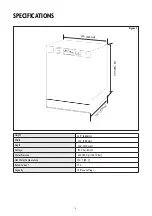
Page 6: ...3 9 860 mm 2 2 4 5 7 0 m m Height Width Depth Voltage Water Pressure Hot Water Temperature 120 F 49 C Rated Current Capacity 15 Place Settings 33 9 860mm 23 5 598 mm 22 4 570 mm 120V AC 60 Hz 4 35 145 0 psi 0 3 10 bar 12 A Figure 1 ...

Page 7: ...f g h i j k l a a Upper Cutlery Rack b Upper Basket Track Latch c Filter Assembly d Detergent and Rinse Aid Dispenser e Upper Nozzle f Upper Rack g Upper Spray Arm h Lower Spray Arm i Lower Rack j Rating Plate k Control Panel l Drying Unit ...

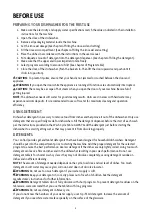
Page 8: ...ishwasher Only use detergents that are specifically made for dishwashers Fill the detergent dispenser before the start of each wash per the instructions provided in the Wash Cycle Table ALWAYS add the detergent just before starting the dishwasher to avoid it getting wet as that may prevent it from dissolving properly DETERGENTS You can find powder gel and tablet detergents that have been designed ...

Page 9: ...gent and a rinse aid ALWAYS make sure to check the specifications of the product and whether or not it is a combined product Check if the detergent used is appropriate for the water hardness and the dishwasher Observe all instructions on packaging when using such products If such detergents are in the form of tablets DO NOT put them into the interior section or the cutlery basket of the dishwasher...

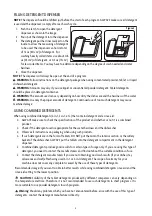
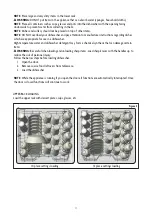
Page 10: ...tems as pots with long handles pot lids plates and cutlery sets into the lower rack The upper rack has been designed for smaller items such as dessert plates salad bowls cups and glasses When placing long stem glasses and goblets lean them against the basket edge rack or glass supporter not against other items to prevent damage It is more appropriate to locate thinner parts towards the middle sect...

Page 11: ...opriate for use in a dishwasher High temperature water and dishwasher detergent may form a chemical synthesis that can damage certain items WARNING Be careful when loading and unloading sharp items Load sharp knives with the handles up to reduce the risk of personal injury Follow the below steps before loading dishwasher 1 Open the door 2 Remove coarse food leftovers from tableware 3 Load the dish...

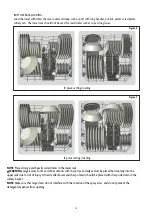
Page 12: ... place settings loading NOTE Place all large and heavily soiled items in the lower rack WARNING Large knives forks and other utensils with sharp tips and edges must be placed horizontally into the upper rack due to risk of injury Other smaller knives and sharp utensils should be placed with sharp side down in the cutlery basket NOTE Make sure that large items do not interfere with the rotation of ...

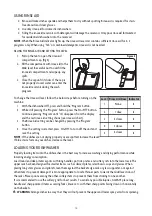
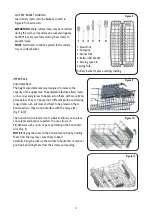
Page 13: ... are designed to increase the capacity of the upper rack The adjustable feature allows items such as cups and glasses to be placed on them with more items place below They can be used in 2 different positions allowing longer items such as knives and forks to be placed on them horizontally so they do not interfere with the spray arms Fig 9 10 The horizontal wire located on top basket allows you to ...

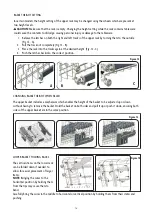
Page 14: ... Fig 12 C 4 Push the latches back into the correct position A B C Figure 12 CHANGING BASKET HEIGHT WHEN FILLED The upper basket includes a mechanism which enables the height of the basket to be adjusted up or down without having to remove the basket Hold the basket on both sides and pull it up or push it down ensuring both sides of the upper basket are in the same position Figure 13 LOWER BASKET F...

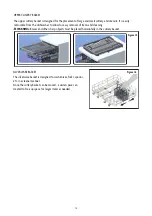
Page 15: ...free up space for larger items as needed Figur Figure Figure 16 UPPER CUTLERY BASKET The upper cutlery basket is designed for the placement of large and small cutlery and utensils It is easily removable from the dishwasher to allow for easy removal of items and cleaning WARNING Knives and other sharp objects must be placed horizontally in the cutlery basket Figure 15 15 ...

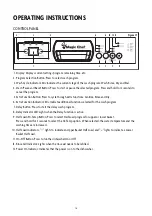
Page 16: ...7 Delay Button Press to start the delay wash program 8 Delay Indicator LED Lights when the Delay function is active 9 Half Load Hi Temp Button Press to select Half Load program for upper or lower basket Press and hold for 3 seconds to select the Hi Temp option When selected the water temperature and the washing time are increased 10 Half Load Indicators lights to indicate an Upper Basket Half Load...

Page 17: ...nd hold the Half Load Hi Temp button for 3 seconds to select Half Load Function Washes either the upper or lower basket Use when there aren t enough dishes to fill the dishwasher To add an Extra function to the wash program 1 Choose the desired wash program 2 Press the Extra button The LEDs indicating any selected Extra functions will be lit 3 Press the Half Load Hi Temp button to select Half Load...

Page 18: ...first and then open the door To continue to the washing program close the door and press Start Pause button NOTE Program and extra functions cannot be changed once the program has started CANCELLING THE WASH PROGRAM To cancel the wash program after it has started Press and hold the Program Cancel button for 3 seconds The display will show 1 and the dishwasher will perform any functions necessary f...

Page 19: ...r daily regular or typical use to completely wash a load of normally soiled dishes Program automatically adjusts the temperature and the quantity of water the energy consumption and the program duration Suitable for heavily soiled dishes Suitable for lightly soiled delicate dishes Suitable for normally soiled daily dishes with faster program Suitable to rinse dishes that you plan to wash later Com...

Page 20: ...ime may accumulate in the machine s washing section In case of such accumulation fill the detergent compartment without loading any dishes into the machine select a program that runs at high temperature and start the machine If this is not sufficient to clean the interior use specialized dishwasher cleaning solutions and follow the directions of that product Clean the door seal regularly to remove...

Page 21: ...ntact as the silver can become discolored Porcelains and glassware with decorations and hand painted utensils may lose their color and patterns due to the high temperatures Check with manufacturer for recommendations Aluminum can turn dark in the dishwasher due to the heat the detergent used or certain minerals in your water Do not wash sponges or dish cloths in dishwasher Do not wash materials su...

Page 22: ... until the program is finished Machine stops during washing Power failure Check mains power Water inlet failure Check water tap Shaking and hitting noises are heard during a wash operation The spray arm is hitting the dishes in the lower basket Move or remove items blocking the spray arm Partial food wastes remain on the dishes Dishes placed incorrectly sprayed water not reaching affected dishes D...

Page 23: ...e Divisor position error Contact for service Faulty heater sensor Contact for service High voltage failure Contact for service FAULT CODES FF F5 F3 F2 F8 F1 FE F7 F9 F6 HI ADDITIONAL INFORMATION AND TIPS 1 When the unit isn t in operation Disconnect the plug and close the tap Leave the door slightly open to prevent odor formation 2 Select the dry option to remove standing water droplets 3 Place di...

Page 24: ... service technician is not available The removal and reinstallation of your appliance if it is installed in an inaccessible location or is not installed in accordance with published installation instructions Refunds for non repairable products are limited to the price paid for the unit per the sales receipt This warranty is non transferable This warranty applies only to the original purchaser and ...

Page 25: ...24 CNA International Inc d b a MC Appliance Corporation All rights reserved Magic Chef logo is a registered trademark of CNA International Inc www mcappliance com Printed in Turkey ...

Reviews: