background image

S M A R T .   V E R Y   S M A R T .

User guide

DVD Micro System

MME239

Thank you for choosing

Magnavox.

Need help fast?

Read your Quick Use Guide and/or

Owner's Manual first for quick tips

that make using your Magnavox product

more enjoyable.

If you have read your instructions

and still need assistance,

you may access our online help at

www.magnavox.com/usasupport

or call

1-800-705-2000

while with your product

(and Model / Serial number)

STOP

Magnavox vous remercie de

votre confiance.

Besoin d'une aide

rapide?

Le Guide d'utilisation rapide et

Manuel de l'utilisateur regorgent

d'astuces destinées à simplifier

l'utilisation de votre produit Magnavox.

Toutefois, si vous ne parvenez

pas à résoudre votre problème,

vous pouvez accéder à

notre aide en ligne à l'adresse

www.magnavox.com/usasupport

ou formez le

1-800-705-2000

Veillez à avoir votre produit à

portée de main

(et model / serial nombre)

ARRÊ

T

Gracias por escoger Magnavox.

Necesita ayuda

inmediata?

Lea primero la Guía de uso rápido o el

Manual del usuario, en donde encon-

trará

consejos que le ayudarán a disfrutar

plenamente de su producto Magnavox.

Si después de leerlo aún necesita ayuda,

consulte nuestro servicio de

asistencia en línea en

www.magnavox.com/usasupport

o llame al teléfono

1-800-705-2000

y tenga a mano el producto

(y número de model / serial)

ALTO

pg001-pg020-MME239_37_Eng-1

31/7/06, 9:27

1

Summary of Contents for MME239 - Micro DVD Home Theater System

Page 1: ...tilisateur regorgent d astuces destin es simplifier l utilisation de votre produit Magnavox Toutefois si vous ne parvenez pas r soudre votre probl me vous pouvez acc der notre aide en ligne l adresse...

Page 2: ...cias perjudiciales en la recepci n de radio o television que se puede identificar encendiendo y apagando el aparato recomendamos al usuario que intente solucionar las interferencias siguiendo una o m...

Page 3: ...REMOVE COVER OR BACK NO USER SERVICEABLE PARTS INSIDE REFER SERVICING TO QUALIFIED SERVICE PERSONNEL Visit our World Wide Web Site at http www magnavox com usasupport Congratulations on your purchase...

Page 4: ...4 IMPORTANT SAFETY INSTRUCTIONS Class II equipment symbol This symbol indicates that the unit has a double insulation system Clean only with dry cloth materials...

Page 5: ...NCI N El uso de mando o ajustes o la ejecucci n de m todos que no sean los aqu descritos puede ocasionar peligro de exposici n a radiaci n This product incorporates copy right protection technology th...

Page 6: ...ng the OSD Language Setting the Audio Subtitle and Disc Menu language Basic Functions Switching the system on off 21 Power saving automatic standby 21 Volume control 21 Sound Control 21 DBB Dynamic Ba...

Page 7: ...Manual programming 32 Automatic programming 32 Listening to preset radio stations 32 Deleting a preset radio station 32 Clock Timer Viewing clock 33 Setting clock 33 Setting wake up timer 33 Setting...

Page 8: ...Rating Level Sleep Wake upTimer Enables the system to switch on off automatically at a preset time Progressive Scan Provides high quality flicker free images for film based sources When a picture ref...

Page 9: ...ht directly from a cold to a warm location or is placed in a very damp room moisture may condense on the lens of the disc unit inside the system Should this occur the CD player would not operate norma...

Page 10: ...lower than the speakers supplied Please refer to the SPECIFICATIONS section of this manual Step 1 Placing speakers and subwoofer For best possible surround sound locate your speakers and subwoofer as...

Page 11: ...rogressive Scan function see Getting Started Setting up Progressive Scan feature If yourTV does not support Progressive Scan you will not be able to view the picture Turn off progressive scan in PROGR...

Page 12: ...e RF modulator Use the RF coaxial cable not supplied to connect the RF modulator to yourTV s RF jack Connections Using S Video In jack Use the S Video cable not supplied to connect the system s S VIDE...

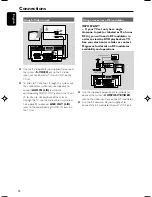
Page 13: ...SITEVIDEO jack to theVIDEO IN jack on theVCR 4 Connect the system s LINE OUT R L jacks to the AUDIO IN jacks on theVCR This will allow you to make analog stereo two channel right and left recording To...

Page 14: ...the system s COAXIAL OUT digital out jack to the DIGITAL IN jack on a digital recording device DTS DigitalTheater System compatible with a Dolby Digital decoder for example Before operation set COAXIA...

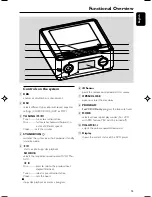
Page 15: ...terrupts disc playback SOURCE selects the respective sound source DVD FM or AUX Disc press to skip to the previous next chapter title track Tuner selects a preset radio station Clock sets the hours 9...

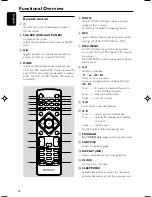
Page 16: ...POP 7 DISC MENU DVD VCD enters or exits the disc contents menu ForVCD with PBC feature PBC must be turned on MP3 WMA JPEG switches on or off the album picture menu 8 OK confirms a selection 4 3 5 6 se...

Page 17: ...menu 9 stops disc playback or erases a program VOL adjusts the volume upward downward Numeric Keypad 0 9 inputs a track title chapter number of the disc GOTO fast searches in a disc by entering a tim...

Page 18: ...properly Getting Started Step 2 Setting up theTV IMPORTANT Make sure you have completed all the necessary connections See ConnectingTV 1 Switch the DVD system on and then select DISC source See Switch...

Page 19: ...rogressive scan feature you must ensure 1 YourTV can accept progressive signals a progressive scanTV is required 2 You have connected the DVD player to your TV usingY Pb Pr see ConnectingTV set 1 Turn...

Page 20: ...gressive scan In this case turn off progressive scan as described in To deactivate Progressive manually Press SYSTEM MENU on the remote to exit the system menu The setup is complete now and you can st...

Page 21: ...er standby and normal standby Power saving automatic standby As a power saving feature the system will automatically switch to Standby mode if you don t press any button within 30 minutes in the stop...

Page 22: ...s DVDs Video CDs VCDs SuperVideo CDs SVCDs Digital Versatile Discs Recordable DVD R DigitalVersatile Discs Rewritable DVD RW Compact Discs CDs MP3 disc on CD R W Supported sampling frequencies 32kHz 4...

Page 23: ...on the display such as allowing you to select favourite songs To switch PBC on or off 1 In disc mode press SYSTEM MENU The menu bar will appear across the top of theTV screen 2 Press 4 3 keys on the...

Page 24: ...A B REPEAT ForDVDs VCD CD MP3 During playback press repeatedly MODE on the system to choose desired repeat play modes ForVCD with PBC feature PBC must be turned off first TV screen shows the play mod...

Page 25: ...m up to 99 desired tracks for playback in the desired sequence If you like store any track chapter title more than once 1 During playback press 9 twice to fully stop the playback 2 Press PROGRAM to ac...

Page 26: ...EO SUBTITLE DVD only Press repeatedly SUBTITLE on the remote control to select different subtitle languages The feature is disc dependant Playing aTitle DVD only 1 During playback press DISC MENU on t...

Page 27: ...in the menu and press AUDIO MP3 is selected appears on theTV 3 Use 3 4 keys to select a picture file then press OK 4 To stop simultaneous playback press 9 The picture and MP3 music playback will stop...

Page 28: ...al p RightVocal p Mono Left p Mono Right p Stereo x Slow The slow motion speed will display Press 4 repeatedly to select a reverse or forward slow motion speed To cancel the slow function press 2 STAT...

Page 29: ...screen saver will be activated OFF Screen saver is disabled Using the setup menu user preference settings This DVD setup is carried out via yourTV set enabling you to customize the DVD System to suit...

Page 30: ...press to exit test tone mode at any time DVD Menu Operations Changing the password You can change the four digit code used as Password 1 In disc mode press SYSTEM MENU 2 Select icon and press 4 Playba...

Page 31: ...ect will not play unless you enter your four digit password or choose a higher level rating Select No Parental to deactivate Parental level and have all discs play 5 6 Press SYSTEM MENU again to remov...

Page 32: ...e radio station PRG disappears on the display Repeat steps 1 4 to store other radio stations Helpful hints You can erase a preset station by storing another frequency in its place Tuner Autostore auto...

Page 33: ...iously set timer 1 In standby mode press and hold SLEEP TIMER on the remote for more than five seconds to enter timer setting mode The current source and timer digits flash on the display panel NOTIME...

Page 34: ...stem PAL NTSC Video Format 4 3 16 9 Video S N 56 dB minimum CompositeVideo Output 1 0Vp p 75 S Video Output Y 0 714Vp p 75 C 0 286Vp p 75 Audio DAC 24 Bits 96 kHz Specifications MAIN UNIT Power Supply...

Page 35: ...ote Set yourTV to the correctVideo In channel This channel is usually near channel 00 Or you may have a button on theTV remote control that selects Auxiliary or A V IN channel See yourTV owner s manua...

Page 36: ...e press or on the remote to resume normal play mode Insert a readable disc with the playback side facing down Check the disc type colour system and regional code Check for any scratches or smudges on...

Page 37: ...lect the correct source DISC or AUX for example before pressing the function button Point the remote control at the remote sensor of the unit Reduce the distance to the player Remove any possible obst...

Page 38: ...r CD RW can contain about 10 times as much data volume as a regular CD can Multichannel DVD is specified to have all sound tracks constitute one sound field Multichannel refers to a structure of sound...

Page 39: ...overy or reinstallation of programs data or other information is not covered under this Limited Warranty This warranty does not apply a to damage caused by accident abuse misuse misapplication or non...

Reviews: