background image

Graco Inc. P.O. Box 1441 Minneapolis, MN 55440-1441

www.graco.com

Copyright 2003

Graco Inc. is registered to I.S. EN ISO 9001

309797P

Repair

Interior Texture Sprayers

TexFinish™

U.S. patent D526,045

For Water-Based Materials Only

Models: 246185, 246186, 249175, 249176

55 psi (3.79 bar) Maximum Fluid Working Pressure

Related Manuals

Read warnings and instructions.

309584

309796

ti3157b

US

C

Conforms to ANSI/UL
standard 1450

Summary of Contents for TexFinish 246185

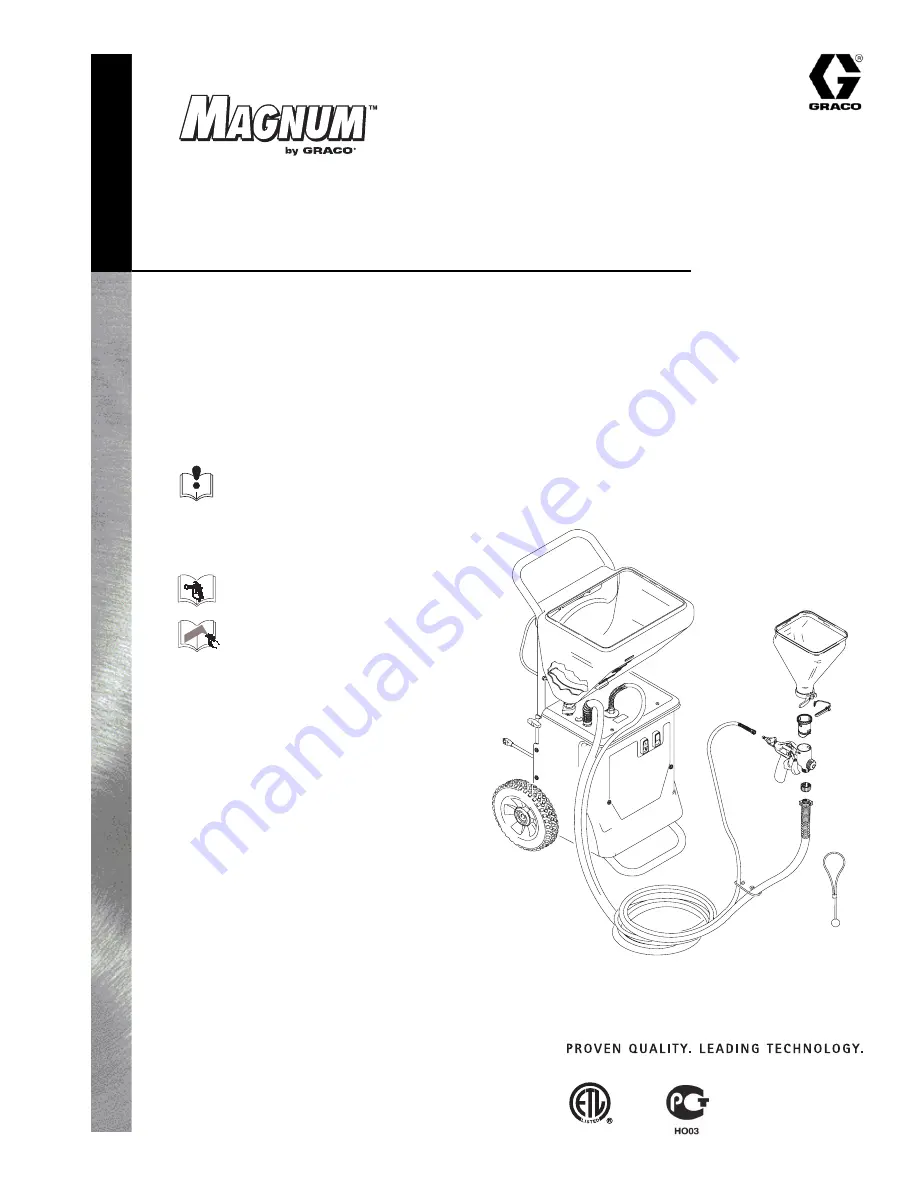
Page 1: ...I S EN ISO 9001 309797P Repair Interior Texture Sprayers TexFinish U S patent D526 045 For Water Based Materials Only Models 246185 246186 249175 249176 55 psi 3 79 bar Maximum Fluid Working Pressure Related Manuals Read warnings and instructions 309584 309796 ti3157b US C Conforms to ANSI UL standard 1450 ...

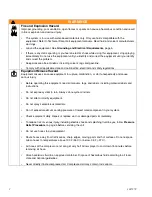
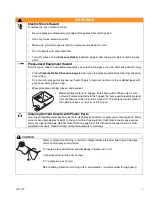
Page 2: ...lfunction or start unexpectedly and cause serious injury Before operating this equipment read all manuals tags and labels including material labels and instructions Do not expose system to rain Always store system indoors Do not alter or modify equipment Do not spray cementcious materials Do not exceed maximum working pressure of lowest rated component in your system Check equipment daily Repair o...

Page 3: ...per install burp guard When only a small amount of material remains in the hopper the burp guard prevents material from shooting out when the unit is turned off This material could splash in the operator s eyes or on skin or into the air Cleaning Solvent Hazard with Plastic Parts Use only compatible water based solvents to clean plastic structural or pressure containing parts Many solvents can deg...

Page 4: ...se plug D Hopper gun spray gun selector switch S Gun plug E ON OFF switch T Material thickness gauge F Air Compressor inside U Nozzle G Material air hose W Gun air valve H Mesh nozzle holding bag Y Burp guard J Texture spray gun manual 309584 aa Hopper fitting fluid inlet K Material Hopper bb Hopper clamp L Graco RotoFlex pump inside cc Hose clip M Hose rack cord wrap dd Gun plug clip N Touch up h...

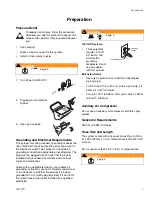
Page 5: ...ing instructions are not completely understood or if in doubt as to whether the product is properly grounded Do not modify plug provided if it will not fit the outlet have proper outlet installed by a qualified electrician 120V AC Systems This equipment requires a 120V AC 60 Hz 15A circuit with a grounding receptacle Do not use an adapter with this product Extension Cords Use only an extension cor...

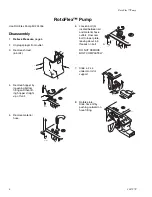
Page 6: ...itting and then lift ing hopper straight up off unit 5 Remove material hose 6 Loosen bolt A located between air and material hose outlets Unscrew bolt to lower plate leaving about 4 5 threads on bolt DO NOT REMOVE BOLT COMPLETELY 7 Slide a 2 x 4 under motor for support 8 Rotate plate Slide hose off by pushing outward on hose fitting 1 2 3 4 5 6 ti3162a ti3118a ti3132a ti3083a A ti3124a ti3119a ...

Page 7: ...se 3 Align dots located on hose fitting making sure they are facing each other at all times to ensure the hose does not twist during reinstallation 4 Reposition plate aligning hex fittings with enclosure openings 5 Remove 2 x 4 support under motor 6 Tighten bolt As bolt is tightened the plate will snug back into place 7 Replace shroud 6 bolts 8 Replace hopper 9 Break in new pump by running dry or ...

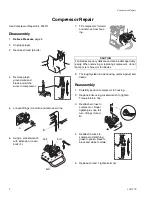
Page 8: ...inside housing removing dust and debris Reassembly 1 Carefully position compressor in housing 2 Replace bolts using socket wrench to tighten Torque to 85 in lbs 3 Reattach air lines to compressor Finger tighten plus one full turn fittings A and B 4 Reattach 3 wires to compressor matching green to green black to black and white to white 5 Replace shroud Tighten bolts 6 1 2 3 4 5 6 ti3162a ti3022a t...

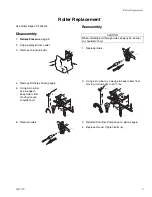
Page 9: ...crow bar as a wedge to keep rollers from moving loosen shoulder bolt 6 Remove rollers Reassembly 1 Replace rollers 2 Using a crow bar as a wedge to keep rollers from moving torque bolts to 40 ft lbs 3 Reinstall RotoFlex Pump hose on plate page 6 4 Replace shroud Tighten bolts 6 1 2 3 5 6 ti3162a ti3026a ti3031a CAUTION When installing bolt through roller keep nylon washer on shoulder of bolt ti303...

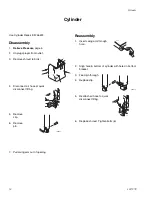
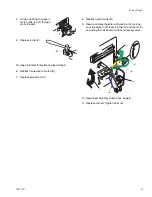
Page 10: ...se at quick disconnect fitting 5 Remove clip 6 Remove pin 7 Pull swing arm out of opening Reassembly 1 Insert swing arm through hole 2 Align hole in bottom of cylinder with holes in bottom bracket 3 Feed pin through 4 Replace clip 5 Reattach air hose to quick disconnect fitting 6 Replace shroud Tighten bolts 6 1 2 3 4 5 6 ti3162a ti3085a ti3086a TI2851A ti3087a TI2852A ...

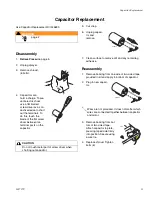
Page 11: ...paci tor and remove 7 Clean surface to remove dirt and any remaining adhesive Reassembly 1 Remove backing from one side of two sided tape provided in kit and apply to bottom of capacitor 2 Plug in new capaci tor 3 Remove backing from bot tom of two sided tape Attach capacitor to plate pressing taped side firmly into position Secure using a wire tie 4 Replace shroud Tighten bolts 6 WARNING page 2 C...

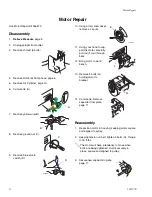
Page 12: ...rt the motor carefully pull rod F out through back 12 Bring motor to work bench 13 Remove 4 bolts G holding motor to bracket 14 Cut wire tie Remove capacitor from plate page 11 Reassembly 1 Reposition motor in housing keeping motor square and aligned to pulley 2 Keeping tension on belt tighten 4 bolts G Torque to 15 ft lbs 3 Secure new capacitor to plate page 11 1 2 3 4 5 6 ti3162a A TI2854A B TI2...

Page 13: ...Step 9 6 Reattach blue wire to switch D 7 Replace ground nut C 8 Reattach yellow wire B 9 Secure all wires together with wire tie A making sure the wires to not touch air line H and the motor can swing the full travel I without stressing wires 10 Reconnect RotoFlex Pump hose page 6 11 Replace shroud Tighten bolts 6 TI2861A F ti308 E H C I ti3117a A B D ...

Page 14: ...olts 4 Loosen nuts A and B 5 Disconnect air hose at fitting 6 Carefully drill out rivets 7 Pull cooler out of hous ing Reassembly 1 Install cooler in housing 2 Rivet or use fasten ers in place 3 Reconnect tubing Torque nuts A and B one full turn beyond hand tight 4 Replace shroud Tighten bolts 6 1 2 3 4 5 6 ti3162a ti3128 A B ti3096a ti3097a ...

Page 15: ...w on top of unit 5 Remove air lines 6 Pull air manifold down through inside of housing 7 Disconnect air hose at quick disconnect fitting Reassembly 1 Reattach air hoses at quick disconnect fitting 2 Slide air manifold back into position inside housing 3 Replace screw on top of unit torque to 30 in lbs 4 Replace shroud Tighten bolts 6 1 2 3 4 5 6 ti3162a ti2736a TI3093a TI3098a ti3094a ...

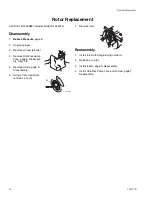
Page 16: ... 6 bolts 4 Remove RotoFlex pump hose page 6 Disassem bly steps 4 8 5 Remove rollers page 9 Disassembly 6 Using a flat screwdriver remove c clip A 7 Remove rotor Reassembly 1 Install rotor with flange facing outward 2 Replace c clip A 3 Install rollers page 9 Reassembly 4 Install RotoFlex Pump hose and shroud page 7 Reassembly 1 2 3 4 5 6 ti3162a TI3099a A TI2868A ...

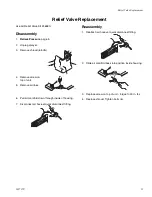
Page 17: ...ate rial Thickness Gauge Loose fittings Check and retighten all fittings Plugged gun Relieve Pressure page 5 Remove gun from hose Clean gun RotoFlex pump worn out Replace hose Recommended hose replacement once a year or every 3000 gallons Pump cold or material frozen in pump Move pump to warm room and allow it to warm up or run hot water through sprayer Motor start capacitor failure Replace capaci...

Page 18: ... sputtering Hopper connection not tight Check gasket TIghten connection Debris in system Clean Quick disconnect does not stay con nected Dirty or corroded fitting Clean thoroughly Soak in oil Apply a few drops of light oil Gun will not shut off Worn nozzle or needle Relieve Pressure page 5 Replace worn parts Debris in needle passage Relieve Pressure page 5 Clean Fluid leaking at Flow Adjustment Nu...

Page 19: ...Air Diagram ELECTROLYTIC CAPACITOR BLACK BLACK BLUE YELLOW GROUND GREEN GREEN BLACK BLACK WHITE WHITE BLACK GREEN ti3120a POWER SWITCH SELECTOR SWITCH AIR COMPRESSOR POWER CORD MOTOR AIR COMPRESSOR AIR CYLINDER AIR COOLER AIR MANIFOLD TI3179a ...

Page 20: ...Parts 20 309797P Parts E D WL H F F D 3DJH 81 ...

Page 21: ...d 1 23 234157 KIT RotoFlex pump 1 27 113415 SCREW mach torx pan hd 1 34 15B865 SHIELD 1 36 234148 KIT hose 1 36a 248930 KIT quick disconnect 1 38 234217 GUN texture manual 309584 1 39 246316 HOPPER 6 gallon 1 39a 15B676 STORAGE nozzle 1 39b 15B990 GUARD burp 1 39c 115099 GASKET 1 52 15B823 TUBE air 1 57 15B822 TUBE air 1 59 290228 LABEL caution 1 60 15B889 LABEL 1 63 234222 HOPPER texture 75 gal 1...

Page 22: ...22 309797P WL F 3DJH ...

Page 23: ...1 195367 SPACER 2 32 15B585 HARNESS wiring 1 33 117727 CLIP wire 3 35 234211 KIT compressor air includes 54 1 37 15B507 CORD set power model 246185 246186 1 15F404 CORD set power model 249175 249176 41 117672 BELT GT2 3mm 1 44 101134 RING retaining ext 1 45 101242 RING retaining ext 2 46 117671 PIN clevis 1 47 117668 PIN cotter bow tie 1 48 115498 SCREW mch hx wash hd 1 49 15B783 SHIELD spray 1 50...

Page 24: ...24 309797P ...
Page 25: ...or motor Universal AC 10 5A Power Cord 14 AWG 3 wire 25 ft model 249175 249176 16 AWG 3 wire 25 ft model 246185 246186 Material hopper capacity 6 gallons Gun material hopper 3 4 gallon Maximum delivery with texture 0 75 gpm 2 8 lpm Dimensions Length 23 in 584 mm with handle Width 23 in 584 mm Height 39 in 991 mm Weight Without hoses or gun 75 lb 34 kg Wetted parts brass aluminum plastic Sound data...

Page 26: ...QUENTIAL LOSS DAMAGE OR EXPENSE OF ANY KIND WHETHER FROM BREACH OF THIS WARRANTY OR ANY OTHER REASON Some states do not allow the exclusion or limitation of incidental or consequential damages so the above limitation or exclusion may not apply to you To make a claim under this warranty return the product with proof of purchase transportation prepaid to any Authorized Graco Service Center Graco s A...

Reviews: