
Atomic Alarm Clock with
Temperature & Date, 6 Time Zones
Model: CL030051WH - CL030051BK
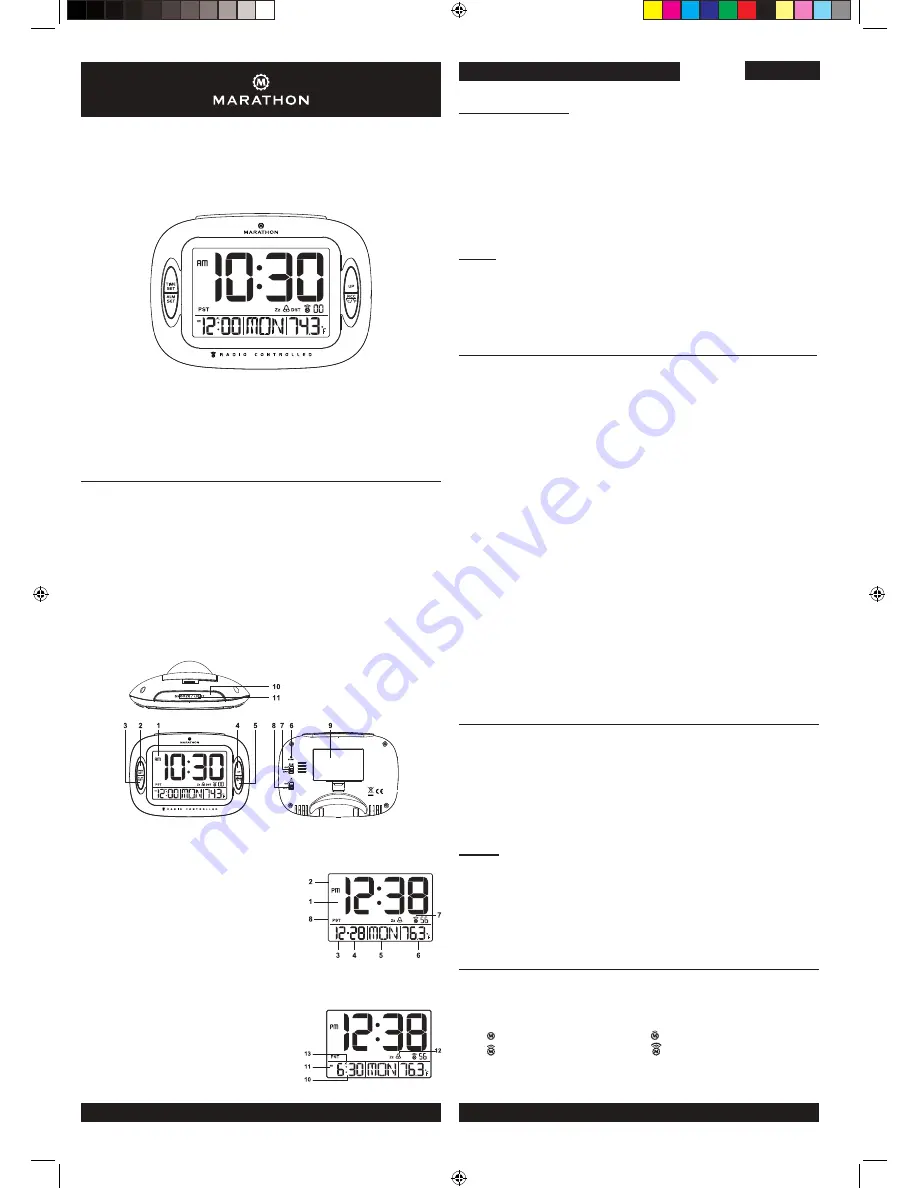
PRODUCT DESCRIPTION
1. LCD display
2.
[ TIME SET ]
button
3.
[ ALARM SET ]
button
4.
[ UP ]
button
5.
[ RCC / °C/°F ]
button
6.
[ RESET ]
button
7.
[ ALARM ON/OFF ]
slide switch
8.
[ NIGHT LIGHT ON/OFF ]
slide switch
9. Battery compartment door
10.
[ SNOOZE/LIGHT ]
button
11. Night-light sensor
DISPLAY
Normal time mode
1. Normal Time
2. AM/PM
3. Month
4. Date
5. Day of the week
6. Temperature
7. Signal strength indication
8. Time zone ( PST/MST/CST/EST/AST/NST )
Alarm time mode
10. Alarm time
11. AM/PM
12. Alarm on/Snooze
13. Alarm mode
GETTING STARTED
- Remove the battery door.
- Install 3 new AAA size batteries as per the polarity information
marked in the battery compartment.
- Once the batteries are installed, the full segments of the LCD will
be shown before entering the radio controlled time reception mode.
- The radio controlled (RC) clock will automatically start scanning for
the radio controlled (RC) time signal within 8 seconds.
NOTE:
If no display appears on the LCD after inserting the batteries, press the
[ RESET ]
button by using a pointed instrument. In some cases, you
may not receive the signal immediately. Due to atmospheric disturbances,
the best reception often occurs during nighttime.
RECEPTION OF WWVB RADIO SIGNAL
- The unit must receive the WWVB Radio Signal to automatically set
the time, date and day of the week.
- The unit automatically starts the WWVB signal search after replacing or
inserting batteries, as indicated by the flashing "signal tower" icon.
- Everyday at 2:00 am, the unit automatically carries out the
synchronization procedure with the WWVB signal to correct any
deviations to the exact time. If the attempt is not successful, the
"signal tower" icon will disappear from the display and the unit will
automatically attempt synchronization at 3:00 am. This procedure
is repeated automatically again at 4:00 am if necessary.
- Each synchronization process will take between 3 to 16 minutes,
depending on the signal strength received. If no signal is detected,
the unit will automatically exit the process in 6 minutes.
- Once the unit is synchronized successfully to the WWVB signal,
the "signal tower" icon will be turned on until 2:00 am of the following day.
- The unit also conducts periodic checking of WWVB radio signals
at 8:00 am, 2:00 pm, and 8:00 pm. Any successful attempts to connect
at these hours will lead to the display of the "signal tower" icon until
2:00 am, the following day.
- To manually start the WWVB signal reception, press the
[ RCC / °C/°F ]
button. Cancel the process by pressing the
[ RCC / °C/°F ]
button.
SETTING TIME ZONE
Your clock is designed to display time for different time zones. Please
refer to the Manual Clock setting to set your desired time zone in
the following order:
PST: Pacifi c MST: Mountain
CST: Central EST: Eastern
AST: Atlantic NST: Newfoundland
NOTE:
After selecting the time zone, the "signal tower" icon will be turned
off as the unit is no longer synchronized to WWVB radio signal. User
may press the
[ RCC / °C/°F ]
button to re-start the synchronization
process, or let the clock automatically carry out the synchronization
procedures daily starting at 2:00 am.
SIGNAL STRENGTH INDICATOR
The signal indicator displays signal strength in 4 levels. Wave
segment fl ashing means the time signal is being received. The signal
quality is classified into 4 types:
No signal
Weak signal quality
Acceptable signal quality Excellent signal quality
If the RC clock receives the signal successfully, the signal tower icon
Thank you for purchasing this radio controlled atomic clock.
The utmost care has gone into the design and manufacture of your
clock. Please read the instructions carefully and keep this manual for
future reference.
MANUAL
ENGLISH
1
C8245B-PD15425M Marathon A4_01.29.2016.indd 1
2016-02-01 1:22 PM


