background image

Originalbetriebsanleitung

Farb-spritzpistole 

D

SG 650

Art.-Nr.: 240.100.210

Translation of the original 

instructions

Colour spray gun  

GB

Originální návod

stříkací pistole

CZ

Summary of Contents for SG 650

Page 1: ...Originalbetriebsanleitung Farb spritzpistole D SG 650 Art Nr 240 100 210 Translation of the original instructions Colour spray gun GB Originální návod stříkací pistole CZ ...

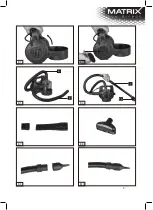
Page 2: ...2 B1 B2 a c b 1 2 12 3 7 13 4 5 6 8 14 11 9 ...

Page 3: ...3 B3 B4 B5 B6 B7 B8 B9 B10 d 6 5 7 14 ...

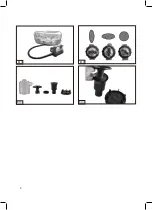
Page 4: ...4 B11 B12 B14 B13 ...

Page 5: ...ften 2 Technische Daten Allgemein Nennspannung 230 240 V Nennfrequenz 50 Hz Nennleistung 650 W Schutzklasse II Behälter Füllmenge max 800 ml air consumption 1 3m3 min water consumption 180ml min Düse 2 5 mm Gewicht ca 1 4 kg Schall Schalldruckpegel LpA 83 2 dB A Schallleistungspegel LWA 96 2 dB A Unsicherheit K 3 dB Vibration Hand Arm Vibration ah 2 1 m s Unsicherheit K 1 5 m s Hinweis Die angegeb...

Page 6: ...ng der Sicherheitshinweise und Anweisungen können elektrischen Schlag Brand und oder schwere Verletzungen verursachen Bewahren Sie alle Sicherheitshinweise und Anweisungen für die Zukunft auf Der in den Sicherheitshinweisen verwendete Begriff Elektrowerkzeug bezieht sich auf netzbetriebene Elektrowerkzeuge mit Netzkabel und auf akkubetriebene Elektrowerkzeuge ohne Netzkabel 3 1 1 Arbeitsplatzsiche...

Page 7: ...men oder tragen Wenn Sie beim Tragen des Elektrowerkzeuges den Finger am Schalter haben oder das Elektrowerkzeug eingeschaltet an die Stromversorgung anschließen kann dies zu Unfällen führen 4 Entfernen Sie Einstellwerkzeuge oder Schraubenschlüssel bevor Sie das Elektrowerkzeug einschalten Ein Werkzeug oder Schlüssel der sich in einem drehenden Geräteteil befindet kann zu Verletzungen führen 5 Ver...

Page 8: ...e dieses Elektrowerkzeug nicht zum Sprühen brennbarer Stoffe Sprühen Sie nur Stoffe deren Flammpunkt über 21 C liegt 2 Reinigen Sie dieses Elektrowerkzeug nicht mit brennbaren Lösungsmitteln 3 Beachten Sie alle Gefahren die von dem zu sprühenden Material ausgehen Berücksichtigen Sie alle Aufschriften auf dem Behälter oder die vom Hersteller des zu sprühenden Materials mitgelieferten Informationen ...

Page 9: ...chs sauber Entfernen Sie gegebenenfalls Verschmutzungen von den Lüftungsöffnungen 8 Richten Sie den Strahl nicht auf Personen Tiere aktive elektrische Ausrüstung oder auf das Gerät selbst Vermeiden Sie den direkten Hautkontakt mit dem Sprühmaterial 9 Sprühen Sie mit diesem Elektrowerkzeug niemals mit lösungsmittelhaltigen Flüssigkeiten oder unverdünnten Säuren und Lösungsmittel wie z B Benzin Farb...

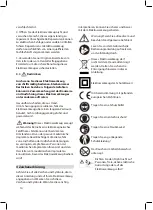
Page 10: ...tive oder passive medizinische Implantate beeinträchtigen Um die Gefahr von ernsthaften oder tödlichen Verletzungen zu verringern empfehlen wir Personen mit medizinischen Implantaten ihren Arzt und den Hersteller vom medizinischen Implantat zu konsultieren bevor das Elektrowerkzeug bedient wird 4 Zeichenerklärung Achten Sie auf alle Zeichen und Symbole die in dieser Anleitung und auf Ihrem Elektro...

Page 11: ...her dass diese frei von Staub Fett und anderen Verschmutzungen und trocken ist 2 Decken Sie Bereiche die nicht besprüht werden sollen mit einer geeigneten Folie oder Ähnlichem sorgfältig ab 3 Rühren Sie das Sprühmaterial gut durch Es darf keine Klümpchen oder Fremdkörper enthalten Bereiten Sie das Material gegebenenfalls wie weiter unten erklärt vor 7 3 Viskosität Die meisten Farben und Lacke sind...

Page 12: ...nete Steckdose an Beachten Sie dazu die technischen Daten 8 Arbeiten mit dem Elektrowerkzeug 8 1 Funktionsweise Der Pistolenteil des Elektrowerkzeuges saugt das Sprühmaterial durch das Ansaugrohr aus dem Behälter 12 und spritzt diese dann unter Hochdruck aus der Düse 8 2 Montage und Vorbereitung 1 Befestigen Sie die Spritzpistole an einem Ende des Schlauchs und schließen Sie das andere Ende an den...

Page 13: ...n waschen Sie bitte die Filter den Behälter die Rohre und die Arbeitsköpfe Lassen Sie diese vor dem nächsten Einsatz an der Luft trocknen Sie können die gesamten Behälterteile lagern Achten Sie beim Abnehmen der Einlassabdeckung Teil e auf den Filter Teil f und bringen Sie die Abdeckung wieder an damit die Spritzpistole und das Gebläse funktionieren Achtung Kein Spielzeug Außer Reichweite von Kind...

Page 14: ...hälter mit dem geeigneten Reinigungs oder Verdünnungsmittel und sprühen Sie solange mit der Spritzpistole bis diese sauber ist Wischen Sie die Außenseite der Spritzpistole mit einem gut ausgewrungenen Lappen ab den Sie vorher in das geeignete Reinigungs oder Verdünnungsmittel getaucht haben Schrauben Sie die Düse von der Spritzpistole los und reinigen Sie diese mit dem geeigneten Reinigungs oder V...

Page 15: ...eshalb über geeignete Sammelsysteme oder senden Sie das Gerät zur Entsorgung an die Stelle bei der Sie es gekauft haben Diese wird dann das Gerät der stofflichen Verwertung zuführen schützen 3 Lagern Sie das Elektrowerkzeug immer außerhalb der Reichweite von Kindern an einem gut belüfteten und trockenen Ort 4 Schalten Sie das Elektrowerkzeug immer aus bevor Sie es transportieren 5 Tragen Sie das E...

Page 16: ...er level LWA 96 2 dB A Uncertainty K 3 dB Vibration Hand arm vibration ah 2 1 m s Uncertainty K 1 5 m s Note The stated sound and vibration values have been determined according to the EN 60745 1 standards Note The given vibration value has been determined according to a standardised test procedure and can be used to compare different power tools with each other In addition this value can be used ...

Page 17: ...When being distracted you may lose control over the power tool 3 1 2 Electric Safety 1 The connection plug of the power tool must fit into the power socket The plug may in no way be modified Do not use adapters in combination with earthed power tools Unmodified plugs and matching power sockets reduce the risk of an electric shock 2 Avoid physical contact to earthed surfaces such as tubes heatings ...

Page 18: ...power socket and or remove the battery before setting the device changing accessory parts or putting the power tool away This precautionary measure prevents the power tool from being switched on accidently 4 Keep unused power tool out of the reach of children Do not let persons use the power tool who are not familiar with using it or who have not read these instructions Power tools are dangerous i...

Page 19: ...ve been prepared according to the viscosity table in order to avoid injuries and damages 2 Never allow children and persons who are not familiar with using the power tool to use this power tool Regional guidelines may give age limitation for the user 3 Consider the work environment Do not use this power tool in flammable and explosive atmospheres Never point the spray jet towards a naked flame and...

Page 20: ...ons there will always be remaining risks in connection with the structure and model of this power tool such as Damages caused to health resulting from vibrations in hands and arms if the power tool is used for a longer period or if it is not used or maintained properly Warning This power tool produces an electromagnetical field when being used This field may affect active or passive medical implan...

Page 21: ...minations 2 Thoroughly cover surfaces not to be sprayed with a suitable foil or similar 3 Mix the spraying material well There may be no clots or foreign objects Prepare the material as described below if required 7 3 Viscosity Most colours and varnishes have been prepared in such a way that they may be applied with a paint brush or a brush In order to use such materials with this power tool you m...

Page 22: ...o the mains sockets and switch on the power to the motor the motor will send air through the hose 5 For safety reasons the motor must be switched off when connecting or disconnecting the hose and paint sprayer 8 3 Adjusting the flow of air Turn the air control valve a clockwise to reduce the flow of air and counter clockwise to increase it 8 4 Operation To activate the paint sprayer press the trig...

Page 23: ...rt 1 1 power supply interrupted check power supply by connecting another power tool 1 2 power cable or plug defective inspection by electrician 1 3 other electrical defect of the power tool inspection by electrician 2 power Tool does not have full power 2 1 extension cable too long and or cross section too small use extension cable with permissible length and or sufficient cross section 2 2 voltag...

Page 24: ...ower tool as described and allow it to dry completely 2 Keep the power tool in the original packaging if not used for a longer period or cover it with a suitable foil to protect it against dust 3 Always store the power tool out of the reach of children in a well ventilated and dry place 4 Always switch off the device before transporting it 5 Always carry the power tool on the respective handles 6 ...

Page 25: ... 240 V 50 Hz 650 W II max 800 ml 1 3m3 min 180ml min 2 5 mm 1 4 kg 83 2 dB A 96 2 dB A 3 dB 2 1 m s 1 5 m s Poznámka hladina hluku a vibrací byly stanoveny podle normy EN 60745 1 Poznámka Uvedená hodnota vibrací byla určena dle standardizovaných zkušebních metod a lze ji použít k porovnání různých nářadí navzájem Navíc tato hodnota může v předstihu odhadnout zatížení pro uživatele způsobené vibrac...

Page 26: ...abelem nebo nářadí napájené baterií bez napájecího kabelu 3 1 1 Bezpečnost práce 1 Udržujte pracovní prostor v čistotě a dobře osvětlené Nepořádek nebo neosvětlené pracovní oblasti mohou vést k úrazům 2 Nepracujte s elektrickým nářadím v nebezpečném prostředí v přítomnosti hořlavých kapalin plynů nebo prachu Nářadí je zdrojem jiskření které může zapálit prach nebo výpary 3 Děti a jiné osoby držte ...

Page 27: ...k napájení a nebo akumulátoru zvednutím nebo přenášením Pokud nosíte přístroj s prstem na spínači nebo je nářadí připojeno k napájení může to vést k nehodám 4 Odstraňte seřizovací nářadí nebo klíč před zapnutím nářadí Nástroj nebo klíč který se nachází v otáčivém dílu zařízení může způsobit zranění 5 Nepřeceňujte držení těla Udržujte stabilní postoj a rovnováhu po celou dobu To umožňuje lepší ovla...

Page 28: ...používejte elektrický nástroj ke stříkaní hořlavé látky Stŕíkejte pouze látky které mají bod vzplanutí nad 21 C 2 Nemyjte tento elektrický nástroj s hořlavými rozpouštědly 3 Všímejte si všech nebezpečí vznikajícich vyprchávaním materiálu Zvažte všechny označení a informace na obalu nebo na materiálu dodávaném výrobcem který se stříká včetně požadavků na používání osobních ochranných prostředků 4 N...

Page 29: ... Odstraňte veškeré nečistoty z větracích otvorů 8 Nesměrujte paprsek na lidi zvířata aktivní elektrická zařízení nebo na samotné zařízení Vyhněte se přímému kontaktu stříkacího materiálu s pokožkou 9 Nestříkejte s tímto nástrojem nikdy kapaliny s obsahem rozpouštědla nebo neředěné kyseliny a rozpouštědla jako je například benzín ředidlo nebo topný olej Mlha tohoto materiálu je vysoce hořlavá výbuš...

Page 30: ...t aktívní nebo pasívní lékařské implantáty Aby se snížilo riziko vážného nebo smrtelného úrazu doporučujeme osobám s lékařskými implantáty kontaktovat svého lékaře a výrobce zdravotnického implantátu před požitím nářadí 4 Vysvětlivky k symbolům Věnujte pozornost všem znakům a symbolům které jsou uvedeny v této příručce a na vašem elektrickém nářadí Pamatujte si tyto znaky a symboly Pokud jste tyhl...

Page 31: ...lochu před aplikacií Ujistěte se že je bez prachu mastnoty a jiných nečistot a suchá 2 Zakryjte oblasti které nejsou ostřikovaná vhodnou fólií nebo podobným materiálem 3 Dobře zamíchejte stříkací materiál Nesmí obsahovat žádné hrudky nebo cizí tělesa Přípravte materiál jak je dále níže vysvětleno 7 3 Viskozita Většina barev a laků jsou připraveny tak aby mohly být aplikovány štětcem nebo kartáčem ...

Page 32: ...ické údaje 8 Práce s elektrickým nářadím 8 1 Proces Pistole nářadí nasává stříkací materiálu skrz sací potrubí z nádoby 12 a pak vstřikuje pod vysokým tlakem z trysky 8 2 Montáž a příprava 1 Připojte stříkací pistoli na jednom konci hadice a druhý konec připojte k motoru 2 Postupujte podle pokynů výrobců barev ve vztahu k ředění barvy 3 Odšroubujte nádrž a naplňte ji barvou Znovu umístěte nádobu n...

Page 33: ...avy Nechte tyto uschnout před dalším použitím Můžete skladovat přístroj jako komplet Davejte pozor při demontáži vstupního krytu část e na filtru část f a pak namontujte kryt aby stříkací pistole a ventilátor fungovali Pozor Přístroj není hračka Uchovávejte mimo dosah dětí 8 6 Použití jako ventilátor Připojení ventilátoru Připojte hlavu ventilátoru část 13 na vypouštěcí trubice a zapněte zařízení ...

Page 34: ...vých hmot Naplňte nádobu vhodným čištícím přostředkem nebo ředidlem a stříkejte tak dlouho s pistolí dokud nebude čistá Otřete vnější stranu stříkací pistole s dobře vyždímaným hadříkem který jste před čistením ponořili do vhodného čištícího prostředku nebo ředidla Vyšroubujte trysku stříkací pistole a vyčistěte ji s odpovídajícím čištidlem nebo ředidlem Motor a hadice mohou být čištěny dobře vyžd...

Page 35: ...ůsobeným nekontrolovanou likvidací odpadu Zlikvidujte staré přístroje pomocí vhodných sběrných systémů nebo pošlete pŕístroj k likvidaci na místo kde jste jej zakoupili To pak provede recyklaci zařízení 3 Skladuje elektrické nářadí vždy mimo dosah dětí na dobře větraném suchém místě 4 Vypněte elektrický nástroj vždy před transportem 5 Přenášejte nářadí vždy pomocí na to určené rukojeti 6 Chraňte e...

Page 36: ...5014 1 EN 55014 2 EN 61000 3 2 EN 61000 3 3 Wörth Isar den 15 03 2013 Art Nr 240 100 210 Farb spritzpistole SG 650 2006 42 EC R TTED 1999 5 EC 2000 14 EC 95 54 EC 73 23 EWG 2006 95 EC 93 68 EEC 2004 108 EC 2002 95 EC_2011 65 EU 2002 96 EC CZ prohlašuje následující shodu podle smernice EU a norem pro výrobek HR ovime izjavljuje da postoji sukladnost prema EU smjernica i normama za sljedece artikle ...

Page 37: ...result in a new warranty period being commenced for the appliance No separate warranty period will commence for spare parts that may be ted We cannot offer a warranty for damage and defects on appliances or their parts caused by the use of excessive force improper treatment and servicing This also applies for failures to comply with the operating manual and the installation or spare and accessory ...

Page 38: ...e d Käufers Straße Haus Nr PLZ Ort Telefon Datum Unterschrift Fehlerbeschreibung GB WARRANTY Purchased at in city street Name of customer Street address Postal code city Telephone Date signature Fault description Farb spritzpistole SG 650 HR JAMSTVOE Kupljeno kod u mjesto ulica ime kupca Ulica kucni broj Broj pošte mjesto Telefon Datum potpis Opis greške ...

Reviews: