


CRONUS
1
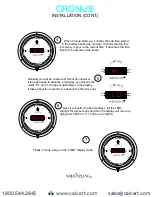
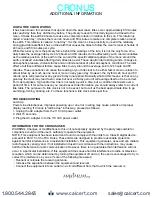
Feed wire from A.C. Adapter through
wall and out. We recommend mounting
the clock on one of our pre-drilled and
centered panels.
CABLE-HOLE
W
L
AL
SCREW
SCREW
PANEL
FROM
A.C.
ADAPTER
PROPER INSTALLATION IS IMPORTANT. IF YOU NEED ASSISTANCE, CONSULT A CONTRACTOR, ELECTRICIAN
OR TELEVISION ANTENNA INSTALLER (CHECK WITH YOUR LOCAL BUILDING SUPPLY, OR HARDWARE STORE
FOR REFERRALS). TO PROMOTE CONFIDENCE, PERFORM A TRIAL WIRING BEFORE INSTALLATION.
CALIBRATED
Removal Of Seal Voids All Warranties
Maximum, Inc.
CAL
ED
IBRA
T
emo
al Of
V
o
ds
A
W
ar
ant
es
R
v
Seal
i
ll
r
i
M
ximu
, I
c
a
m
n
.
IB
A
T
D
CAL
R
E
Remo
al
fS
al
V
o
d
l
ar
i
s
v
O
e
i
s
Al
W
rant
e
x
mum
n
Ma
i
, I
c.
R
W E A T H E R I N S T R U M E N T S
HANDCRAFTED
in the U.S.A.
508.995.2200 www.maximum-inc.com
This device complies with Part 15 of the
FCC Rules. Operation is subject to the fol-
lowing two conditions: (1) this device may
not cause harmful interference, and (2)
this device must accept any interference
received, including interference that may
cause undesired operation.
A.C. ADAPTER
(NO POLARITY)
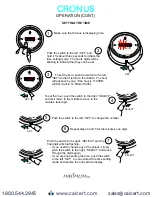
Set All
Connect the wires from the
A.C. Adaptor cable to the contact
posts marked “A.C. ADAPTER” on
rear of Cronus. The polarity does
not matter so either wire can
connect to either post.
2
FROM
A.C.
ADAPTER
3
P
l
ug the A.C. Adapter into a 110Volt A.C. outlet.
INSTALLATION
www.calcert.com
sales@calcert.com
1.800.544.2843
0
5
10
15
20
25
30


