background image

ENG

RunMaxx 7.4 T

Treadmill

INST

ALLA

TION

 &

 OPERA

TING

 MANUAL

Summary of Contents for RunMaxx 7.4 T

Page 1: ...ENG RunMaxx 7 4 T Treadmill I N S TA L L AT I O N O P E R AT I N G M A N U A L ...

Page 2: ... Accessories 35 Exploded Drawing 36 37 Spare Parts List 38 39 Warranty 42 Service Contract 43 2020 MAXXUS Group GmbH Co KG All rights reserved All rights reserved This publication may not be reproduced stored in a retrieval system or transmitted in whole or in part in any form or by any means electronic mechanical photocopying recording or otherwise without the prior written permission of Maxxus G...

Page 3: ... should be placed under the device to protect damageable floors such as wood laminates floor tiles etc Please ensure that this underlay cannot slip or slide Do not put this training device on pale or white coloured carpets or rugs as the feet of the device may leave marks Make sure that your training device and mains cable are kept out of contact with hot surfaces and are kept at a safe distance f...

Page 4: ...Hexagon socket screw M8x15 10 Part Description Qty D15 Hexagon socket screw M8x15 4 D18 Pan head screw M5x16 4 D35 Washer M8 4 D32 Spring washer M8 4 D31 Locking washer M8 10 B09 Allen key 6mm 1 B08 Wrench Phillips screwdriver 1 B10 Allen key 5mm 1 Overall View of the Device Scope of Delivery Cockpit Bottle Holder Side Frame Motor Housing Hand Grip Hand Pulse Sensors Safety Key Treadmill Deck Side...

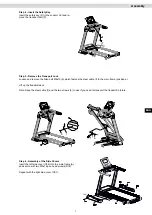
Page 5: ...ults Perform the assembly in a location that is level clean and free from obstructions Carry out the assembly with two people Only start training after fully completing the installation Preparing for Assembly Unpack the main frame A and place it in the designated assembly area which should be level and clean ATTENTION Do not remove the transport safety strap P until you are instructed to do so pre...

Page 6: ... the cockpit frame B from the front and the inside each side with an Allen bolt M8x15 D11 and an M8 washer D31 on the right and left side frames A08 A07 Step 3 Assembly of the Cockpit Remove the cover C11 from the underside of the cockpit frame B by loosening and removing the screw D22 Connect the cables from the cockpit C with the cables that protrude from the cockpit frame B Insert the cockpit C...

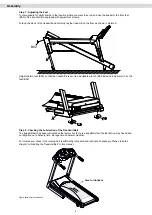
Page 7: ...Allen bolt M8x15 b which fastens the steel cable f to the main frame position a Lift up the treadmill deck Note Keep the steel cable f and the two screws b to use if you need to transport the treadmill in future Step 6 Assembly of the Side Covers Insert the left side cover C06 into the main frame A and secure with two M5x16 pan head screws D18 Repeat with the right side cover C07 Assembly ...

Page 8: ...dmill is level Use a suitable wrench B08 included in delivery to fix the feet B02 Step 8 Checking the Lubrication of the Treadmill Belt The treadmill belt has been lubricated at the factory but there is a possibility that the lubrication may have dried out slightly due to delivery time storage time and warm weather For this reason check if the running belt is sufficiently lubricated and lubricate ...

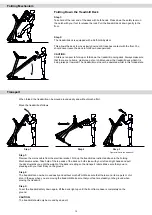
Page 9: ...fold the treadmill deck up and down as follows Folding up the Treadmill Deck Step 1 Make sure that the deck incline level is at 0 switch the treadmill off at the main switch and remove the mains plug from the socket CAUTION Never fold up the treadmill deck without the incline in 0 position or without switching it off Step 2 Hold onto the rear end of the treadmill deck and lift it upwards Make sure...

Page 10: ...eadmill can be moved around easily and without much effort Move the treadmill as follows Step 1 Step 2 Step 3 Figure similar to the treadmill Step 1 Remove the mains cable from the electrical socket Fold up the treadmill as instructed above in the Folding Mechanism section Take hold of the top ends of the deck on both sides with your left and right hands and pull the deck towards you until the wei...

Page 11: ...he treadmill on or off Switch position I treadmill switched on Switch position 0 treadmill switched off Fault Current Switch depending on the model There is a fault current button switch next to the main switch on the front of the motor cover to prevent the treadmill from being damaged by electrical surges in the network This button switch is triggered off by if a surge in the electrical supply oc...

Page 12: ...est of the Safety Key Check the proper function of the safety key each time before using the treadmill To do this start the treadmill without getting on it Pull the safety key out of its contact position The treadmill should stop immediately CAUTION Never use the treadmill if the safety key is not working properly Stop training immediately if you realise that you cannot keep up with the pace if yo...

Page 13: ...g device is switched off and the power plug is re moved Vacuum the visible dust with the small nozzle of a vacuum cleaner Never use detergent or compressed air under any circumstances Check the mounting materials once a month Check the bolts and nuts at least once a month Tighten if necessary Why is maintenance of my treadmill so important For you to enjoy your treadmill for a long time it is impo...

Page 14: ...elt at least once a week If the treadmill is not used or if the treadmill remains folded up for some longer period you must check the lubrication of the belt before use and lubricate it if necessary To achieve optimum lubrication of the belt use the MAXXUS maintenance oil bottle remove the normal screw bottle top Di agram 1 and screw on the thin tube top Diagram 2 Before lubricating the belt make ...

Page 15: ... at a time 2 2 If the belt is running towards the right turn the right adjustment screw by 1 8 turn clockwise and the left adjustment screw 1 8 turn anti clockwise 3 If the belt is now running in the middle of the deck the adjustment will be correct If this is still not the case repeat the steps described in 2 1 and 2 2 until the belt is running in the middle If the belt cannot be adjusted please ...

Page 16: ...e control menu Displays the current user Press the Switch User key to save a new user or to select a different one Press this symbol to get to the settings menu Menu Item Description WiFi To establish the WiFi connection Display Brightness To adjust the brightness level of the display Language To select the language of the display Change Units To change the units for distance and speed between Met...

Page 17: ... the menu for adjusting the brightness of the screen Here you can make the screen brighter or darker by moving the white square further towards the large white sun symbol to make it brighter or further towards the smaller sun symbol to make it darker Settings Unit Change Press the Unit Change key to get to the menu to change the units for speed and distance Here you can select if information is to...

Page 18: ...D Key to adjust the speed START Key to start the current training program or quick start function STOP Key to end the current training session PAUSE Key to interrupt the current training session Quick Selection Key SPEED Quick selection key for speeds 6 8 and 10 km h Quick Selection Key INCLINE Quick selection key for incline levels 3 5 and 7 ...

Page 19: ...home screen Now select My Reports You will now see the reports for the currently selected user The following information will be shown Time total Distance total Calories total Steps total Speed average Tempo average The Tempo value is the time it would take to go one kilometre based on the current speed Press the Delete Data key to reset all the values of the report to zero Please note that these ...

Page 20: ...rt Rate Measurement The cockpit of this treadmill is already equipped with a receiver for wireless heart rate measurement A transmitter chest belt not included in the scope of delivery is required for this This chest belt must transmit at a frequency of 5 KHz and be uncoded MAXXUS recommends the use of a POLAR T34 transmitter chest belt The use of Bluetooth chest belts is not possible Please also ...

Page 21: ...lly It is possible to pre set the training time training distance calorie consumption or the number of steps Step 1 Program Selection Switch on the treadmill and press the corresponding key for your preferred training target on the home screen Distance Time Calories Steps Step 2 Select Set the Training Target Step 2 1 Training Target Distance Here you can choose from the pre set distances 5 km 10 ...

Page 22: ...In the upper part of the display you can now select the desired training profile from P1 to P36 by swiping the available options to the right or left and then pressing the desired profile The selected profile is brightly illuminated and the incline and speed for that profile will be displayed graphically Step 3 Setting the Time In the lower part of the display you can select the desired training t...

Page 23: ...23 ENG Cockpit ...

Page 24: ...art Rate Based on the age of the currently selected user the cockpit will display the target heart rate which is 65 of the maximum heart rate for the user If you want to change this value you can slide the control below the intensity value into the desired position You can choose values from 65 75 85 and 95 of the maximum heart rate Step 5 Setting the maximum speed The pre set maximum speed can be...

Page 25: ...rupt the current training session press PAUSE on the display or press the PAUSE key on the keypad To end the pause and resume training press CONTINUE or the START key on the keypad Training End The training session ends automatically when the set training target is reached To end the training prematurely press STOP on the display or press the STOP key on the keypad Individual Training Programs Her...

Page 26: ...stics for runners This performance test origi nally developed for the US Air Force is still used today by the German police Armed Forces and for sports degrees Procedure The task in this test is to cover the largest possible distance within 12 minutes Using the following table the user can compare the distance he has run with corresponding reference values for age and gender Male Up to 30 Years 30...

Page 27: ...out any problems Please abort the test or reduce the speed immediately if it overstrains you You should also stop the test immediately if you feel at all unwell The treadmill will stop automatically at 15 00 minutes and the test result will be shown in the display Age V02 Max ml min kg Males 20 29 V 38 38 V 42 42 V 46 46 V 51 V 51 30 39 V 37 37 V 41 41 V 44 44 V 48 V 48 40 49 V 35 35 V 38 38 V 42 ...

Page 28: ...e current user data Please check that the correct user has been selected otherwise the test result will be incor rect Step 1 Starting the Analysis Press START and immediately grasp the hand pulse sensors with both hands Test Result After successful measurement the test result will be shown on the display Percentage of Body Fat Result 19 Thin 20 to 25 Normal Weight 26 to 29 Overweight 3 0 Very Over...

Page 29: ... can be connected directly to the training device via the USB connection The following file formats are supported MP3 and APE After you have inserted the USB stick containing the MP3 audio files press either the Music Note Icon or Video Film roll Icon These two icons will be shown alternately in the display Now select the Music to show all the existing audio files Key to play or pause the music fi...

Page 30: ...te that this menu item is currently only available in English All information however can also be found in this manual Fitness training with the APP FitShow The cockpit of your treadmill is already equipped with a Bluetooth receiver as standard Download the FitShow APP using a suitable smartphone or tablet PC To do this scan the QR code on the back of this manual Step 1 Download the FitShow app fr...

Page 31: ...at 25 carbohydrate and 5 protein Fat burning target zone 60 to 70 of the maximum heart rate This training zone is suitable for athletes and sports people who aim to lose weight Training in this zone the body will burn approx 6 10 calories per minute to produce energy The percentage rate per calorie is approx 85 fat 10 carbohydrate and 5 protein Condition Fitness target zone 70 to 80 of maximum hea...

Page 32: ...e If the display of the pulse does not work only in individual cases the device is not defective In this case we recommend the use of a chest belt to achieve a permanently correct pulse display This is available as an accessory Heart Rate Measurement using a Chest Belt Many MAXXUS training devices are already fitted with a receiver as standard Using a chest belt we recommend the exclusive use of a...

Page 33: ...g Do not just get off your training device immediately the training session is finished Like with the warm up stage you should continue for 3 5 minutes at minimum resistance to cool down After training you should stretch your muscles thoroughly Front Thigh Muscles Support yourself with your right hand against the wall or on your training device Bend your knee and raise your left foot backwards so ...

Page 34: ...But since most people have training goals such as weight reduction cardiac exercise training improvement of physical con dition stress reduction etc to strive for training intensity to meet these goals should be be adjusted It makes most sense to work with the appropriate heart rate for the respective training goal The information on the heart rate and the corresponding table in this manual will h...

Page 35: ...m suitable for treadmills 240 x 100 cm suitable for treadmills MAXXUS Silicone Optimal lubricant and release agent for running belt and running deck Available in the following sizes 50 ml 250 ml European Disposal Regulations 2012 19 EU Do not dispose your training device in the normal household rubbish Dispose the device at a communal waste disposal facility or at a registered waste disposal compa...

Page 36: ...36 Exploded Drawing ...

Page 37: ...37 ENG Exploded Drawing ...

Page 38: ... Bottom panel 1 C16 Front panel support 1 C17 Bottom panel support 1 C18 Front key board 1 Part No Description Specification Qty C19 Bottom key board 1 C20 Safety key seat 1 C21 Safety key 1 C22 Handle pulse seat 2 C23 Side rail fixation seat 8 C24 Motor belt 1 C25 Display acrylic 1 C26 Front handlebar foam 2 C28 Running belt 1 C29 Cushion pad 4 C30 Elliptical cushion pad 4 C31 Transportation whee...

Page 39: ...cription Specification Qty E10 AC wire Length 350 brown 2 E11 AC wire Length 350 blue 2 E12 Earthed wire Yellow and green 1 E13 Running board 1 E14 Display 1 E15 Control board 1 E16 Keyboard plate 1 E17 Front keyboard plate 1 E18 Display upper wire 1 E19 Display middle wire 1 E20 Display bottom wire 1 E21 Pulse upper wire 1 E22 Pulse bottom wire 2 E23 Control panel upper wire 1 E24 Control panel b...

Page 40: ...Notes 40 ...

Page 41: ...41 ENG Notes ...

Page 42: ...period for your training device starts on the date of purchase and applies solely to products which were purchased directly from the MAXXUS Group GmbH Co KG or one of the MAXXUS Group GmbH Co KG direct and authorised distribution partners The warranty covers defects caused by production or material faults and only apply to devices purchased in Germany The warranty does not apply to damages or defe...

Page 43: ...must be completed Fault Description Please enter a short description of the error as precisely as possible below For example when where and how does the error occur Frequency after which period at what Use etc A copy of the proof of purchase invoice receipt is attached I accept the General Terms and Conditions of MAXXUS Group GmbH Co KG I hereby instruct the company MAXXUS Group GmbH Co KG to repa...

Page 44: ...Maxxus Group GmbH Co KG Nordring D 64521 Gross Gerau Germany E Mail info maxxus com www maxxus com ...

Reviews: