background image

1

Freestanding Gas Range Control Guide

FEATURE GUIDE

WARNING:

To reduce the risk of fire, electric shock, or injury to persons, read the IMPORTANT SAFETY INSTRUCTIONS, located in

your appliance's Owner's Manual, before operating this appliance.

This manual covers several models. Your model may have some or all of the items listed. Refer to this manual or the Product Help
section of our website at

www.maytag.com

for more detailed instructions. In Canada, refer to the Product Help section at

www.maytag.ca

.

WARNING

Food Poisoning Hazard

Do not let food sit for more than one hour before or
after cooking.

Doing so can result in food poisoning or sickness.

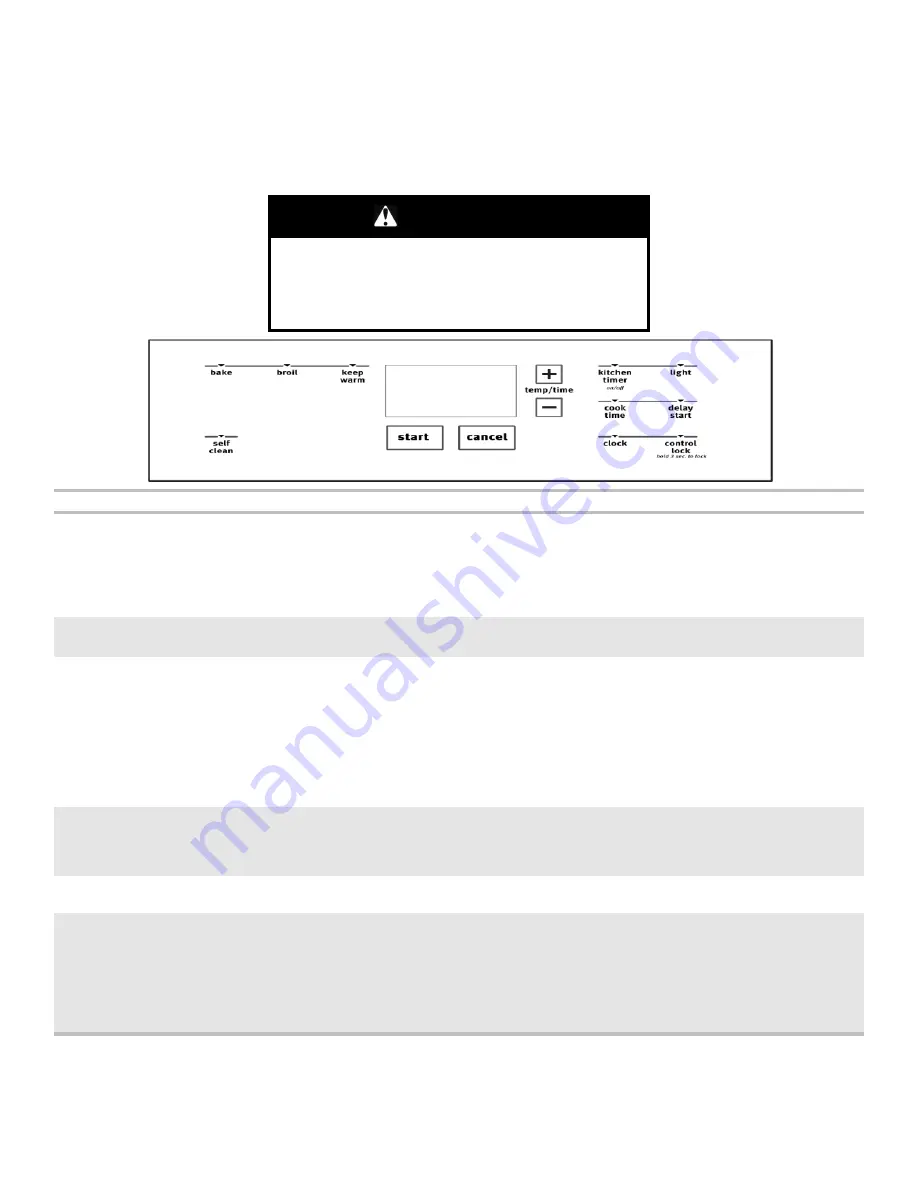
KEYPAD

FEATURE

INSTRUCTIONS

CLOCK

Clock

This clock uses a 12 hour cycle.

1.

Check that the oven is OFF.

2.

Press CLOCK.

3.

Press the Temp/Time “+” or “-” keypad to set the time of day. Press and hold to scroll
quickly.

4.

Press CLOCK or START.

LIGHT

Oven cavity
light

While the oven door is closed, press LIGHT to turn the light on and off. The oven light will
come on when the oven door is opened.

KITCHEN TIMER
ON/OFF

Oven timer

The Timer can be set in hours or minutes up to 9 hours and 59 minutes.

1.

Press KITCHEN TIMER.

2.

Press the Temp/Time “+” or “-” keypad to set the length of time.

3.

Press START to begin the countdown. If enabled, timer tone(s) will sound at the end of
countdown.

4.

Press KITCHEN TIMER to cancel the Timer and return to the time of day. Do not press
the Cancel keypad because the oven will turn off.

5.

If the Timer is running but not in the display, press KITCHEN TIMER to display the
countdown for 5 seconds.

START

Cooking start

The Start keypad begins any oven function. If Start is not pressed within 10 seconds, a
tone will sound, and Start will blink until pressed or canceled. If Start is not pressed within
30 seconds after pressing a keypad, the function is canceled and the time of day is
displayed.

CANCEL

Range
function

The Cancel keypad stops any oven function except the Clock, Timer, and Control Lock.

BAKE

Baking and
roasting

1.

Press BAKE.

2.

Press the Temp/Time “+” or “-” keypad to set the desired temperature. Press and hold
to scroll quickly. The temperature will not scroll past the minimum or maximum
allowable temperature.

3.

Press START.

4.

To change the temperature, repeat Step 2. Press START for the change to take effect.

5.

Press CANCEL when finished.

Summary of Contents for MGR6600FB

Page 1: ...FF Oven timer The Timer can be set in hours or minutes up to 9 hours and 59 minutes 1 Press KITCHEN TIMER 2 Press the Temp Time or keypad to set the length of time 3 Press START to begin the countdown...

Page 2: ...and a lock will be displayed 4 Repeat to unlock No keypads will function with the controls locked Sealed Surface Burners A Burner cap B Burner base C Alignment pins D Igniter E Gas tube opening IMPORT...

Page 3: ...area element or surface burner Ideal cookware should have a flat bottom straight sides and a well fitting lid and the material should be of medium to heavy thickness Rough finishes may scratch the coo...

Page 4: ...ss and hold the Temp Time arrow keypad for 5 seconds C or F will appear on the display Repeat to change back To exit mode press CANCEL Keypress Tones Activates or turns off the tones when a keypad is...

Page 5: ...cooking mode not Sabbath mode compliant To Set a Timed Bake Using Sabbath Mode on some models 1 Press BAKE 2 Press the Temp Time or keypad to enter a temperature other than the one displayed 3 Press...

Page 6: ...food in unless recommended otherwise in the recipe Position food on grid in a broiler pan and then place it in the center of the oven rack IMPORTANT Close the door to ensure proper broiling temperatur...

Page 7: ...ampe pour allumer ou teindre la lampe La lampe du four s allume l ouverture de la porte KITCHEN TIMER ON OFF minuterie de cuisine marche arr t Minuterie du four La minuterie peut tre r gl e en heures...

Page 8: ...la temp rature souhait e Appuyer et maintenir appuyer pour faire d filer rapidement Le d filement des temp ratures ne d passe pas les temp ratures minimale et maximale admissibles 3 Appuyer sur START...

Page 9: ...diqu ci dessus Une bonne flamme est bleue plut t que jaune Garder cette zone exempte de souillures et ne pas laisser les produits renvers s les aliments les agents de nettoyage ou autre produit p n tr...

Page 10: ...l ustensile de cuisson Ustensile Caract ristiques Aluminum Chauffe rapidement et uniform ment Convient tous les genres de cuisson L paisseur moyenne ou forte convient le mieux pour la plupart des t c...

Page 11: ...vec un raccordement au secteur 120 V de pr senter les fonctions des commandes sans pour autant activer les l ments chauffants Si cette fonction est activ e le four ne fonctionnera pas Pour modifier Ap...

Page 12: ...de clignoter et reste affich Le four est pr sent au mode Sabbat et respecte les modalit s du mode Sabbat Si l on appuie sur Cancel annulation tout moment le four revient au mode de cuisson normal ne p...

Page 13: ...four ce qui peut modifier la dur e n cessaire et le r sultat de la cuisson Pour suivre l avancement de la cuisson il est conseill d utiliser l clairage du four REMARQUE Sur les mod les quip s d une fo...

Page 14: ...act ristique de touche Horloge la section Guide des caract ristiques 1 Appuyer sur BAKE cuisson au four 2 Utiliser la touche Temp Time temp rature dur e ou pour r gler la temp rature souhait e Appuyer...

Reviews: