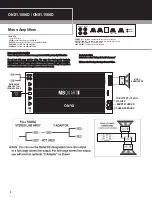
background image

System  Design

The success of any car stereo system relies on several factors, such as 
the system design, execution of the installation, and system setup. Please 
remember that any system is only as good as its weakest link.
Please remember that higher power systems are not necessarily useful 
purely for high sound pressure levels, but also to establish a headroom 
capability, to reproduce musical peaks cleanly without distortion. 

 Lower power amplifiers will clip earlier than their more powerful cousins, 
and cause loudspeaker failure when overdriven, due to the harmonics 
generated by a clipped signal, thus overheating voice coils.

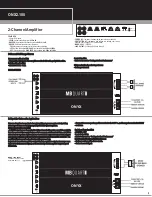
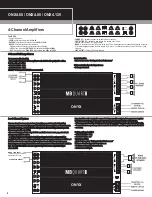
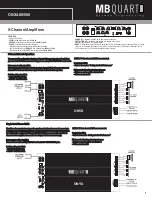
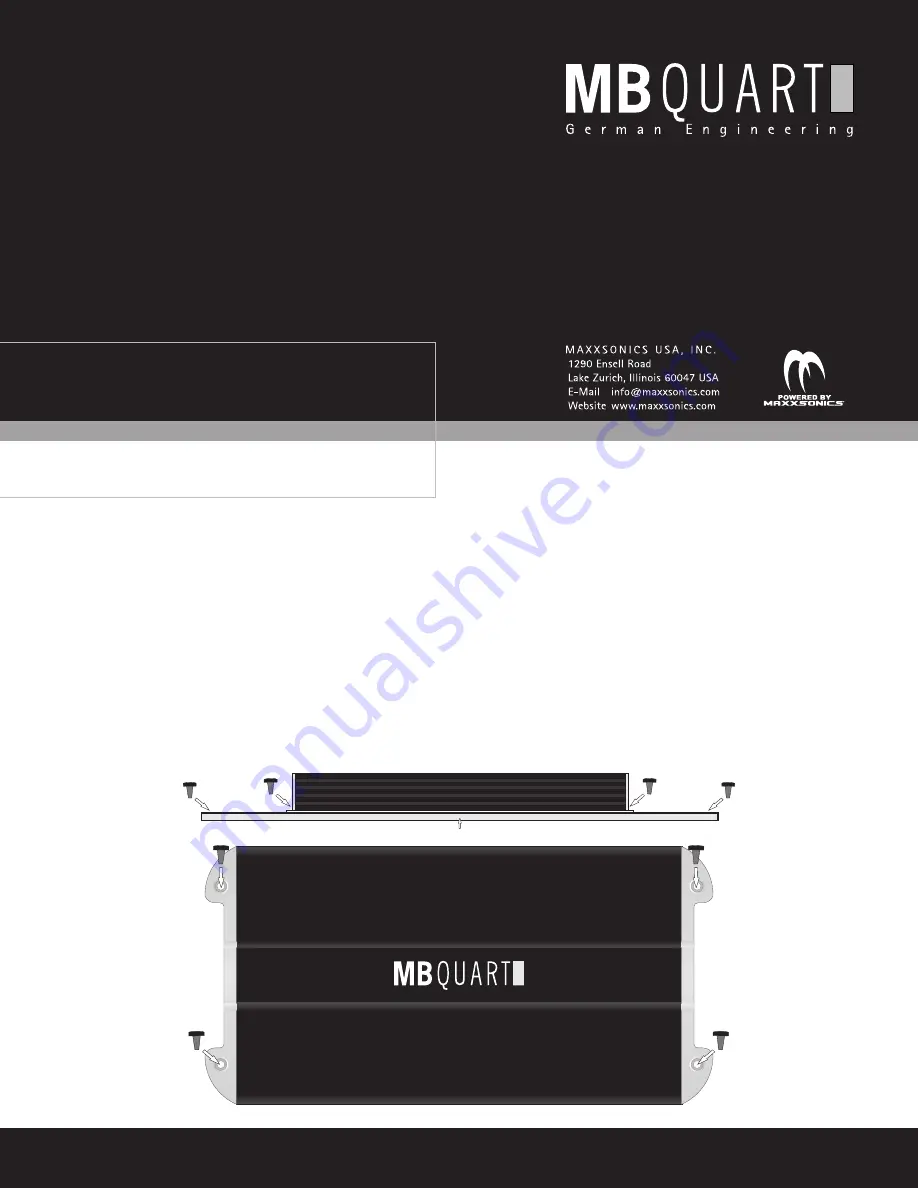
Amplifiers should be mounted with the fins running horizontally for best 
convection cooling, to minimize overheating. Purchase the best quality 
RCA cables you can afford, for reliability and less engine noise 
interference in the audio system. 

It is highly recommended that the amplifier be mounted to a board of MDF 
or other solid structure using the 4 mounting screws provided. Avoid 
mounting the amplifier to metal as this can introduce noise and other 
unwanted issues. When mounting the amplifier, ensure that it is mounted 
HORIZONTALLY, as shown in the diagram above, for optimal heat 
dissipation. Mounting amplifiers to speaker enclosures is not 
recommended as this can cause damage to the amplifier components. 
When choosing a location for mounting the amplifier, ensure that you 
check for clearance from wires, gas tank, electrical devices and brake 
lines etc.

Congratulations!
By purchasing an amplifier from MB Quart, you have decided on a product 
of the highest technical quality. MB Quart wishes you great enjoyment with 
your amplifier. Should you  have any questions about this system or other 
MB Quart products, please email us at info@maxxsonics.com 

Installation Manual

WOOD

ONYX

ONYX

ONX2.100 / ONX4.60 / ONX4.80 / ONX4.125 / ONX4.80/500 / ONX1.1000D / ONX1.1500D

Summary of Contents for ONYX ONX1.1000D

Page 1: ...rference in the audio system It is highly recommended that the amplifier be mounted to a board of MDF or other solid structure using the 4 mounting screws provided Avoid mounting the amplifier to metal as this can introduce noise and other unwanted issues When mounting the amplifier ensure that it is mounted HORIZONTALLY as shown in the diagram above for optimal heat dissipation Mounting amplifier...

Page 2: ...plifiers ONX2 100 2 Channel Amplifiers ONX4 80 500 5 Channel Amplifier ONX1 1000D ONX1 1500D D Class Mono Amplifiers TECHNICAL DATA INSTALLATION INSTRUCTIONS General Instructions Settings for Best Performance 1 WARRANTY 1 FOR EXTENDED WARRANTY INFORMATION PLEASE VISIT WWW MAXXWARRANTY COM ...

Page 3: ... spring washer and nut to securely fasten the ground lug Use petroleum jelly to coat the bolt lug connection to prevent oxidization with time TIP Use the same approach when installing head units equalizers or any audio equipment for that matter run short individual grounds from each piece directly to the vehicle chassis to minimize ground loops and system noise All power ground and speaker connect...

Page 4: ...equency cut off for your system reproduction The point that you set it at cuts off any frequencies from reproduction beyond this point The 12 o clock position is a great starting point EXAMPLE If you adjust the High Pass to 100Hz the amplifier will not play frequencies below 100Hz but will play frequencies from 100Hz to the highest frequency the amplifier is capable of reproducing When in Low Pass...

Page 5: ...hiclechassiswillcausethemainfusetoblow Systemdoesnotturnon 1 Checkallfuses 2 Checkallconnections 3 Measure the 12 volt and remote turn on voltages at the amplifier terminals If these are non existent or low take voltage measurements at fuse holders distribution blocks theheadunit s 12voltandremoteleadstolocalizetheproblem Noiseproblems Systemnoisecanbedividedintotwocategories hiss andelectricalint...

Page 6: ...el amplifiers to power a subwoofer by taking as shown advantage of the mono bridging capability of all MB Quart amplifiers Interconnect cable checklist Switch setting checklist A MONO signal source is required to bridge channels 1 2 such as would be available X OVER LPF from the mono sub bass output of an active crossover whether standalone or built into Control checklist a head unit or equalizer ...

Page 7: ...h left and right inputs via a Y adapter RCA cable Here we show how to use the 4 channel amplifiers as a 3 channel unit by taking Connect the mono speaker positive terminal to the RIGHT and its negative terminal to LEFT advantage of the mono bridging capability of all MB Quart amplifiers In order to create as shown a 2 channel system simply follow the example to also mono bridge channel pair 1 2 In...

Page 8: ...riable sensitivity from 0 2V to 6V BASS EQ Adjustable 45Hz bass boost from 0dB to 10dB X OVER Selects internal crossover functions FULL Bypasses all crossovers for full frequency operation BP Selects the built in LOW PASS filter variable from 30Hz to 150Hz HI Selects the built in HI PASS filter variable from 10Hz to 15KHz POWER LED Indicates the powered up and turned on condition PROTECTION LED In...

Page 9: ...blechecklist Connecttheinputstoasuitablesource e g aheadunitwithgoodqualityRCAcables Controlchecklist Refertothesection SettingsforBestPerformance Use at least 12 gauge speaker wiring The amps have dual speaker terminals simplifyingthehookupofmultiplespeakers Theseampsaremono 1channel amplifiers Minimumfinalloudspeakerimpedance 1 Ohm which have multiple positive and negative connections for ease o...

Page 10: ...9 ...

Page 11: ...res and activates the MX 2 As an option the module also offers a remote turn on wire Remote Output Driver circuit to turn on amplifier when module activates MX 3 Bass Controller Parametric Bass EQ Provides a wide array of subwoofer output signal shaping controls to enhance bass response and sound quality including Bass Boost adjustable Bandwidth wide and narrow Low Pass and Subsonic Filter Accepts...

Page 12: ...PART S411 Check out our videos of new products events and technical tutorials at www youtube com maxxsonicsusainc ONX2 100 ONX4 60 ONX4 80 ONX4 125 ONX4 80 500 ONX1 1000D ONX1 1500D ...

Reviews: