
If you have any questions about your sprayer, please do not return it to the store!! Call the
Consumer Hotline at 1-800-253-4642 year -yound Monday through Friday 8:00 a.m. to 7:00 p.m. ;
March 1 - August 31 on Saturday and Sunday 10:00 a.m. to 4:00 p.m., Eastern Time
Owners’ Manual
Lawn & Garden Polymer Sprayers
Models 1401M, 1402M, 1403M and 1002M
WARNING!!! THIS PRODUCT IS DESIGNED TO SPRAY CHEMICALS THAT MAY BE HARMFUL
AND COULD CAUSE SERIOUS PERSONAL INJURY IF INHALED OR BROUGHT INTO CONTACT
WITH THE USER. FAILURE TO READ AND FOLLOW OWNERS’ MANUAL INSTRUCTIONS BEFORE
USE AND/OR MISUSE OF THIS PRODUCT COULD RESULT IN EXPLOSIVE FAILURE
WITH MAJOR INJURIES.
•
ALWAYS
water test sprayer before each use.
•
ALWAYS
wear long sleeve shirts, long pants, goggles, gloves and durable shoes.
•
ALWAYS READ AND FOLLOW
label instructions for the chemicals to be applied.
•
AFTER USE
release pressure and clean the sprayer.
•
ALWAYS RELEASE
pressure in sprayer before servicing.
•
DO NOT
alter the sprayer or any components.
•
DO NOT
spray flammable, caustic (i.e. acids, chlorines and bleach), corrosive, heated or self-heating solutions
with this sprayer.
•
DO NOT
store liquids in the sprayer.
•
NEVER
fill tank above the “MAX FILL LINE” on the tank.
ASSEMBLY INSTRUCTIONS
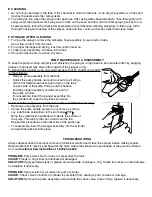
A. HOSE TO TANK ASSEMBLY
1. Insert the pink siphon tube approximately ½” into the pink hose insert otherwise sprayer will spray only air.
2. Lubricate the black o-ring on the pink hose insert and then push
(2a)
into the threaded tank nipple until fully
seated.
3. Screw hose nut onto threaded tank nipple. Firmly hand tighten.
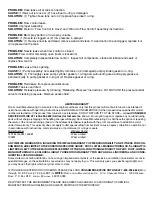
B. FLOW CONTROL TO HOSE
1. Remove the flow control hose nut from the flow control and slide over the hose.
2. Push the hose over the pointed end of the flow control until it touches the threads.
3. Screw the flow control hose nut onto the flow control. Firmly hand tighten.
1 2 3
1 2 2a 3


