background image

1

Hood User Manual

3110-3112-3113-3115-3120-3122-3123-3130-3131-3140

3141-3143-3150-3151-3152-3153-3155-3157-3158-3160

3161-3170-3171-3173-3174-3175-3176-3210-3272-3321

3322-3324-3325-3326-3350-3351

Manual de Utilizador

MEP 261 X

MEP 291 X

MEP 361 X

MEP 391 X

MEP 191 XN

MEP 470 XN

Summary of Contents for MEP 191 XN

Page 1: ...120 3122 3123 3130 3131 3140 3141 3143 3150 3151 3152 3153 3155 3157 3158 3160 3161 3170 3171 3173 3174 3175 3176 3210 3272 3321 3322 3324 3325 3326 3350 3351 Manual de Utilizador MEP 261 X MEP 291 X MEP 361 X MEP 391 X MEP 191 XN MEP 470 XN ...

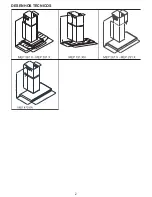
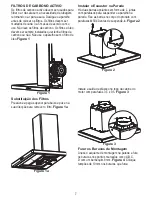
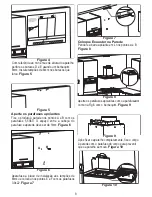
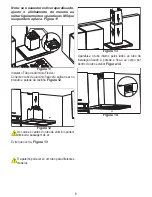
Page 2: ...2 DESENHOS TÉCNICOS ...

Page 3: ...não remova os filtros quando está ligado Em caso de chama desligue o aparelho e os aparelhos de cocção O seu produto pode causar risco de incêndio se não o limpar periodicamente Desligue o produto antes de começar o processo de manutenção desligue na tomada Quando a chaminé e os aparelhos de cocção usam outra energia que não a eléctrica ao mesmo tempo a pressão negativa na sala não deve ser maior ...

Page 4: ...ação retire o produto da embalagem Verifique que não existe nenhuma deformação no produto Danos no transporte deves ser imediatamente reportados ao transportador Se notar algum dano reporte ao vendedor Não deixe as crianças brincarem com o material de embalar Min 65 cm Max 75 cm Standard accessories Optional accessories INSTALLATION TEMPLATE Acessórios standard Acessórios opcionais ...

Page 5: ...sco de lesão Devido a deixar cair o aparelho Use botas de segurança Manutenção e Limpeza Risco de queimadura risco de choque Devido ao aparelho Deixe o aparelho arrefecer antes de limpar Desconecte o cabo Cuidado Há um risco de dano devido à entrada de humidade nos componentes electrónicos Não limpe os elementos de controlo com um pano molhado A superfície pode ficar danificada devido a indevida l...

Page 6: ...re delicate against scratches Clean the surfaces with a soft damp cloth dish soap or a less active glass cleaning material Soften the dirt that is dried and stuck on the surface with a damp cloth Do not rub It is not suitable to use dry clothes scratchy sponges materials that require rubbing cleaning materials with sand sodium carbonate acids or chlorine and other active agents Clean the stainless...

Page 7: ...ra 1 Substituição dos Filtros Pressione a pega superior para baixo e puxe na sua direcção para remover o filtro Figura 1a Figura 1a Instalar o Exaustor na Parede Há duas barras apoiantes em forma de L juntas com parafusos para suspender o aparelho na parede Fixe as barras no corpo do produto com parafusos M5X40 antes de suspendê lo Figura 2 Figura 2 Instale a saída de plástico no topo da cabine do...

Page 8: ... parafuso e aparede deve ser de 5mm Figura 6 Figura 6 D E D E Aparafuse a placa de instalação aos tampões de 6mm ue colocou nos pontos E e F com os parafusos 3 9x22 Figura 7 Coloque Exaustor na Parede Pendure a barra apoiante em L nos pontos A e B Figura 8 Figura 7 Figura 8 Figura 9 Aperte os parafusos apoiantes com o aparafusador como na Fig 6 com o berbequim Figura 9 Após fixar o aparelho comple...

Page 9: ... o tubo de alumínio flexível à saída de ar no produto e parede da cozinha Figura 12 As curvas e cantos do tubo de alumínio podem diminuir a passagem de ar Evite que ocorra Figura 13 O aparelho pode ter só um tubo para diferentes modelos Figura 12 Figura 13 Aparafuse o tubo interno pelos lados ao tubo de instalação fixado à parede e fixe o ao corpo por dentro do tubo exterior Figura 14 Figura 14 ...

Page 10: ...urs operation of the appliance This explanation applies to models with djt switch Desconecte o exausto Para substituir as lâmpadas de halogéneo retire a cobertura da lâmpada Rode no sentido do relógio e puxe para baixo a lâmpada e substitua Figura 15 Figura 15 Substituição das Lâmpadas Desligue a ligação do exaustor Retire os filtros Retire a lâmpada fundida e substitua pela nova Espera que elas a...

Page 11: ...se que os filtros de carbono não têm mais de 6 meses Assegure se que a cozinha tem um bom sistema de circulação de ar Se o aparelho não funciona Antes de contactar o serviço Assegure se que o cabo e os fusíveis estão bem instalados Verifiue a tabela 1 antes de contactar o serviço Substituição das Lâmpadas Desligue a ligação do exaustor Retire os filtros Retire a lâmpada fundida e substitua pela no...

Page 12: ...5 3120 3122 3123 3130 3131 3140 3141 3143 3150 3151 3152 3153 3155 3157 3158 3160 3161 3170 3171 3173 3174 3175 3176 3210 3272 3321 3322 3324 3325 3326 3350 3351 Hood User Manual MEP 261 X MEP 291 X MEP 361 X MEP 391 X MEP 191 XN MEP 470 XN ...

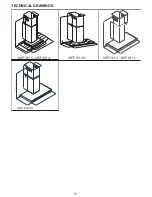
Page 13: ...13 TECHNICAL DRAWINGS ...

Page 14: ... of fire if the cleaning is not performed as per the specified periods De energize the appliance before any maintenance operations De energize the appliance by unplugging it Negative pressure inside the room when the electric stove top hood and other electrically powered devices are operated simultaneously shall not exceed 4 Pa 4 X 10 bar Any fuel or gas powered devices in the medium where your ap...

Page 15: ...nstallation is completed Figure 1 Figure 1 Installation Removing the Appliance from its Package Check that your appliance is not deformed Report the transport issues immediately to transport operator Any faults encountered shall be reported to the dealer too Do not allow children to play with packing material Min 65 cm Max 75 cm Standard accessories Optional accessories INSTALLATION TEMPLATE ...

Page 16: ...es during installation work of the appliance Risk of injury Due to the dropping of the appliance Always fix all safety bolts and safety covers properly Cleaning and protective maintenance Risk of being burnt Risk of electric shock Due to the appliance Allow the appliance to cool before any cleaning or maintenance Disconnect the fuse connection or remove the plug Caution There is a risk of damage d...

Page 17: ...l it Figure 1 Figure 1 Replacement of Aluminum Cartridge Carbon Filter Press on the upper catch and pull towards yourself to remove the carbon filter Figure 1a Figure 1a Installation of the Appliance Installation of the suspension plate to the hood There are 2 L shaped suspension plates available in the installation accessories to suspend the appliance to the wall These plates are supplied with a ...

Page 18: ...flue installation plate to the Ø 6 dowels you have tapped to the wall using the 3 9x22 screw supplied with your hood Figure 7 Suspending the Hood to the Wall Hold the hood from its body and suspend it to the wall on A and B points using the L plates you have fixed on the hood cabinet before Figure 8 Figure 7 Figure 8 Figure 9 When the suspension procedure is completed tighten the suspension screws...

Page 19: ...e on the wall Figure 12 Avoid bends and elbows as much as possible as the bends and elbows in the aluminum pipe shall reduce the air suction power Engage the flues to the circumference of the body Figure 13 Appliance may have single flue on some model options In this case you may procure the inner flue suitable for your appliance from your authorized dealer Figure 12 Figure 13 Tighten the inner fl...

Page 20: ... to turn on lamps of the appliance This explanation applies to models with push button switch Cleaning Periods for the Metal Filters Filters shall be cleaned every 2 to 3 weeks as per frequency of operation or when the C signal is shown on the display After cleaning and installing the filters press button when the appliance is turned off to remove signal C for more than 3 seconds E shall be indica...

Page 21: ... replace with a new one with the same rating Lamps may burn your hand when they are hot wait until they are cooled off Figure 17 Figure 17 Check electric connection Voltage of the electric network should be between 220 240V cooker hood should be connected to grounded Check motor switch Motor switch should be at on position Check motor switch Motor switch should be at on position Check aluminum fil...

Reviews: