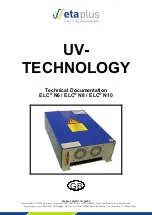
background image

UV-

TECHNOLOGY 

Technical Documentation 
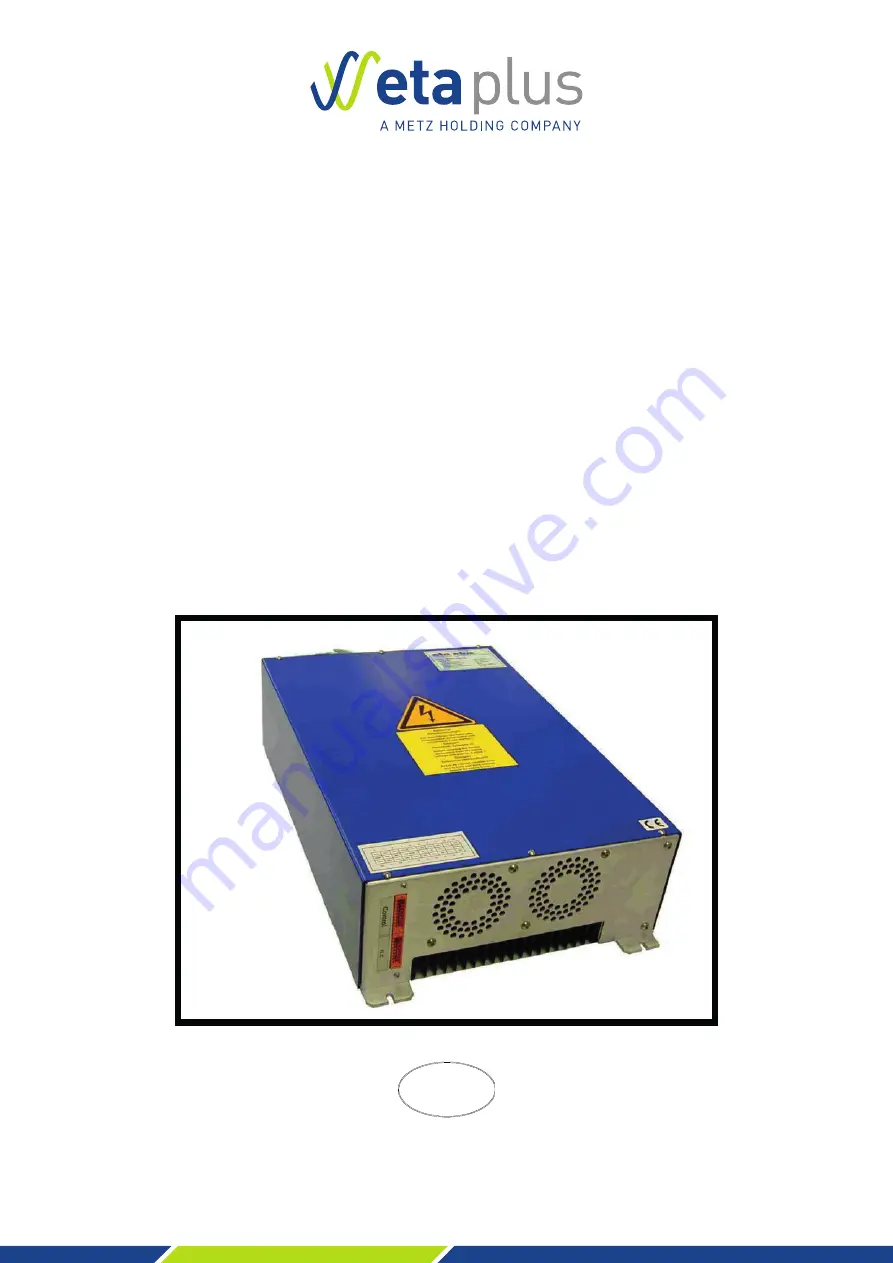
ELC

®

 N6 / ELC

®

 N8 / ELC

®

 N10 

GB

£¤

Ÿ

eta plus electronic gmbh 

Lauterstraße 29, D-72622 Nürtingen, T49 (0) 70 22 - 60 02-80, Fax +49 (0) 70 22 – 6 58 54 

Postfach 1411, D-72604 Nürtingen, e-mail: info@eta-uv.de

–––––––––––––––––––––––––––– 

Eingetragen unter HRB 724321 AG Stuttgart, USt.-Id.-Nr. DE 146267800 

Geschäftsführer: Dr. Peter Schwarz-Kiene

our name is our principle

eta plus electronic gmbh

Lauterstraße 29, 72622 Nürtingen, T49 7022 6002-80, Fax +49 7022 65854, E-mail: info@eta-uv.de, www.eta-uv.de

Eingetragen unter HRB 724321 AG Stuttgart, USt.-Id.-Nr. DE 146267800, 

Geschäftsleitung: Uwe Uhlemann, Dr. Markus Roth 

Summary of Contents for Eta Plus ELC N10

Page 1: ...ngen e mail info eta uv de Eingetragen unter HRB 724321 AG Stuttgart USt Id Nr DE 146267800 Geschäftsführer Dr Peter Schwarz Kiene our name is our principle eta plus electronic gmbh Lauterstraße 29 72622 Nürtingen Telefon 49 7022 6002 80 Fax 49 7022 65854 E mail info eta uv de www eta uv de Eingetragen unter HRB 724321 AG Stuttgart USt Id Nr DE 146267800 Geschäftsleitung Uwe Uhlemann Dr Markus Rot...

Page 2: ...ELC N6_N10 V3 1 09 11 GB subject to technical alterations ELC Electronic Lamp Control is a registered trademark of IST Metz GmbH ...

Page 3: ...rack mounting 6 3 2 Connection 8 3 3 Control current connections 12 3 4 Explanations of the control functions for ELC 14 3 4 1 Release relay 14 3 4 2 Control input START 14 3 4 3 Setting lamp power 14 3 4 4 Table lamp power 15 3 4 5 Earth fault control 16 4 Operation of ELC 17 4 1 Initial operation 17 4 2 Switching on the ELC 17 4 3 Switching on the lamp 17 4 4 Dimming Operation 18 4 5 Standby Ope...

Page 4: ...e strictly observed Information This symbol indicates key information on use Non observance can lead to failure 1 2 Safety Advice The ELC must be installed and connected in compliance with existing regulations and practices This is e g EN 60204 1 in Europe Repairs on the ELC may only be carried out by the manufacturer The installation and starting up may only be carried out by skilled electricians...

Page 5: ... threshold or by means of an independent equipotential connection 1 3 Correct operation The ELC is an electrical unit intended to be installed in the switch cabinets of industrial high voltage power installations It is conceived as an electronic ballast for the operation of lamps intended for this purpose Any other use is deemed as misuse The manufacturer will not assume liability for damage resul...

Page 6: ...The ELC offers a high level of lamp power constancy due to its integrated power control Variations in operating voltage of 10 do not affect lamp power Ignition device When the lamp is switched on the ELC initiates trigger pulses to fire the lamp a separate ignition device is not required Other performance characteristics High level of electrical efficiency The ELC has a network power factor of 0 9...

Page 7: ...are shown in 3 1 1 and in 3 1 2 The ELC should not be mounted in the immediate proximity of sensitive electronic equipment An appropriate distance must be maintained to scatter field transformers or other inductors The flow of cool air in ELC must be safeguarded The ambient temperature must not exceed the values described in chapter 6 The switching cabinet has to be air conditioned in consideratio...

Page 8: ...mounting 319 mm 130 mm min 20 min 20 min 20 min 50 500 mm 270 mm 23 mm 23 mm 473 mm min 100 min 100 90 mm Top Assembly for instance by gudgeon M6 with distance sleeve pin and socket connector for control signals Lamp feeder cable mains connection Fig 1 Assembly of the ELC all dimensions in mm ...

Page 9: ...lterations 3 1 2 Side by side rack mounting 321 mm 130 mm min 20 min 50 473 mm min 100 min 100 520 mm 539 mm 80 mm 23 mm M8 4x Top pin and socket connector for control signals Lamp feeder connection mains connection Fig 2 side by side rack mounting with assembly brackets ...

Page 10: ... 11 GB subject to technical alterations If side by side rack mounting is preferred assembly brackets and screws can be provided upon request Attach bracket to the upper surface of the appliance Attach bracket to the underside of the appliance ...

Page 11: ...to the ELC To this end the connector has an EMC screw connection also see connection lamp cable If wished the shielding can also be connected to the lamp unit The connection of mains supply cables and lamp feeder cables must be separated from control cables Quality standards according to EN 50160 regarding mains frequency voltage drops transients etc are required The one phase short circuit power ...

Page 12: ...The mains connection of the ELC is situated at the top right The cross section of the earthed wire must be at least 4 mm The three phases must be provided with an automatic cut out In order to avoid damaging the terminal pins please do not exceed the following torque L1 L2 L3 0 6 0 8 Nm Grounding conductor 3 0 4 0 Nm ...

Page 13: ...escribed in chapter Technical Data Connector assembly from left to right Carrier casing Casing gasket Hood and screws EMC cable gland with plastic insert Preparing the lamp feeder cable Remove sheath Free metal braid and put over cable sheath Insulate conductor Ferrule the grounding conductor if applied 8 60 12 measurements in mm Insert cable into the cable gland and bush casing ...

Page 14: ...aligned with the tightening nut When tightening the nut hold the wire in position Torque 1Nm permissible moment für screw driver 1 2 Nm Hexagon socket jaw span 2 Connect grounding conductor if applied Screw on hood Recommended orientation Cable gland in the direction of PIN1 see picture below Ensure that the shield evenly covers the plastic inset of the cable gland 360 contact ...

Page 15: ...ol wires are connected to the underside of the casing by means of the connectors On the underside there are two plug strips s Fig 5 The pin connector is to be connected to the plug strip marked Control The pin assignment is shown in Fig 6 and Chart 1 All control circuits must be earthed upon installation Fig 5 Control connections Pin assignment Start1 Start2 Max1 Min1 10 V DC 0 10V P lamp I lamp E...

Page 16: ...V 5 set voltage between 0 10 V and GND input impedance 200 kΩ GND 16 17 analogous control input SET VALUE control GND P Lamp 6 analogous output 0 10 V DC 1 mA 1 V 1 kW Reference GND GND 15 PL lamp output control GND I Lamp 7 analogous output 0 10 V DC 1 mA 1 V 2 A Reference GND GND 14 IL lamp current control GND ES1 8 ES2 13 Relay earth contact ES contact potential free up to 30 V AC DC max 0 5 A ...

Page 17: ...p at maximum current until the desired power is achieved see below We recommend warm up at maximum power After a short time approx 2 mins the full output has been reached and the lamp power can be varied as desired 3 4 3 Setting lamp power Stepless infinitely variable The lamp can be dimmed steplessly from between approx 20 to 100 of the nominal power The lamp power is set by applying an analog vo...

Page 18: ...of the control voltage at SET VALUE E g Lamp warm up maximum power or Standby operation minimum power To this purpose the control inputs MAX and MIN respectively are set to High whereby the function MAX has the higher priority 3 4 4 Table lamp power SET VALUE MIN MAX Lamp power 0 10 V LOW LOW stepless Minimum Maximum 0 10 V HIGH LOW Minimum 0 10 V LOW HIGH Maximum 0 10 V HIGH HIGH Maximum ...

Page 19: ...d the ELC does not switch off the lamp The error is also not stored by the ELC In order for the earth fault control to function properly it is essential that it be connected as prescribed particularly the earth connectors The relay contact ES pins 8 and 13 on the control connector opens when the isolation resistance R_error drops below approx 200 kOhm If an earth fault occurs during lamp operation...

Page 20: ...g on the lamp A HIGH signal is applied to the digital START control input to switch on the lamp If a HIGH signal has already been given to the digital START control input before the ELC is switched on then the lamp will not start up In the case of a power failure the ELC cannot automatically switch on the lamp when power returns Before switching on the lamp a LOW signal must be applied to the digi...

Page 21: ...at minimum power but can be brought up to nominal power within a few seconds Standby operation is set as follows a HIGH signal at the digital MIN control input or 0 V control voltage at the analogous SET VALUE control input The warm up time from standby operation to nominal operation depends on the lamp s ambient conditions If cooling is too intensive during standby operation the acceleration time...

Page 22: ... HIGH Switch OFF lamp Fault in ELC Contact manufacturer see 5 1 Lamp is too hot Let lamp cool down increased cooling probably required Lamp does not fire after being switched on and the relay RELEASE opens Lamp not connected Check plug contacts between ELC and lamp Lamp defective Replace lamp 5 1 Repair ELC Only the manufacturer is permitted to repair the ELC In case of failure please contact the ...

Page 23: ...ation before initial operation leave at least 4 hrs at room temperature Permissible pollution pollution severity 2 according to VDE 0110 Permissible humidity relative atmospheric humidity 80 non condensing Dimensions H x W x D approximately 500 x 320 x 130 mm Weight approximately 16 kg Installation position only vertical lamp and power connection at the top control connections at the bottom respec...

Page 24: ...kW 8 kW 8 kW 10 kW 10 kW Lamp voltage 750 V 750 V 800 V 800 V 800 V 800 V Tolerance lamp voltage 7 7 6 6 6 6 Line protection 3 channel automatic cut out characteristic C Lamp feeder cable approved types and lengths The use of cable types which have not been approved by the manufacturer can lead to malfunction The possibility of damage to the electronic ballast cannot be excluded Article no Type EL...

Reviews: