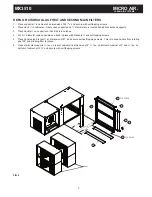
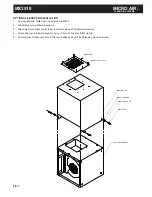
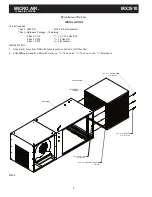
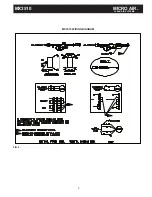
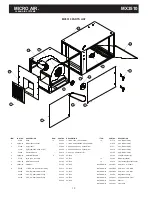
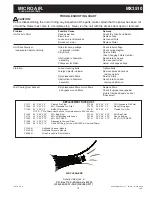
background image

MICRO-AIR AIR CLEANER

INSTALLATION AND OPERATION MANUAL

MX3510

Includes Installation, Operation, and Service Instructions

CAUTION

Read complete instructions before operating. 

Please file for future reference.

Summary of Contents for MX3510

Page 1: ...ICRO AIR AIR CLEANER INSTALLATION AND OPERATION MANUAL MX3510 Includes Installation Operation and Service Instructions CAUTION Read complete instructions before operating Please file for future reference ...

Page 2: ...ing has been completed NOTE It is recommended that a properly sized motor starter protector be used in the supply circuit for 208 240V 460V 575V units 120V units have thermally protected motors with on off switches 2 Make electrical connections as shown in wiring diagram to the wires protruding form the conduit on the side of the unit 3 Check blower for proper rotation direction Blower should rota...

Page 3: ...ex bolts and washers that secure motor blower module to filter module 4 Rotate motor blower module 90 as shown in FIG 3 5 Using 15 16 hex bolts and washers re secure motor blower module with filter module CAUTION Due to relocation of internal components some wiring may be loose Be sure to retain wires so they will not become loose in air stream of blower inlet 6 Reinstall motor access door and exh...

Page 4: ...o 3pc Horizontal support p 16pc 8 32 self tapping hex screws HEPA OR CHARCOAL AS SECOND MAIN FILTER 1 Place supports k in cabinet at a dimension of 13 1 4 and secure with self tapping screw 2 Place track j in cabinet so it rests upon supports and 1 2 diameter pin is located behind brackets on supports 3 Place handle l on supports so that it rests in notches 4 Lock 1 2 diameter rods on handle and t...

Page 5: ...ehind brackets on supports 3 Place handle l on supports so that it rests in notches 4 Lock 1 2 diameter rods on handle and track in place with brackets m and self tapping screws 5 Place handle stop bracket n at dimension of 27 and secure with self tapping screws This is to keep handle from rotating past 90 and allowing filter to loosen 6 Place Horizontal supports o 1pc on rear of cabinet at a dime...

Page 6: ...ule to assure an even fill Excess material may be saved by resealing the plastic bag NOTE Slow pouring will minimize dust that will be present during pouring 4 After filling module discard plastic bag and reinstall fill cover removed in step 2 NOTE The MX3510 requires two modules when used as a second main filter and four modules when used as a first and second main filter 5 With Filter track in p...

Page 7: ...wer Assembly 3 Align holes from Silencer with those located on sides of the Blower Assembly 4 Attach Silencer to Blower Assembly using 3 8 bolt lockwasher flat washer 5 Center Exhaust Grille over hole in Silencer attach using 8 32 self tapping machine screws BLOWER ASSEMBLY 3 8 BOLT LOCK WASHER FLAT WASHER SILENCER EXHAUST GRILLE 8 32 SMS FIG 7 ...

Page 8: ...h P222 15 16 18 Hex Nut 6 Each P233 15 16 Flat Washer INSTALLATION 1 Align six 6 holes from WAP with holes located on bottom of Air Filter Unit 2 Attach Wrap Around Pre filter with six 6 ea 15 16 18 hex bolt 15 16 18 hex nut and 15 16 flat washer WAP ASSEMBLY FILTER MEDIA 3 SIDES MX3510 5 16 X 75 HEX BOLTS TYP 6 PLCS 5 16 FLAT WASHER TYP 6 PLCS 1 8 X 1 4 ADHESIVE BACKED FOAM 5 16 18 HEX NUT TYP 6 ...

Page 9: ...MX3510 MICRO AIR CLEAN AIR SYSTEMS 9 MX3510 WIRING DIAGRAM FIG 9 ...

Page 10: ...1 Cabinet Weldment 11 P1495 42 Belt P3540 12 00 Blower Pulley 6 P1372 Latch 2 ea required P3207 43 Belt 13 P3498 Blower Standard 7 38011 02 Motor Access Panel P3182 44 Belt 14 P3214 Filter Gasket Specify Length 8 38043 01 Filter Door P3198 45 Belt NOT SHOWN 38059 01 SCM W 3 8 Collars 9 P2105 1 1 2 HP 5 8 Shaft Motor Pulley P3213 46 Belt NOT SHOWN 38059 02 SCM W 2 10 Collars P3578 2 HP 5 8 Shaft Mo...

Page 11: ...MX3510 MICRO AIR CLEAN AIR SYSTEMS 11 NOTES ...

Page 12: ...on Loose mounting bolts Tighten bolts Foreign objects in blower Remove access door and remove objects Dirty disposable filters Service filters Obstruction in hose arm Reach into hood and assembly remove obstruction Mist Coming from Exhaust Dirty disposable filters or torn filters Replace filters air bypass around filters Check for proper seal against picture frame and seals on door back wall REPLA...

Reviews: