background image

Microsoft Azure StorSimple Appliance 8100  
Hardware Installation Guide

Summary of Contents for Azure StorSimple 8100

Page 1: ...Microsoft Azure StorSimple Appliance 8100 Hardware Installation Guide ...

Page 2: ...k your device 3 Rack mount your device 4 Site preparation 4 Prerequisites 5 Rack mounting rail kit 5 Install the device on the rails 5 Mounting the device in the rack 6 Cable your device 8 Prerequisites 8 Power cabling 8 Network cabling 9 Serial port cabling 11 ...

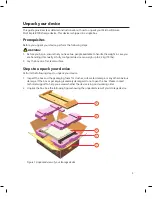
Page 3: ...y A fully configured device can weigh up to 32 kg 70 lbs 2 Lay the box on a flat level surface Steps to unpack your device Perform the following steps to unpack your device 1 Inspect the box and the packaging foam for crushes cuts water damage or any other obvious damage If the box or packaging is severely damaged do not open the box Please contact technical support to help you assess whether the ...

Page 4: ...ll your Microsoft Azure StorSimple 8100 storage device in a standard 19 inch rack with front and rear posts This device has a single primary enclosure The installation consists of multiple steps each of which is discussed in the following procedures Site preparation The device must be installed in a standard 19 inch rack that has both front and rear posts To prepare for rack installation ensure th...

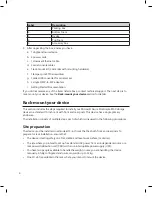
Page 5: ...oss of space within the rack Install the device on the rails Follow these steps to safely install the device on the rails 1 With the enclosure on the work surface remove the left and right front flange caps by pulling the caps free The flange caps simply snap onto the flanges 2 These rails are installed at the factory If these are not then install the left rail and right rail slides to the sides o...

Page 6: ...the rail assembly is level b Secure the rail assembly to the rack vertical members using two of the metric screws provided Use one screw on the front and one on the rear c Repeat these steps for the other rail assembly 4 5 2 1 3 Figure 3 Attaching rail assemblies to the rack Label Description 1 Clamping screw 2 Square hole front rack post screw 3 Left front rail location pins 4 Clamping screw 5 Ri...

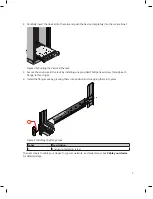
Page 7: ... rack by installing one provided Phillips head screw through each flange left and right 4 Install the flange caps by pressing them into position and snapping them into place 1 Figure 5 Installing the flange caps Label Description 1 Enclosure fastening screw The next step is to cable your device for power network and serial access See Cable your device for detailed steps ...

Page 8: ... Power and Cooling Modules PCMs Both the PCMs must be installed and connected to different power sources to ensure high availability Perform the following steps to cable your device for power 1 Ensure that the power switches on each of the PCMs are in the OFF position 2 Connect the power cords to both the PCMs in the primary enclosure 3 Attach the power cords to the rack power distribution units P...

Page 9: ...y the various data ports in the backplane of your device Figure 7 Back plane of your device showing the data ports Label Description 0 1 4 5 1 GigE network interfaces 2 3 10 GigE network interfaces 6 Serial ports 2 For high availability HA the device requires a minimum of two connections for each controller a The DATA 0 port is automatically enabled and configured via the serial console of the dev...

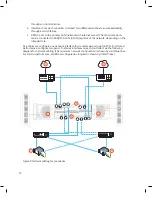
Page 10: ...SI LAN VLAN segment of the network depending on the intended role At a minimum configure one network interface for cloud access and one for iSCSI For HA and performance configure two pairs of network interfaces on each controller See the following diagram for network cabling The minimum network configuration is shown by solid blue lines For HA and performance additional configuration required is s...

Page 11: ...nal emulation to the device to the serial port of the active controller 4 Install the serial USB drivers shipped with this device on your computer 5 Set up the serial connection as follows 115 200 baud 8 data bits 1 stop bit no parity and flow control set to None 6 Verify the connection is working by pressing Enter in the console A serial console menu should be presented NOTICE Lights Out Manageme...

Page 12: ... 2014 Microsoft Corporation X19 32482 02 ...

Reviews: