background image

 1

Install Software

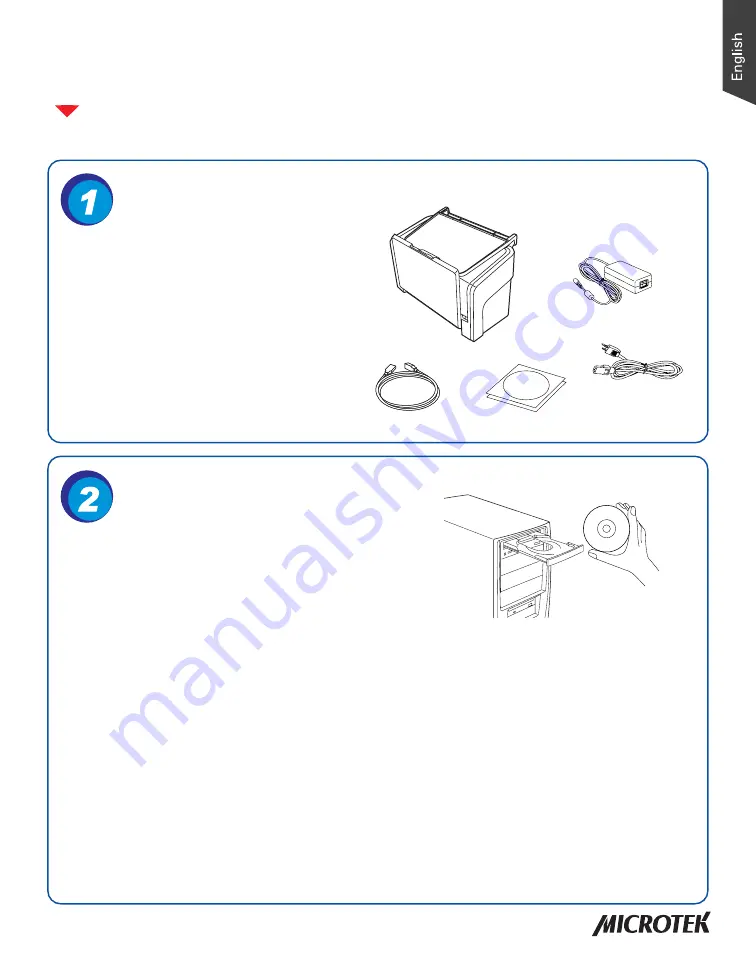
Unpack your scanner package and check for

major components.

Copyright © 2013   Microtek International, Inc.   http://www.microtek.com

I49-004856 D, September 2013

Start Here


I

nstalling your Microtek ArtixScan DI 6260S/6250S/6240S &

ArtixScan TS  630S

3

1. Scanner
2. Hi-Speed USB cable
3. Software CDs/DVDs
4. Power cord
5. Power adapter

1

5

2

4

Important:


You must install software before connecting

your scanner. Always close any open programs, and

turn off Anti-virus utilities before installing software.

PC:

A.

Place the 

Microtek Software CD/DVD

into a drive, and follow the on-screen

instructions to install the scanner

driver and software.

B.

Restart your computer at the end of all

software installation.

NOTE

: If the Microtek Software Installer screen

does not come up automatically, double-click the

following in succession: “My Computer”; the CD/

DVD-ROM icon; then cdsetup.exe to start the

installer program.

MAC:

A.

Place the 

Microtek Software CD/DVD

(ScanPotter) 

into a drive, and double-click

the 

ScanPotter

 installer icon to install

ScanPotter.

B.

Install the remaining software

components, then restart your computer

at the end of all software installation.

NOTE

: After rebooting your Macintosh, the Microtek

software will attempt to locate your scanner on the

system. Since this is your first install and you have

not yet connected the scanner, simply ignore the

message that appears and proceed to the next step.

Unpack Contents

Summary of Contents for ArtixScan DI 6240S

Page 1: ...the scanner driver and software B Restart your computer at the end of all software installation NOTE If the Microtek Software Installer screen does not come up automatically double click the following in succession My Computer the CD DVD ROM icon then cdsetup exe to start the installer program MAC A Place the Microtek Software CD DVD ScanPotter into a drive and double click the ScanPotter installe...

Page 2: ...Feed Tray backwards in the direction as the arrow shown to fully open the tray D Along the tracks of the two sides of the Document Feed Tray slide the feed tray down until it locks in place Open FeedTray OutputTray Open Output Tray and Paper Stabilizer Bring down the a Document Output Tray and b Paper Stabilizer from the top towards the direction as shown in the graph Document Feed Tray Before Aft...

Page 3: ...ll Customize the Function Button Your scanner is equipped with one Select one Scan Stop and one Favorite buttons plus a LED display used to automate a number of customized and predefined operations such as scanning to a file sending an image to your printer scanning for OCR etc Customizing is done through the Save Settings to Function Button command in the ScanWizard DI refer to the scanner s User...

Page 4: ... with the side to be scanned facing down and the top edge facing toward the feeder Push the stack of papers into the tray until the paper s edge touches the bottom edge of the feeder WARNING The document feeder is not designed for scanning photos doing so may damage your originals Microtek accepts no responsibility for damage that may arise from misuse of equipment 3 Align the stack of originals w...

Page 5: ...f the paper Finally load the papers to be scanned into the feed tray to start your scanning NOTE The settling position for the Paper Stopper on the tray must be equivalent to the length of the paper Incorrect positioning of the Paper Stopper will result in disorders and mess for the after scanned outputs Be sure the stopper is lightly against the edge of the paper Load the paper inside the space b...

Page 6: ... dimension in the Paper Size drop down menu as your preview image size d Select a desired resolution in the Resolution drop down menu for your image output resolution e If Auto crop Auto deskew is selected the scanner automatically detects the size of the original image crops the full scan frame to fit the image and removes unwanted black borders after the scan as well as corrects the distorted im...

Page 7: ...file or opened in an image editing program Alternatively click the Quick Scan button to scan your documents directly to a PDF NOTE For more details on other scanning scenarios applicable to your scanner refer to the scanner s User s Manual in the Microtek Software CD DVD Image correction settings Image type Scanning settings Scan frame enclosed by dotted lines and labeled with the tag Main Preview...

Page 8: ... Select a desired resolution in the Resolution for your image output resolution c Select Automatic Detection or a desired dimension in the Scan Frame as your preview image size 5 If necessary click the Preview button to perform a preliminary scan of the image in the Preview window Then reload the document into the feed tray 6 If necessary resize the scan frame floating dotted rectangle around the ...

Page 9: ...mposite display of image effects Filter column and additional image correction tools Additional Adjustment column for your scanned image Click the Scan Settings button to switch back to the default control panel of ScanPotter Preview window Scan frame enclosed by dotted lines ...

Page 10: ...ing out it in an upward direction 3 Close the scanner cover You should hear a click sound when the scanner cover returns to its original position NOTE Do not take out a jammed paper by force from the scanner when the scanner cover closes If doing so it may damage the rollers and cause the scanner work improperly Release button Scanner cover ...

Page 11: ...face areas Cleaning the Rollers Find several groups of rollers and then clean the rollers with a lint free cloth or a swab moistened with alcohol ethanol or water Cleaning the Sensors Find 4 sets of sensors Ultrasonic Double feed sensors I O sensors and Tray sensors and then clean the sensors with a dust blower Cleaning the Recesses Locate two recesses at the top of the roller cover and then clean...

Page 12: ...hen pull down the cover of the roller with your finger Take out the roller and replace it with the new one NOTE The recommended replacement point for the Separation Roller is approximate after 150 000 scans for Feed Roller Assembly is around 100 000 scans Please contact your local resellers for purchasing new rollers For more details of replacement refer to the scanner s User s Manual in the Micro...

Page 13: ...ter clicking scan a blank screen appears Uninstall and reinstall the ScanWizard DI or ScanPotter software 4 When trying to scan an error message appears on your screen that reads Can t Find Scanners Make sure your scanner is connected to your computer and plugged into a power source see Step 4 Uninstall and reinstall the ScanWizard DI or ScanPotter software 5 When trying to scan an error message a...

Page 14: ...run your product or your computer system properly later please go to the Microtek Download Service site at ww7 microtek com tw service php to download and install any updates you may require For additional information about Microtek products please visit our website at www microtek com Copyright 2013 Microtek Microtek ScanMaker ArtixScan ScanWizard and ColoRescue are trademarks or registered trade...

Reviews: