background image

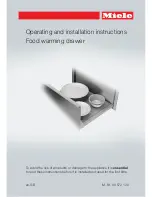
Operating and installation instructions
Food warming drawer

To avoid the risk of accidents or damage to the appliance it is 

essential

to read these instructions before it is installed and used for the first time.

en-GB

M.-Nr. 09 572 120


Summary of Contents for ESW 6114

Page 1: ...stallation instructions Food warming drawer To avoid the risk of accidents or damage to the appliance it is essential to read these instructions before it is installed and used for the first time en GB M Nr 09 572 120 ...

Page 2: ...irst time 16 Operation 17 Operation 17 Functions 18 Duration 18 Temperature settings 18 Keeping food warm 20 Warming crockery 22 Tips 22 Heating up times 22 Capacity 22 ESW 6114 ESW 6214 23 ESW 6129 ESW 6229 24 Low temperature cooking 25 Other uses 32 Combination with a CVA coffee machine 33 Cleaning and care 34 Problem solving guide 36 Optional accessories 38 Safety instructions for installation ...

Page 3: ...Contents 3 Building in dimensions ESW 6129 ESW 6229 45 Installation 49 Electrical connection 50 After sales service data plate 52 ...

Page 4: ...appliance please read these instructions carefully before installation and before us ing it for the first time They contain important notes on installa tion safety use and maintenance Miele cannot be held liable for damage caused by non compli ance with these Warning and Safety instructions Keep these instructions in a safe place and ensure that new users are familiar with the content Pass them on...

Page 5: ...perat ing instructions Any other usage is not supported by the manufac turer and could be dangerous People with reduced physical sensory or mental capabilities or lack of experience and knowledge who are not able to use the draw er safely on their own must be supervised whilst using it They may only use it unsupervised if they have been shown how to use it safe ly and recognise and understand the ...

Page 6: ...ot be allowed to clean the drawer unsupervised Please supervise children in the vicinity of the drawer and do not let them play with it The warming drawer gets hot when in use and remains hot for a while after being switched off Keep children well away from the warming drawer until it has cooled down and there is no danger of burning Danger of suffocation Packaging e g plastic wrappings must be ke...

Page 7: ...ical installation tested by a qualified electrician Before connecting the drawer to the mains supply ensure that the connection data on the data plate voltage and frequency match the mains electricity supply This data must correspond in order to avoid the risk of damage to the drawer Consult a qualified electrician if in any doubt Do not connect the drawer to the mains electrical supply by a multi...

Page 8: ...ust only be replaced by Miele spare parts If the plug is removed from the connection cable or if the cable is supplied without a plug the drawer must be connected to the elec trical supply by a suitably qualified electrician If the connection cable is damaged it must be replaced by a suit ably qualified electrician with a specialist connection cable of type H 05 VV F pvc insulated available from M...

Page 9: ...ers can support a maximum load of 25 kg Overloading or leaning or sitting on the drawer will damage the tele scopic runners If the drawer is installed behind a furniture panel e g a door en sure that the door is never closed whilst the drawer is in use Heat and moisture can build up behind a closed furniture panel and cause subsequent damage to the drawer the housing unit and the floor Do not clos...

Page 10: ... function is designed to keep hot food warm and not to warm up cold food Ensure food is really hot when placed inside the drawer Bacteria can develop on the food if the temperature is too low Make sure that you set a high enough temperature to keep food warm Cleaning and care Do not use a steam cleaning appliance to clean the drawer The steam could reach electrical components and cause a short cir...

Page 11: ...aste in landfill sites Disposal of your old appliance Electrical and electronic appliances of ten contain valuable materials They al so contain materials which if handled or disposed of incorrectly could be po tentially hazardous to human health and to the environment They are however essential for the correct functioning of your appliance Please do not therefore dispose of it with your household ...

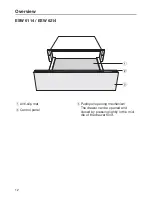
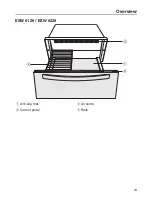
Page 12: ...Overview 12 ESW 6114 ESW 6214 a Anti slip mat b Control panel c Push pull opening mechanism The drawer can be opened and closed by pressing lightly in the mid dle of the drawer front ...

Page 13: ...Overview 13 ESW 6129 ESW 6229 a Anti slip mat b Control panel c Air vents d Rack ...

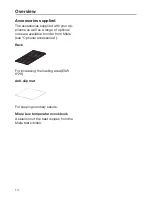
Page 14: ...nce as well as a range of optional ones are available to order from Miele see Optional accessories Rack For increasing the loading area ESW 6 29 Anti slip mat For keeping crockery secure Miele Low temperature cookbook A selection of the best recipes from the Miele test kitchen ...

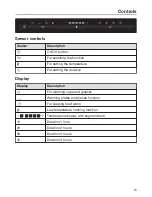
Page 15: ...he temperature For setting the duration Display Display Description For warming cups and glasses Warming plates and dishes function For keeping food warm Low temperature cooking function Temperature display with segment bars 1h Duration 1 hour 2h Duration 2 hours 3h Duration 3 hours 4h Duration 4 hours ...

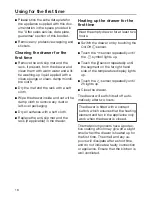
Page 16: ...if applicable in the drawer Heating up the drawer for the first time Heat the empty drawer for at least two hours Switch the drawer on by touching the On Off sensor Touch the sensor repeatedly until the symbol lights up Touch the sensor repeatedly until the segment on the far right hand side of the temperature display lights up Touch the sensor repeatedly until 2h lights up Close the drawer The dr...

Page 17: ... short circuit Open and close a loaded drawer carefully to prevent liquids from spill ing Open the drawer Touch the sensor to switch the drawer on Touch the sensor repeatedly until the required function lights up Touch the sensor repeatedly until the segment for the required temper ature lights up in the temperature dis play Touch the sensor repeatedly until the required duration in hours lights u...

Page 18: ... and dishes function but can get very hot Duration Do not leave the drawer unattended for too long in continuous operation mode Keeping food warm for a long time can result in it drying out or even self igniting Your drawer is fitted with a safety switch off mechanism which switches it off after a maximum of 12 hours continuous operation The drawer is set for continuous opera tion mode Exception L...

Page 19: ...Operation 19 Temperature display Temperature C 40 60 65 65 45 65 70 70 50 70 75 75 55 75 80 80 60 80 85 85 Approximate temperature values measured in the middle of the drawer when empty ...

Page 20: ...ated dishes To pre heat dishes place them in the drawer while it is heating up Do not cover roast or fried food which you want to keep crisp These types of food need to be kept warm at a higher temperature Cover food with a high moisture con tent and liquid and food which can develop a skin with aluminium foil or a plate To avoid spillages do not overfill dishes Freshly cooked food is hotter than ...

Page 21: ...es x Fish fingers Pan No x Meat in a sauce Dish Yes x Vegetables in a sauce Dish Yes x Goulash Dish Yes x Mashed potato Dish Yes x Plated meal Plate Yes x Baked potatoes new potatoes Plate dish Yes x Breaded escalope Pan No x Pancakes potato cakes Plate No x x Pizza Plate No x Boiled potatoes Dish Yes x Gravy Dish Yes x Strudel Plate No x To warm bread No x x To warm rolls No x x depending on mode...

Page 22: ...e crockery maximum capacity how the crockery is arranged the temperature setting It is therefore not possible to state pre cise times However the following in formation can be used as a guide With the function it takes approx 30 35 minutes for 6 place settings to heat up evenly 40 45 minutes for 12 place settings to heat up evenly With increased usage you will get to know which setting suits your ...

Page 23: ...oup bowls 23 cm 6 dessert plates 19 cm 1 oval serving dish 32 cm 1 serving dish 16 cm 1 serving dish 13 cm or alternatively 12 dinner plates 26 cm 18 soup bowls 23 cm 16 soup cups 10 cm 6 dinner plates and 6 soup bowls 26 cm 23 cm 6 pizza plates 36 cm 72 espresso cups 5 9 cm 30 cappuccino cups 8 8 cm 30 punch glasses 6 7 cm 8 cm high ...

Page 24: ...23 cm 12 dessert plates 19 cm 1 oval serving dish 32 cm 1 serving dish 19 cm 1 serving dish 16 cm 1 serving dish 13 cm or alternatively 40 dinner plates 26 cm 60 soup bowls 23 cm 45 soup cups 10 cm 20 dinner plates 20 soup bowls 26 cm 23 cm 20 pizza plates 36 cm 142 espresso cups 5 9 cm 90 cappuccino cups 8 8 cm 30 punch glasses 6 7 cm 8 cm high ...

Page 25: ... be cooked to a core temperature higher than 70 C is not suitable for cooking in the food warming drawer The core temperature reading gives in formation about the degree of cooking in the middle of a piece of meat The lower the core temperature the less cooked the meat is in the middle 45 50 C rare 55 60 C medium 65 C well done Cooking duration The cooking duration depends on the size of the indiv...

Page 26: ...n in the food warming drawer If you wish to use a food thermome ter Push the food thermometer into the meat so that the tip is in the centre Make sure that it does not come into contact with bones or layers of fat as these can cause a false reading If you wish to cook on a different set ting please see the table on the follow ing pages Select the Low Temperature func tion Select the desired temper...

Page 27: ... 50 55 60 65 40 50 60 80 90 110 Sirloin joint approx 400 g 4 6 mins 6 mins 8 mins 45 50 55 60 65 90 120 120 145 145 175 Sirloin joint approx 600 g 4 mins 6 8 mins 8 mins 45 50 55 60 65 115 135 150 180 225 255 Sirloin joint approx 1500 g 8 mins 8 10 mins 10 12 mins 45 50 55 60 65 120 150 250 280 300 330 Rump steak approx 180 g 1 per side 1 2 per side 2 per side 45 50 55 60 65 50 60 80 90 120 140 45...

Page 28: ...pprox 160 g 2 cm thick 1 per side 1 2 per side 2 per side 45 50 55 60 65 35 50 60 80 75 90 45 50 C rare 55 60 C medium 65 C well done Searing time Core temperature Duration Temperature setting Poultry cooking chart Type of cut min C min Duck breast approx 350 g 5 6 mins 60 70 45 65 80 95 Chicken breast approx 160 g 2 3 per side 70 45 60 Poularde breast approx 250 g 2 3 per side 70 60 80 Turkey bre...

Page 29: ...gammon approx 1500 g 8 mins 65 195 225 Pork loin approx 700 g 6 8 mins 65 180 210 Pork loin approx 1500 g 8 10 mins 65 210 240 Medallions approx 4 cm thick 2 per side 2 3 per side 60 65 75 95 100 120 Roulades approx 150 g cm thick 4 6 mins 65 150 180 Spare ribs 4 6 per side 65 165 195 60 C medium 65 C well done Searing time Core temperature Duration Temperature setting ...

Page 30: ...ack of lamb1 approx 400 g 3 4 mins 4 6 mins 60 65 100 130 120 150 French trim rack of lamb1 approx 600 g 3 mins 6 mins 60 65 90 120 130 160 Boned leg of lamb 2 approx 1200 g 8 10 mins 65 330 360 1 Use an ovenproof dish 2 Use a roasting dish or pan 60 C medium 65 C well done Searing time Core temperature Duration Temperature setting ...

Page 31: ...rox 800 g 5 6 mins 6 8 mins 60 65 135 150 165 180 Saddle of roebuck off the bone 1 approx 800 g 4 mins 6 mins 60 65 120 135 150 165 Haunch of hare2 approx 250 g 5 7 mins 65 210 230 Roast wild boar 2 approx 600 g 6 8 mins 65 190 220 1 Use an ovenproof dish 2 Use a roasting dish or pan 60 C medium 65 C well done 70 C well done Searing time Core temperature Duration Temperature setting ...

Page 32: ...ge latine Bowl No 12 15 Proving dough Bowl Yes with plate 12 30 Making yoghurt Yogurt jars with lids 5 00 Rice pudding to finish off the cooking proc ess Dish Yes with lid 12 40 Melt chocolate Bowl No 12 20 Defrosting fro zen vegetables Bowl No 1 00 Temperature setting Temperature setting Duration ...

Page 33: ...ode The function cannot be altered The duration cannot be altered The safety switch off mechanism is deactivated Activating coffee mode Coffee mode can only be activated when the drawer is switched off Connect the drawer to the coffee ma chine Touch the sensor Then touch the sensor Continue to touch both sensors until both the 1h and 4h symbols in the time display and the symbol light up simultane...

Page 34: ...uld cause a breakage in cer tain circumstances Remove any residual cleaning agent immediately Allow the drawer to cool down to a safe temperature before cleaning The drawer and accessories should be cleaned and dried thoroughly after each use Unsuitable cleaning agents To avoid damaging the surfaces do not use cleaning agents containing soda ammonia acids or chlorides cleaning agents containing de...

Page 35: ...ied with a sponge or use a clean damp mircofibre cloth Wipe with clean water afterwards After cleaning wipe the surfaces dry using a soft cloth Cleaning the anti slip mat Do not clean the anti slip mat in the dishwasher or washing machine Never place it in the oven to dry Remove the anti slip mat for clean ing Clean the anti slip mat by hand only using a solution of hot water and mild washing up l...

Page 36: ...t up The appliance is not correctly plugged in and switch ed on at the mains socket Insert the plug and switch on at the socket The fuse is defective or has tripped Reset the trip switch in the mains fuse box mini mum fuse rating see data plate If after resetting the trip switch in the mains fuse box and switching the appliance back on the appliance will still not heat up contact a qualified elect...

Page 37: ...ng time Various factors will affect how long the crockery will take to heat up see Warming crockery The crockery is too hot The function for warming plates and dishes or warming cups and glasses is not selected Select the correct function The temperature setting is too high Select a lower temperature A noise can be heard when the drawer is in use The noise is caused by the fan which distributes th...

Page 38: ...s cleaning and conditioning products for your Miele appliances These can be ordered online at or from Miele see end of this booklet for contact details Rack For increasing the loading area Anti slip mat For keeping crockery secure Microfibre cloth For removing finger marks and light soiling ...

Page 39: ...on with those appli ances quoted by Miele as being suitable Miele cannot guarantee trouble free operation if the appliance is operated in combination with appliances other than those quoted by Miele as being suitable The base on which the drawer and the combination appliance are fitted must be fixed in place and must support the weight of both appliances When building in the combination appliance ...

Page 40: ...t the need for an interim shelf The drawer is available in two models which differ in height The building in dimensions for the warming drawer must be added to the building in di mensions for the combination appli ance to establish the niche size re quired All dimensions are given in mm ...

Page 41: ... oven b Building in dimension including mains supply cable connection Connection cable L 2200 mm Glass front Metal front ESW with H 6xxx BM BP M 61xx M 62xx a Ventilation cut out required when in stalled with a pyrolytic oven b Building in dimension including mains supply cable connection Connection cable L 2200 mm Glass front Metal front ...

Page 42: ...ins supply cable connection Connection cable L 2200 mm Glass front Metal front ESW with DGC 6500 DGC 6600 DGC 680x a Ventilation cut out required when in stalled with a steam combination oven b Building in dimension including mains supply cable connection Connection cable L 2200 mm Glass front Metal front ...

Page 43: ...mension including mains supply cable connection Connection cable L 2200 mm Glass front Metal front For the DGC 6805 cut outs are re quired for the water inlet and drain ho ses see DGC 6805 installation in structions ESW with DGC 6660 a Cut out for ventilation b Building in dimension including mains supply cable connection Connection cable L 2200 mm Glass front Metal front ...

Page 44: ...200 mm Glass front Metal front For the steam oven with pressure cut outs are required for the water inlet and drain hoses see installation in structions for steam oven with pres sure ESW with CVA 6401 CVA 68xx a Ventilation cut out for installation in combination with a coffee machine b Building in dimension including mains supply cable connection Connection cable L 2200 mm Glass front Metal front...

Page 45: ... oven b Building in dimension including mains supply cable connection Connection cable L 2200 mm Glass front Metal front ESW with H 6xxx BM BP M 61xx M 62xx a Ventilation cut out required when in stalled with a pyrolytic oven b Building in dimension including mains supply cable connection Connection cable L 2200 mm Glass front Metal front ...

Page 46: ...ins supply cable connection Connection cable L 2200 mm Glass front Metal front ESW with DGC 6500 DGC 6600 DGC 680x a Ventilation cut out required when in stalled with a steam combination oven b Building in dimension including mains supply cable connection Connection cable L 2200 mm Glass front Metal front ...

Page 47: ...mension including mains supply cable connection Connection cable L 2200 mm Glass front Metal front For the DGC 6805 cut outs are re quired for the water inlet and drain ho ses see DGC 6805 installation in structions ESW with DGC 6660 a Cut out for ventilation b Building in dimension including mains supply cable connection Connection cable L 2200 mm Glass front Metal front ...

Page 48: ...200 mm Glass front Metal front For the steam oven with pressure cut outs are required for the water inlet and drain hoses see installation in structions for steam oven with pres sure ESW with CVA 6401 CVA 68xx a Ventilation cut out for installation in combination with a coffee machine b Building in dimension including mains supply cable connection Connection cable L 2200 mm Glass front Metal front...

Page 49: ...he drawer into the housing unit as far as the vapour strip and make sure it is correctly aligned in the unit Open the drawer and use the screws supplied 2 for the smaller drawer 4 for the larger drawer to secure it to the side walls of the housing unit Build in the combination appliance in accordance with the operating and installation instructions supplied with it ...

Page 50: ... from the con nection cable or if the cable is sup plied without a plug the drawer must be connected to the electrical supply by a suitably qualified electrician If the switched socket is not accessi ble after installation or if the appli ance is to be hard wired an addi tional means of disconnection must be provided for all poles When switched off there must be an all pole contact gap of at least...

Page 51: ...es Automatic circuit breakers Press the red button until the middle black button springs out Built in circuit breakers Circuit breakers type B or C Switch the on off switch from 1 on to 0 off Residual current device RCD Residual current circuit breaker Switch the main switch from 1 on to 0 off or press the test button Replacing the mains connec tion cable If the mains cable needs to be replaced it...

Page 52: ...ealer or Miele please quote the model and serial number of your appliance Data plate Space in which to stick the extra data plate supplied with the appliance Ensure that the model number is the same as the one on the back page of these instruc tions Guarantee The appliance is guaranteed for 2 years from the date of purchase In the UK you must activate your cover by calling 0330 160 6640 or registe...

Page 53: ......

Page 54: ......

Page 55: ...venue Citywest Business Campus Dublin 24 Tel 01 461 07 10 Fax 01 461 07 97 E Mail info miele ie Internet www miele ie Ireland Malaysia Miele Sdn Bhd Suite 12 2 Level 12 Menara Sapura Kencana Petroleum Solaris Dutamas No 1 Jalan Dutamas 1 50480 Kuala Lumpur Malaysia Phone 603 6209 0288 Fax 603 6205 3768 Miele New Zealand Limited IRD 98 463 631 Level 2 10 College Hill Freemans Bay Auckland 1011 NZ T...

Page 56: ...M Nr 09 572 120 02 en GB ESW 6114 ESW 6214 ESW 6129 ESW 6229 ...

Reviews: