background image

Operating instructions 

for washing machine 
W 916

It is essential to read these opera-
ting instructions before installing or

Q

using the machine to avoid the risk
of accident, or damage to the
machine.

M.-Nr. 04616330

Summary of Contents for W 916

Page 1: ...ting instructions for washing machine W 916 It is essential to read these opera ting instructions before installing or Q using the machine to avoid the risk of accident or damage to the machine M Nr 04616330 ...

Page 2: ...2 Adding or removing washing after programme start 13 Adding detergent 14 Adding fabric conditioner 15 Programme chart 16 Programme sequence 18 Wash care symbols 20 Additional options 21 Delay start time left display 22 Maintenance Cleaning and Care 23 What to do if 27 After sales service 32 Installation and connection Installation 33 Plumbing 37 Electrical connection 41 Activating the programmabl...

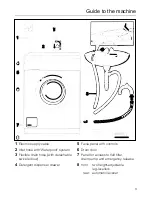
Page 3: ...proof system 3 Flexible drain hose with detachable swivel elbow 4 Detergent dispenser drawer 5 Facia panel with controls 6 Drum door 7 Panel for access to fluff filter drain pump and emergency release 8 front two height adjustable leg levellers rear automatic leveller 3 ...

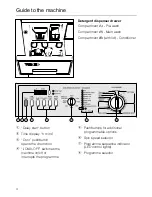
Page 4: ...OFF switches the machine on off or interrupts the programme Detergent dispenser drawer Compartment i Pre wash Compartment j Main wash Compartment p with lid Conditioner f Pushbuttons for additional programmable options g Spin speed selector h Programme sequence indicator LED control lights i Programme selector 4 ...

Page 5: ... the connection data on the data plate fusing voltage and fre quency matches the mains electricity supply If in any doubt consult a quali fied electrician The electrical safety of this ma chine can only be guaranteed when continuity is complete between the machine and an effective earthing system which complies with local and national regulations It is most import ant that this basic safety requir...

Page 6: ...cock roaches or other vermin will not be covered by the appliance guarantee Before using the machine for the first time check that the transit fit ting at the rear of the machine has been removed see section on Installa tion During spinning a transit fitting which is still in place may result in dam age to both the machine and adjacent furniture or appliances Turn off the stopcock if the ma chine ...

Page 7: ...ied by the manu facturer as being suitable for use in a washing machine Always observe the manufacturer s instructions carefully If washing at very high tempera tures remember that the porthole glass will be hot Do not let children touch it during a hot wash programme Always make sure the drum is sta tionary before reaching in to remove washing Reaching into a mov ing drum is extremely dangerous T...

Page 8: ...s polyropylene PP Rather then just throwing these ma terials away please take them to the nearest local authority collection point for specific waste Disposal of your old machine Old machines may contain material which can be reclaimed or recycled Please contact your dealer your local waste collection centre or scrap mer chant about potential recycling schemes Ensure that the machine presents no d...

Page 9: ... for a clean result so a pre wash is not auto matically included in the programmes If it is wanted a simple press on the pre wash selector includes it Economy tips To help you wash most economically remember the following tips The automatic load control facility allows you to wash individual loads of between 1 and 5 kg Ideally wash with the maximum load specified for each programme This uses the e...

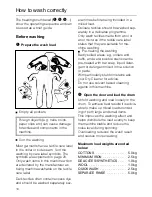
Page 10: ...textiles made from wool or wool mixtures if the textile care label states that they are suitable for ma chine washing Pre treating the washing Badly soiled areas e g collars and cuffs and water soluble stains can be pre treated with bar soap liquid deter gent or detergent mixed into a solution or paste With particularly stubborn stains ask your Dry Cleaner for advice Do not use solvent based clean...

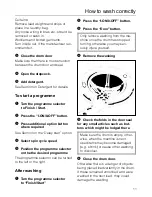
Page 11: ...tion the programme selector on the the desired programme The programme selector can be turned to the left or the right After washing 1 Turn the programme selector to Finish Start 2 Press the I ON 0 OFF button 3 Press the Door button Only remove washing from the ma chine once the drum has stopped turning otherwise you may seri ously injure yourself 4 Remove the washing 5 Check the folds in the door...

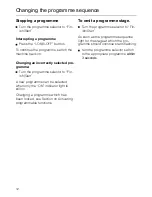
Page 12: ...amme selector to Fin ish Start A new programme can be selected when only the ON indicator light is still on Changing a programme which has been locked see Section on Activating programmable functions To omit a programme stage Turn the programme selector to Fin ish Start As soon as the programme sequence light for the stage at which the pro gramme should continue starts flashing turn the programme ...

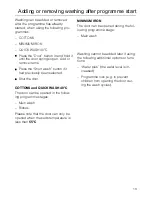
Page 13: ...ously been selected Shut the door COTTONS and QUICK WASH 40 C The door can be opened in the follow ing programme stages Main wash Rinses Please note that the door can only be opened when the suds temperature is less than 55 C MINIMUM IRON The door can be opened during the fol lowing programme stage Main wash Washing cannot be added later if using the following additional options or func tions Wate...

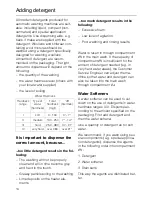
Page 14: ...l not be properly clean and will in time become grey and hard to the touch Greasy particles cling to the washing Lime deposits on the heater ele ments too much detergent results in the following Excessive foam Low level of agitation Poor washing and rinsing results Water is taken in through compartment j in the main wash If the capacity of compartment j is insufficient for the amount of detergent ...

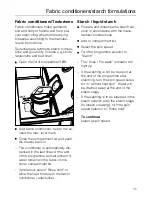
Page 15: ...ramme a small amount of water remains in the fabric condi tioner compartment p If preferred select Rinse hold to allow the load to steep in the fabric conditioner retexturiser Starch liquid starch Prepare and dispense the starch sol ution in accordance with the manu facturer s instructions Add to compartment i Select the spin speed Turn the programme selector to Starch The Soak Pre wash indicator ...

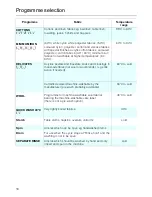
Page 16: ...d triacetate socks and stockings in man made fibres not wool or wool blends gentle action if needed 60 C to cold Curtains declared machine washable by the manufacturer pre wash probably advisable 30 C to cold WOOL Programme for machine washable wool fabrics bearing the machine washable care label there is not a pre wash option 40 C to cold QUICK WASH 40 C 7 Very lightly soiled fabrics 40 C Starch ...

Page 17: ...xtiles with wool content If cold is selected for the temperature the water is warmed to 24 C This helps the effect of the detergent Fill the drum loosely 1 2 to 3 4 full Soak Pre wash Short Dust in curtains usually makes pre wash advisable 1 kg If cold is selected for the temperature the water is warmed to 24 C This helps the effect of the detergent 2 5 kg Water plus Add less detergent half load 5...

Page 18: ...xplanations X Function included Function not included 1 A 4th rinse automatically switches in if there is too much foam in the drum or if a spin speed lower than 800 rpm has been selected 2 Increasing the water level The water level can be increased from a low level to a higher level by pressing the Water plus button Top up rinse Additional water flows into the drum and the suds are cooled slightl...

Page 19: ...speed can be selected Anti crease spin and loosen The anti crease action guards against the tendency for creases to set in when fabrics have been left in water for a long time There is drum movement twice a minute The anti crease phase can be cancelled by pressing in the Door button Rinse hold Interim rinse and spin is carried out in the relevant programmes At the end of the final rinse the washin...

Page 20: ... programme and only wash woollens bearing the label shown here This symbol is registered by the IWS International Wool Secretariat Hand wash do not wash h dry clean ABC do not dry clean D suitable for chlorine bleaching y not suitable for chlorine bleaching z Tumble dry at normal temperature q at a lower temperature r do not tumble drys Ironing hot ironI medium hot iron H cool iron G do not iron J...

Page 21: ...t pre wash Add the total amount of detergent to compartment j or directly into the drum on top of the laundry Programmes with pre wash 1 4 of the detergent should be added to compartment i for the soak and pre wash and 3 4 added to compart ment j for the main wash With pre wash For heavily soiled and stained items Water plus This is recommended for particularly delicate fabrics and if more water i...

Page 22: ...t will go out The Time left indicator light will come on and the time remaining in the pro gramme selected will be shown Deleting Delay start Press the pushbutton when 9 h 30 mins shows in the display Time left Programme duration shows in hours and minutes as soon as the programme selector switch is set to the required programme the delay start period has elapsed After the programme has started th...

Page 23: ...ing a suitable proprietary stainless steel cleaner Do not use abrasive cleaners or sol vents Detergent dispenser drawer Pull out the detergent dispenser drawer until a resistance is felt Press down the red release knob and at the same time pull the drawer right out of the machine Clean the detergent dispenser and conditioner dispenser compartments Remove the suction tube from com partment p wash u...

Page 24: ...ace a dish underneath the drain fix ture Turn the fluff filter lid round 2 3 times Do not take it right out Approx 2 litres of water will drain out of the hose If the drain outlet is clogged more water will be retained in the machine max 25 l In this case screw the fluff filter back into position and empty the dish before repeating the procedure as often as necessary Caution if laundry has been wa...

Page 25: ...and fluff Turn the impeller by hand to check that it is free to rotate Any foreign ob jects causing an obstruction should be removed Clean the inside of the fluff filter hous ing Remove any deposits of lime scale and detergent or foreign bodies from the thread of the filter housing and filter unit as these objects can cause a leakage of water 25 ...

Page 26: ...very six months or after an interruption to the external water supply To clean the filter in the inlet hose Turn off the stopcock Unscrew the inlet hose from the stop cock Remove the rubber seal from the re cess Using pointed pliers take hold of the plastic filter bar remove the filter and clean Put the filter and seal back in the reverse order and reconnect the hose Turn on the stopcock and check...

Page 27: ... a programme The Check water inlet outlet LED s are flashing The water inlet is blocked The Check water inlet LED is flashing but the programme has run normally The stopcock is not opened far enough The inlet hose is kinked The water pressure is too low Call the Service Dept The water inlet system is blocked The Check water inlet LED is flashing and the Finish light is on in the Sequence display b...

Page 28: ...be selected Turn the programme selector to Spin The ON LED is flash ing Programme locking is activated The programme selected has been changed Go back to the programme originally selected The washing has not been spun satisfactorily The spin speed selected was too low Select a higher spin speed next time The load was not distributed sufficiently evenly in the drum Laundry was either only spun at a...

Page 29: ...onditioner is not completely dispensed or water remains in the p com partment The dispenser drawer was not pushed right in when the fabric conditioner was being flushed in The siphon tube is either incorrectly positioned or clogged Clean the siphon tube Excessive build up of foam Use only a suitable low lather detergent at the appropriate temperature Follow recommendations on the packet Take the w...

Page 30: ...tergent does not give the required result Liquid detergents do not contain bleaching agents They do not remove stains eg fruit coffee and tea stains Use a general purpose washing machine powder containing a bleaching agent Pour stain remover salts into the dispenser drawer compartment j Never put stain salts and liquid detergent together in the dispenser drawer After washing knobbles pilling appea...

Page 31: ...he door mechanism downwards the door will open Always make sure that the drum is sta tionary before reaching in to remove washing Reaching into a moving drum is extremely dangerous To check water pressure Place a bucket under the stopcock Turn on the stopcock If 5 litres of water flow into the bucket in 15 seconds the water pressure correct Electric socket If there is any doubt about the elec tric...

Page 32: ...le Service depart ment see back cover for the address When contacting the Service Depart ment please quote the Model and Ser ial nos of your appliance both of which are shown on the data plate visible when the door is opened above the porthole glass Example PC Where any LED indicator light is also marked PC the PC function is reserved for the service engineer 32 ...

Page 33: ...be large enough to span several joists and should be bolted to the joists and not only to the floorboards Check for the presence or pipes and cables first The most stable part of a floor is usually in the corner If the machine is installed on a raised plinth it must be secured against slip page during spin using retaining clips available from the Miele Spare Parts Dept Installation Lift the machin...

Page 34: ...plate Plug the two holes with the plastic caps supplied The machine should not be moved with out the transit fitting in place The transit fitting should be stored in a safe place for future use It must be re fitted if the machine is to be moved again Re fitting is car ried out by reversing the procedure 34 ...

Page 35: ... worktop A special conversion kit is required The machine lid must be replaced by a cover plate To ensure electrical safety the cover plate must be fitted by a suitably competent person exactly according to the fitting instructions included with the kit For installation under a work surface 900 910 mm from the floor a raising kit is required Connections for electricity water and drainage should be...

Page 36: ... Water hardness reminder The amount of detergent will depend on various factors including the water hardness level in your area Set the water hardness dial located in the detergent dispenser box as a reminder Turn the dial to the relevant setting using 1 soft 4 very hard Use the spatula supplied with the ma chine It is located at the rear of the dis penser drawer If you do not know how hard the wa...

Page 37: ... is a minimum flow pressure of 1 bar pressure if 5 litres of water flow into a suitable container in 15 seconds The water pressure must not exceed 10 bar If the water pressure is higher than 10 bar it is essential to fit a reducer valve The Miele Waterproof system con nected between the stopcock and the machine offers the safest protection against water leaks For the Waterproof system to function ...

Page 38: ...he event of a leaking machine Any leaking water is collected in a sump in the base of the appliance A float switch switches the safety valve off electrically no more water will flow in Protection in the event of a leaking water inlet hose Leaking water is fed into the sump through the protective covering which surrounds the inlet hose as a second skin The float switch switches off the water supply...

Page 39: ...Plumbing Important The plastic casing of the water connec tion contains an electric component Do not dip into liquids 39 ...

Page 40: ...ection 32 mm Drain hose connection Direct into a sink Hook the hose over the edge and secure Make sure that the water can flow freely to avoid flooding and to prevent water from being sucked back into the ma chine Connected to a standpipe Connected to a plastic drain pipe with a rubber nipple There is no need to use a non return valve Allow the water to drain off into a floor drain If required the...

Page 41: ...rth symbol z or coloured green or green and yellow The wire which is coloured blue must be connected to the terminal which is marked with the letter N or coloured black The wire which is coloured brown must be connected to the terminal which is marked with the letter L or coloured red WARNING THIS APPLIANCE MUST BE EARTHED Non rewireable plugs BS 1363 If this machine or appliance is fitted with a ...

Page 42: ...INIMUM IRON and QUICK WASH 40 C D Programme Lock Child safety feature Programme lock prevents a wash pro gramme being changed from another e g by children playing This also applies to the additional op tion selections and prevents un planned opening of the door The washing machine ignores any changes after the first three minutes of starting the programme i e if the pro gramme selector switch is s...

Page 43: ... the machine close the door release all pushbutton switches and set the programme selector switch to Finish Start Steps 2 to 4 must be carried out within 25 Seconds Step 1 Press in the Soak and Short wash buttons Step 2 Press in the I ON 0 Off button Step 3 Release the Soak button 43 ...

Page 44: ...hort wash button The ON LED will now light up and the Main wash light flashes Step 5 Select the programmable function required Programmable function AHigh water level turn programme selector to SEPARATE RINSE Continue with Step 6 to activate 42 ...

Page 45: ...QUICK WASH 40 C Continue with Step 6 to activate Programmable function D Gentle action turn the programme selector to DELICATES 50 C Continue with Step 6 to activate Step 6 activate Press and release the Short wash button 4 times i e twice in and twice out Then if activated LED Rinses 1 2 lights up if cancelled LED Rinses 1 2 goes out Step 7 to store in memory press in the I ON 0 OFF button 45 ...

Page 46: ...the I ON 0 OFF button This finishes the check of the programm able function To cancel the programmable function Proceed as for Switching on a pro grammable function Step 1 to Step 6 inclusive With step 6 the programmable function can be cancelled The indicator light Rinse 1 2 goes out again Press the I ON 0 OFF button The programmable function is can celled from memory 46 ...

Page 47: ...ter 58 l Time 1 h 36 mins MINIMUM IRON 40 C 2 5 kg Electricity 0 45 KWh Water 65 l Time 1 h 21 mins DELICATES SYNTHETICS 30 C 1 kg Electricity 0 40 KWh Water 75 l Zeit 58 min WOOL 30 C 1 kg Electricity 0 2 KWh Water 60 l Time 46 mins Acc to EN 60456 Consumption data can vary from the nominal values given as a result of water pressure water hardness water inlet temperature room temperature type of ...

Page 48: ...ating Water flow pressure min Static water pressure max Drain pump head max Drain pump length max Test certificates awarded Electrically suppressed according to 85 cm 59 5 cm 60 cm 97 cm 103 kg 1600 Newton approx 160 kg 5 kg dry laundry s Data plate 1 bar 10 bar 1 m 5 m Radio tv suppression VDE DIN EN 60555 VDE 0838 48 ...

Page 49: ...49 ...

Page 50: ...50 ...

Page 51: ...51 ...

Page 52: ...Alteration rights reserved 00 9 This paper consists of cellulose which has been bleached without the use of chlorine 1 13 6 ...

Reviews: