background image

TECHNICAL & SERVICE MANUAL

Air-Conditioners For Building Application

<Indoor unit>

2004

Models

Ceiling Concealed

Series PEFY

PEFY-P40VMH-E,PEFY-P50VMH-E

PEFY-P63VMH-E,PEFY-P71VMH-E

PEFY-P80VMH-E,PEFY-P100VMH-E

PEFY-P125VMH-E,PEFY-P140VMH-E

PEFY-P200VMH-E,PEFY-P250VMH-E

INDOOR UNIT

CONTENTS

SAFETY PRECAUTIONS ·························

1

1. FEATURES ···········································

3

2. PART NAMES AND FUNCTIONS ········4
3. SPECIFICATION···································

6

4. OUTLINES AND DIMENSIONS············9
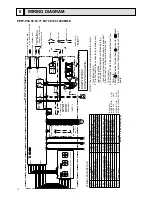
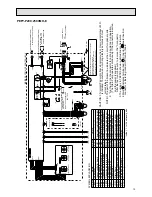
5. WIRING DIAGRAM ·····························

11

6. REFRIGERANT SYSTEM DIAGRAM 13

····

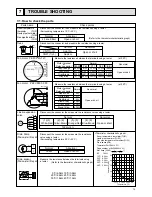
7. TROUBLE SHOOTING·······················

14

8. DISASSEMBLY PROCEDURE···········17

For use with  the R410A & R407C & R22

Summary of Contents for City Multi PEFY-P100VMH-E

Page 1: ...EFY P71VMH E PEFY P80VMH E PEFY P100VMH E PEFY P125VMH E PEFY P140VMH E PEFY P200VMH E PEFY P250VMH E INDOOR UNIT CONTENTS SAFETY PRECAUTIONS 1 1 FEATURES 3 2 PART NAMES AND FUNCTIONS 4 3 SPECIFICATION 6 4 OUTLINES AND DIMENSIONS 9 5 WIRING DIAGRAM 11 6 REFRIGERANT SYSTEM DIAGRAM 13 7 TROUBLE SHOOTING 14 8 DISASSEMBLY PROCEDURE 17 For use with the R410A R407C R22 ...

Page 2: ...r consult the dealer or an authorized technician If the air conditioner is installed improperly water leakage elec tric shock or fire may result After completing installation work make sure that refrigerant gas is not leaking If the refrigerant gas leaks and is exposed to a fan heater stove oven or other heat source it may generate noxious gases Do not reconstruct or change the settings of the pro...

Page 3: ...ll degrade if it is mixed with a large amount of mineral oil Use liquid refrigerant to fill the system If gas refrigerant is used to seal the system the composition of the refrigerant in the cylinder will change and performance may drop Do not use a refrig If another refrigerant R22 etc is used the chlorine in the refrig erant may cause the refrigerator oil to deteriorate Use a vacuum pump with a ...

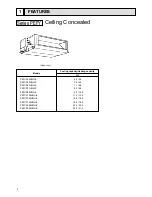
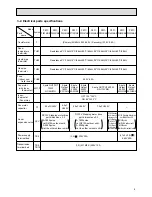
Page 4: ...VMH E PEFY P100VMH E PEFY P125VMH E PEFY P140VMH E PEFY P200VMH E PEFY P250VMH E 4 5 5 0 5 6 6 3 7 1 8 0 8 0 9 0 9 0 10 0 11 2 12 5 14 0 16 0 16 0 18 0 22 4 25 0 28 0 31 5 FEATURES 1 Indoor unit Ceiling Concealed Series PEFY Models Cooling capacity Heating capacity kW ...

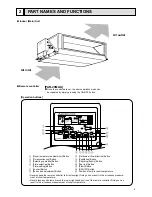
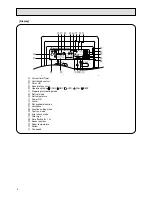
Page 5: ...temperature adjustment Button 2 Timer continuous Button 3 Selecting operation Button 4 Time selection Button Time setting Button 5 Louver Button 6 Fan speed adjustment Button 7 Up down airflow direction Button 8 Ventilation Button 9 Checking built in Button 0 Test run Button A Filter Button B ON OFF Button C Position of built in room temperature Never expose the remote controller to direct sunligh...

Page 6: ...urrent time Timer Centralized control Timer ON Abnormality occurs Operation mode COOL DRY AUTO FAN HEAT Preparing for Heating mode Defrost mode Set temperature Power ON Louver Not available function Ventilation Function setting mode Test run mode Error check mode Filter sign Set effective for 1 hr Sensor position Room temperature Airflow Fan speed A B C D E F G H I J K L M N O P Q R S T U ...

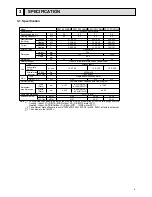
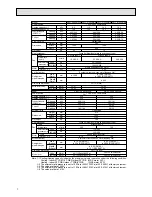
Page 7: ...n Single phase induction motor Synthethic fiber unwoven cloth filter long life 10 0 14 0 220 240V 50Hz 60Hz PEFY P40VMH E PEFY P50VMH E 5 6 4 5 6 3 5 0 Galvanizing 380 900 1 12 7 6 35 32 1 1 4 inch 0 08 0 19 0 23 0 19 0 23 0 88 1 06 0 88 1 06 0 24 0 30 0 24 0 30 1 12 1 38 1 12 1 38 0 26 0 33 0 26 0 33 1 20 1 51 1 20 1 51 45 50 ø ø 9 52 ø PEFY P63VMH E 7 1 8 0 ø 15 88 ø 12 7 R410A ø 15 88 R22 R407C...

Page 8: ...ng kW A A mm mm mm kg m 3 min Pa Pa kW mm mm dB A dB A Heating capacity 1 Power consumption 50 60Hz Current External finish Dimension Height Width Depth 380V 400 415V 380V 400 415V Net weight Heat exchanger Fan Type Airflow rate External static pressure 4 Motor Output 5 Type Air filter option Refrigerant pipe dimension Gas Brazing Liquid Brazing Drain pipe dimension Noise level Galvanizing 470 125...

Page 9: ... NC 45VMH 4 pole Output 180W NC 71VMH Symbol L1 L2 L3 N 660V 40A TH23 Resistance 0 C 15kΩ 10 C 9 6kΩ 20 C 6 3kΩ 25 C 5 4kΩ 30 C 4 3kΩ 40 C 3 0kΩ Inner thermostat Fan motor Liquid pipe thermistor Fan motor capacitor Linear expansion valve 4 pole Output 220W NC 80VMH 4 pole Output 230W NC 90VMH 4 pole Output 550W NS 200VMH 4 pole Output 800W NS 250VMH 4 pole OUTPUT 400W NS 112VMH 3 0µF 440V 4 0µF 44...

Page 10: ... fan 4 Make sure to install the air filter field supply on the air intake side In case field supplied air filter is used attach it where the filter service is easily done 5 On Model 50 100 125 140 you would use flare nut packed with the Indoor Unit when connnecting the Outdoor Unit for R407C R22 6 In order to increase the strength of the flare nut the size of some of them has been increased Refrig...

Page 11: ...ing bolt pitch 60 340 1100 Drain hole Control box Drain hole option Keep duct work length 850mm or more Air outlet Air inlet Lower than 550mm Lower than 300mm 3 When installing the drain water lifting up mech option Refrigerant piping flare connection gas M copper tube HP Refrigerant piping flare connection liquid N copper tube LP Drain hose 32mm 1 1 4inch flexible joint 200mm accessory 1 2 3 Make...

Page 12: ...ector or fastening connector of control board inside is the optional parts NAME SYMBOL EXPLANATION Power source terminal bed Transmission terminal bed TB5 Transmission terminal bed TB15 TB2 SW4 I B SW1 A B SW14 A B SW12 A B SW11 A B SW3 I B SW2 I B Switch 1st digit address set Transformer Address board Indoor controller board Electronic linear expan valve B Capacitor for MF Fan motor LEV T A B I B...

Page 13: ...igit address set SYMBOL NAME TH22 TH23 Thermistor inlet temp detection TH21 X04 X06 NOTE 1 The part of the broken line indicates the circuit for optional parts 2 A in the chart is the connector for a drain pump test run operation The Drain Pump operates continuously if the connector is inserted and the power is supplied After the test run make sure to remove the A connector 3 The wirings to TB2 TB...

Page 14: ... P50VMH E Liquid pipe Capacity Item ø 12 7 1 2F R410A ø 12 7 1 2F ø 6 35 1 4F ø 15 88 5 8F ø 9 52 3 8F ø 15 88 5 8F R22 R407C ø 6 35 1 4F R410A ø 9 52 3 8F R22 R407C PEFY P63 71 80VMH E Gas pipe PEFY P100 125 140VMH E PEFY P200VMH E Liquid pipe Capacity Item ø 19 05 3 4 R410A ø 9 52 3 8F ø 25 4 1 R22 R407C ø 15 88 5 8F R410A ø 19 05 3 4F R22 R407C ø 9 52 3 8 R410A ø 12 7 1 2 R22 R407C ø 22 2 7 8 R...

Page 15: ... 81Ω 49 8Ω P71 32 9Ω 27 56Ω 30 64Ω 38 31Ω P80 33 3Ω 27 1Ω 28 56Ω 36 82Ω P100 125 140 14 05Ω 9 11Ω 9 87Ω 12 89Ω Motor terminal or Relay connector Normal Abnormal Red White 5Ω Open or short White Black Red Black Brown Gray 5Ω 5Ω 6 08Ω Gray Yellow Brown Yellow 6 08Ω 6 08Ω Normal 1 5 White Red 150Ω 10 Abnormal Open or short 2 6 Yellow Brown 3 5 Orange Red 4 6 Blue Brown CNT 3T 1 3 CN3T 1 2 3 4 5 6 7 8...

Page 16: ...efer to install manual of outdoor unit operate the address setting 3 Setting the address is combination of SW11 1st digit address setting and SW12 2nd digit address setting Address 3 setting is composed SW11 3 and SW12 0 Address 25 setting is composed SW11 5 and SW12 2 Indoor unit do not run without address setting in field CN62 SW1 SW7 ON ON ON W254665G06 JP2 SW14 FP AD R CN82 6 8 1 1 240V 220V 1...

Page 17: ...5 6 7 8 910 1 2 3 4 5 6 ON OFF 220V 240V SW5 PEFY P140VMH E SW1 ON OFF SW2 ON OFF ON OFF SW3 ON OFF 1 2 3 4 5 6 7 8 910 1 2 3 4 5 6 7 8 910 1 2 3 4 5 6 ON OFF 220V 240V SW5 PEFY P200VMH E SW1 ON OFF SW2 ON OFF ON OFF SW3 ON OFF SW4 5 1 2 3 4 5 6 7 8 910 1 2 3 4 5 6 7 8 910 1 2 3 SW4 5 4 4 4 4 4 4 4 4 4 4 1 2 3 1 2 3 4 5 6 ON OFF 220V 240V SW5 PEFY P250VMH E SW1 ON OFF SW2 ON OFF ON OFF SW3 ON OFF ...

Page 18: ...uid piping sensor lead wire Gas piping sensor lead wire Power supply transformer lead wire Address board lead wire Drain pump lead wire Drain sensor lead wire 3 Control board exchange 4 Condenser exchange 5 Power supply transformer exchange 6 Arrest exchange 7 Intake air sensor exchange Optional parts 2 Removing the terminal bed cover 1 Remove the fixing screws two of the terminal bed cover B and ...

Page 19: ...ntroller board Power supply lead wire Network remote contoller transmission lead wire Fan motor lead wire LEV lead wire Intake air sensor lead wire Liquid piping sensor lead wire Gas piping sensor lead wire Power supply transformer lead wire Address board lead wire Drain pump lead wire Drain sensor lead wire 3 Control board exchange 4 Power supply transformer exchange 5 Arrest exchange 6 Intake ai...

Page 20: ...or base D and bell mouse C attached the fan case B removed motor A can be pull with motor base and fan along rail 1 Remove the fan motor connector E 2 Loosen the fixing screws F three of the bell mouse C and removed the bell mouse D turning screws in direction arrow counterclockwise Fig 3 3 Remove the fixing screws four of the motor base D Notice It s necessary using the driver over 30cm length to...

Page 21: ...fan case which are in front of motor remove the motor 1 Remove the bell mouse of the front fan motor with procedure models 40 140 2 Loosen the setting screws of the front fan removed the fan 3 Remove the front fan case 4 Operate with procedure models 40 80 Notice Fixing screws of the fan case are shown Fig 7 Remove the fixing screws H fan case can be removed Fig 5 Fig 6 Fan case Service side Fan c...

Page 22: ...ntrol box and remove the control box Fig 8 5 Move the control box to place that is not block operation Fig 9 2 Removing the fan motor After the fan A the fan case B and the bell mouse C removed motor can be pull with motor base and inner fan along rail 1 Remove the fixing screws three of the bell mouse C and remove the bell mouse C Fig 3 2 Loosen the setting screws G of the front fan removed the f...

Page 23: ...5 Remove the fixing screws four of the motor base D Notice It s necessary using the driver over 30cm length to remove the fixing screws a Fixing screws are placed back Fig 13 6 Slide the motor M with motor base D in direction of arrow 2 Fig 14 Notice It s not necessary removing the fan case L Fig 11 Fig 12 Fig 14 Be careful on removing heavy parts Fig 13 Fig 15 B Fixing screws H J Fixing screws K ...

Page 24: ...quid piping fine piping gas piping thick piping Models 200 250 1 Removing the LEV These models have 2 LEV 1 Remove the fixing screws three of the heat exchanger cover A and remove the cover A 2 Remove the fixing screws four of the maintenance cover B and remove the cover B Fig 3 3 Remove the LEV driving motor with a double spanner Fig 4 2 Removing the thermistors 1 Remove the thermistors from the ...

Page 25: ...ving the heat exchanger 1 Remove the heat exchanger cover with procedure 8 3 1 2 Remove the bottom plate which is air outlet side fixing screws ten Fig 1 3 Remove the drainpan Fig 2 Fig 1 Fig 2 Fig 3 Be careful on removing heavy parts Bottom plate Drainpan Fixing screws ...

Page 26: ...the maintenance cover fixing screws two Fig 4 5 Remove the heat exchanger fixing screws four Fig 3 5 Removerd heat exchanger is as shown Fig 6 Fig 4 Fig 5 Fig 6 Be careful on removing heavy parts Fixing screws Maintenance cover Fixing screws ...

Page 27: ...re that water is not leaking from drain hose 2 Remove the power supply wire and the transmission line Make sure that power source is turning off 3 Pull down the main unit 4 Turn over the main unit upside the bottom plate 5 Remove the bottom plate which is air outlet side fixing screws fifteen Fig 7 6 Remove the drainpan Fig 8 Fig 7 Fig 8 Fig 9 Be careful on removing heavy parts ...

Page 28: ... screws four of the maintenance cover and remove the cover Fig 10 7 Remove the heat exchanger Fixing screws non piping side two Fig 9 Fixing screws piping side two Fig 11 Removerd heat exchanger is as shown Fig 12 Fig 10 Fig 11 Fig 12 Be careful on removing heavy parts Fixing screws Fixing screws A Maintenance cover Fixing screws ...

Page 29: ...3 FAN2 CN81 CN42 CN23 CN26 CN24 X04 X05 X06 DSA board Magnet contactor Trans Trans DSA board Condenser for motor Power sourse terminal bed Power sourse terminal bed Address board Address board LEV adapter board Transmission terminal bed Transmission terminal bed Indoor unit contoller board Indoor unit contoller board CN62 CN82 SW12 SW11 SW1 SW14 SWA SWC STR2012 SW5 SW5 STR2012 SW11 SW12 SW14 SWC S...

Page 30: ...P71 80VMH E PEFY P100 125VMH E PEFY P140VMH E PEFY P200 250VMH E Liquid sensor Liquid sensor 200 250 Liquid sensor Liquid sensor Liquid sensor Liquid sensor Gas sensor Gas sensor Gas sensor Gas sensor Gas sensor 125 Gas sensor 250 Gas sensor 200 Gas sensor 100 ...

Page 31: ...FFICE MITSUBISHI DENKI BLDG 2 2 3 MARUNOUCHI CHIYODA KU TOKYO 100 8310 JAPAN Issued in June 2004 MEE04K242 Printed in Japan New publication effective June 2004 Specifications subject to change without notice ...

Reviews: