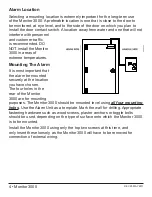
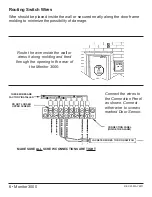
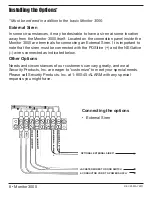
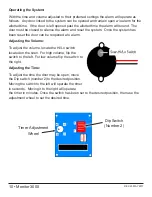
background image

30950 Corral Drive, Suite B, Coarsegold, CA 93614

1-(800) 45-ALARM

1-(800)-452-5276 • Fax (559) 642-2699

www.SecurityProductsInc.com 

rbe@SecurityProductsInc.com

 Monitor 3000

Installation and 

Operations Manual

Summary of Contents for 4920333

Page 1: ...30950 Corral Drive Suite B Coarsegold CA 93614 1 800 45 ALARM 1 800 452 5276 Fax 559 642 2699 www SecurityProductsInc com rbe SecurityProductsInc com Monitor 3000 Installation and Operations Manual ...

Page 2: ...l Accessories Offered Note The options above are additional items and are offered as enhancements to the standard equipment and are for variations in application which might not be needed Other options and details of varying applications are being developed in a continuing effort to meet customer s needs Please call Security Products Inc for more information at 1 800 45 ALARM External Siren Additi...

Page 3: ...itch 1 12 foot 22 gauge 2 conductor wire 4 Wallboard anchors for mounting the alarm unit onto hollow walls 4 Wood screws for mounting the alarm unit onto wood surfaces 1 Monitor 3000 Installation Operations Manual To assure proper and effective operation of your new Monitor 3000 system Security Products Inc recommends that the system be installed by a qualified technician such as an electrician or...

Page 4: ...peratures Mounting The Alarm It is most important that the alarm be mounted securely at the location you have chosen The four holes in the rear of the Monitor 3000 are for mounting purposes The Monitor 3000 should be mounted level using all four mounting holes Use the Alarm Unit as a template Mark the wall for drilling Appropriate fastening hardware such as wood screws plaster anchors or toggle bo...

Page 5: ... close to the door as possible on the handle side not the hinge side of the door 2 Drill the two sensor holes with a 1 8 drill 3 Mount the sensor to the door frame and attach the two wires to the door sensor terminals in the alarm 4 With the sensor mounted place the magnet on the door so there is approximately a gap between them 5 Drill holes and mount the magnet to the door SENSOR APPROXIMATELY 1...

Page 6: ...e the wire inside the wall or dress it along molding and feed through the opening in the rear of the Monitor 3000 Connect the wires to the Connection Panel as shown Connect either wire to screws marked Door Sensor THESE WIRES ARE FACTORY INSTALLED DO NOT LOOSEN UPPER SCREWS CONNECTION PANEL INSIDE THE ALARM JACKETED WIRES TO DOOR SWITCH MAKE SURE ALL SCREW CONNECTIONS ARE TIGHT ...

Page 7: ...O NOT LOOSEN UPPER SCREWS POSITIVE WIRE IS MARKED POS NEGATIVE WIRE IS MARKED NEG MAKE SURE ALL SCREW CONNECTIONS ARE TIGHT DOOR SWITCH 2 CONDUCTOR CORD TO POWER SUPPLY CONNECTION PANEL INSIDE THE ALARM Inside The Monitor Doors are wired in series One wire from each door spliced together The other two are connected to the screws on the connection panel labeled Door Sensor FROM THE TWO DOORS DOOR 2...

Page 8: ...l Siren It is important to note that the siren must be connected with the POSitive and the NEGative wires connected as indicated below Other Options Needs and circumstances of our customers can vary greatly and we at Security Products Inc are eager to customize to meet your special needs Please call Security Products Inc at 1 800 45 ALARM with any special requests you might have OPTIONAL EXTERNAL ...

Page 9: ...e molding or conduit to secure and protect these wires Connecting the Wires Insert the wires through the hole in the rear of The Monitor Connect the wire marked positive to the first screw on the far left marked 12V positive Connect the wire marked negative to the second screw from the left marked negative CAUTION The wires marked positive and negative must be hooked up correctly Powering and Test...

Page 10: ...en reset the door can be reopened w o alarm Adjusting the Volume To adjust the volume locate the Hi Lo switch located on the siren For high volume flip the switch to the left For low volume flip the switch to the right Adjusting the Time To adjust the time the door may be open move the Dip switch number 2 to the desired position Moving the switch to the left will operate the timer in seconds Movin...

Page 11: ... the 120 volt outlet and run the long screw through the tab on the Power Supply threading into the center hole of the wall plate Tighten until snug DO NOT OVERTIGHTEN Please select a 120 volt outlet that is in a safe location where delivery carts and water cannot damage it preferably above eye level WALL OUTLET POWER SUPPLY SURGE PROTECTOR POWER TO MONITOR LONG SCREW ...

Page 12: ...on or failure to follow operating instructions provided with the product Nor does it cover products that have been repaired or altered by anyone other than Security Products Inc or its authorized representatives This warranty is non transferable and applies only to the original purchaser Under no circumstances shall Security Products Inc be liable for any loss or damages direct or indirect inciden...

Page 13: ...m can be solved over the phone and your Monitor 3000 can be back in service within minutes The parts inside the Monitor 3000 are modular If additional repair is required simply unplug and return the defective part along with the original sales invoice to Security Products Inc The defective part must be returned for the warranty to be valid Made with Pride in the U S A ...

Page 14: ... KEYS TO THE MONITOR ALARM WITH THE GENERAL MANAGER OR THE MANAGER ON DUTY WHEN YOU HAVE FINISHED YOUR INSTALLATION PLEASE HAVE THE MANAGER CALL 1 800 452 5276 UPON COMPLETION OF THIS INSTALLATION TO DISCUSS KEY CONTROL AND SYSTEM OPERATION THANK YOU SECURITY PRODUCTS INC ...

Reviews: