background image

Steam cleaner

with attachments

Please read and keep these instructions

www.morphyrichards.com

getting the best from your 
new steam cleaner...

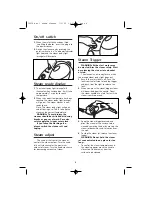
• Quick start

1

Fill the tank up to a maximum of 1.0 litre of water (using warm

water will reduce heat-up time). Screw cap on and tighten fully.

2

Attach the required accessories.

3

Connect to the power supply.

4

Press the on/off button to start heat-up. When orange light

turns off, the steam is ready.

5

Press the trigger on the handle to release the steam.

6

Aim the steam safely: Note at the start water may be ejected.

Hold over a sink or bucket until excess water has cleared.

• Descale

Descale regularly, do not wait for a problem to occur. In very

hard water areas we recommend using distilled water. See

page 10 for descaling instructions.

70535 Rev 1 steam cleaner  7/3/05  10:11 AM  Page 1

Summary of Contents for IB70535

Page 1: ...ries 3 Connect to the power supply 4 Press the on off button to start heat up When orange light turns off the steam is ready 5 Press the trigger on the handle to release the steam 6 Aim the steam safely Note at the start water may be ejected Hold over a sink or bucket until excess water has cleared Descale Descale regularly do not wait for a problem to occur In very hard water areas we recommend u...

Page 2: ...ons Do not use any chemical detergents perfumes alcohol etc in the water Repairs to electrical appliances are only to be undertaken by trained personnel Unprofessional repairs can be dangerous for users Use only genuine Morphy Richards spare parts and accessories If the electrical cable becomes damaged the complete cable assembly must be replaced Do not attempt this task yourself contact Morphy Ri...

Page 3: ...ozzle Ë Window squeegee attachment È Upholstery nozzle Í Jet nozzle Î Angled nozzle Ï Small large brush plastic brush Ì Small large brush brass brush Ó Cotton towel È Í Î Ï Ô Measuring jug Elbow attachment shown attached to floor nozzle Ò Cloth cap for upholstery nozzle Ú Funnel Û Jet nozzle adaptor Ù Steam adjust knob ı Hose inlet NB Most accessories are in the storage cart beneath the main body ...

Page 4: ...to assemble your steam cleaner 4 Ò Fitting the hose 1 Pull the flap down at the front of the cleaner line up the locating keyway on the plug with the socket and push the hose connector firmly and fully into the cleaner socket 70535 Rev 1 steam cleaner 7 3 05 10 11 AM Page 4 ...

Page 5: ...tres of water by using the jug provided and funnel Warm water may be used which will reduce heat up time Do not use any detergent 3 Refit the filler cap and fully tighten by pressing down and turning clockwise WARNING The filler cap must never be opened during use WARNING The use of any other fluids can be dangerous and can lead to damage of the heating element IMPORTANT The water tank should be e...

Page 6: ...rols the steam output Turn the knob fully anti clockwise for the maximum amount of steam Turn the knob clockwise for decreasing amounts of steam Steam Trigger WARNING At the start water may be ejected Aim the steam safely Start by releasing the steam into a bucket or sink The cleaner is now ready for use when the orange steam ready light goes out 1 Ensure the safety lock is off Push the lock from ...

Page 7: ...le slide the handle into the accessory head or tube until it locks in place Floor nozzle The floor nozzle is used for the cleaning of large washable walls and floor areas The floor nozzle can be used with or without the cloth cover Sensitive surfaces wood linoleum etc should be used with the cloth 1 Fit the elbow attachment to the floor nozzle Á and twist 1 2 a turn 2 Fit the floor nozzle to the e...

Page 8: ...n to lock into place 2 It can be used with various fittings angled nozzle small and large brush attachments depending on the task The jet nozzle can be used with various fittings for cleaning inaccessible areas such as corners joints blinds radiators and toilets as well as various surfaces such as stainless steel windows mirrors enamelled surfaces and also for stain removal Brush attachment 1 Choo...

Page 9: ...op to bottom using the rubber squeegee Wipe the rubber squeegee and the lower edge of the window Dry after every strip WARNING Glass surfaces can be shattered by the sudden application of excessive heat Warm glass surfaces first from a distance of 20 25 cm Continue at a distance of 10 15 cm Tube park During use the tubes and nozzle can be stored in the park position for short breaks whilst cleanin...

Page 10: ...should descale the steam tank at least every 6 months 1 Switch the cleaner off unplug and allow to cool 2 Empty any water out of the tank 3 Mix the descaler in the measuring jug using warm water We recommend using 50gm of citric acid crystals per 1 litre of water Citric acid crystals are available from most pharmacies 4 Pour 1 litre of the descaler solution into the tank 5 Fit the cap and tighten ...

Page 11: ...actured to withstand normal day to day use but an occasional wipe over with a damp cloth will help maintain its good looks Abrasive cleaners should not be used Purchasing parts Use original parts Replacement parts can be purchased from specialist retailers If you have difficulty call the number on the front of this booklet Helpline If you have any difficulty with your appliance do not hesitate to ...

Page 12: ...al till receipt or invoice to indicate the date of initial purchase To qualify for the 2 year guarantee the appliance must have been used according to the manufacturers instructions For example the cleaner must have been regularly descaled EXCLUSIONS Morphy Richards shall not be liable to replace or repair the goods under the terms of the guarantee where 1 The fault has been caused or is attributa...

Reviews: