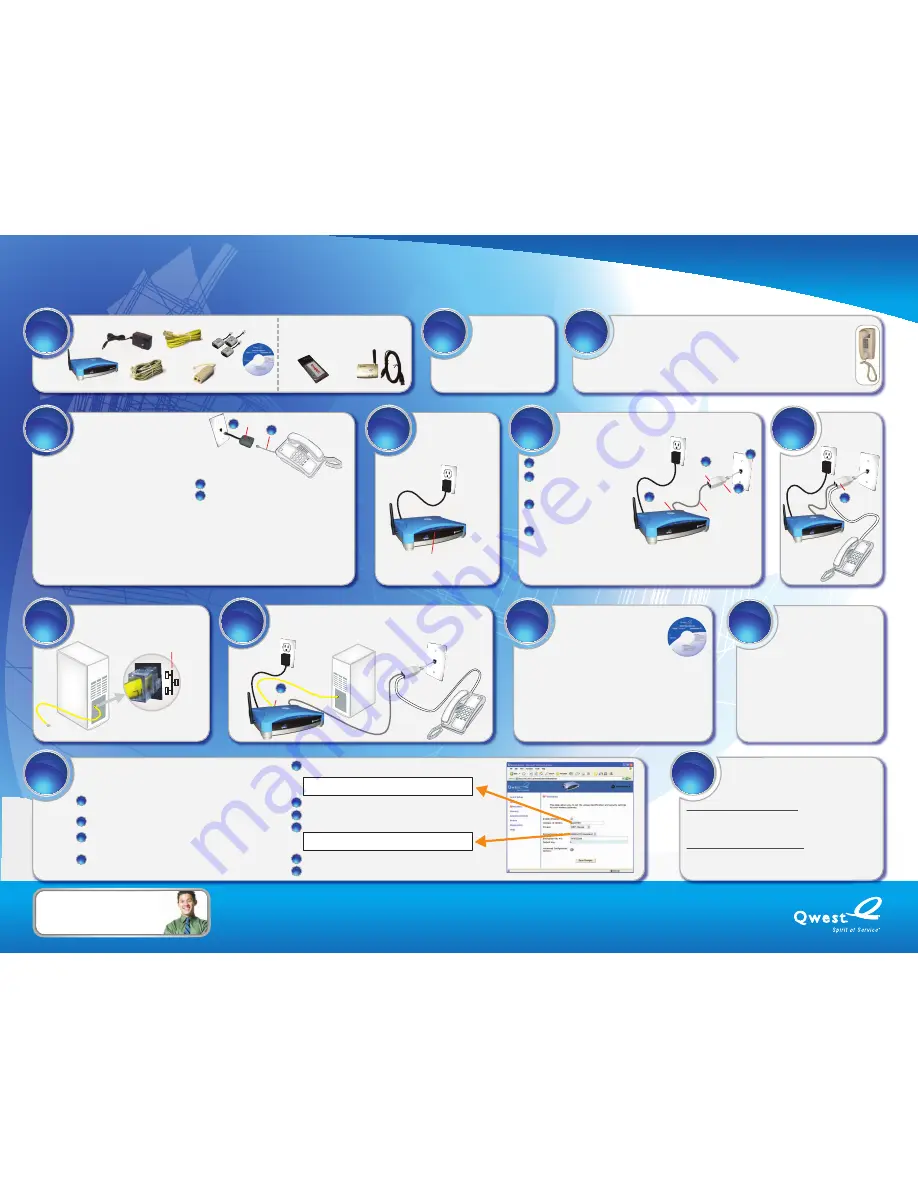
Identify the components in your installation kit
Modem
Gray Phone Cord
Yellow Ethernet
Cable
Wall-jack Splitter
If you ordered and received adapters to connect
computers to your new wireless network, you will
NOT need them at this time. After completing the
steps in this installation guide to connect your first
computer, then insert the installation CD into
computers you want to connect to your wireless
network.
Filters
Installation
CD
Wireless Laptop Card
Power Cord
1
1
USB Adapter
2
2
Service activation
date
Check the service activation
date on the Installation
Information sheet that came
in your installation kit.
Do not install Qwest
High-Speed Internet prior to
the listed date and time.
3
3
Wall-mounted telephone
Do you have a wall-mounted telephone on the same line (same telephone number)
as your Qwest High-Speed Internet service? If so, the wall-mounted telephone may
interfere with your Internet service. You can continue this installation, but you must
disconnect the wall-mounted telephone until you install a wall-mount filter.
• To disconnect the wall phone, lift up and pull out. Unplug the wall-mounted telephone.
• Complete steps 4 - 11 in this guide to get online.
• Go online to
http://www.qwest.com/internethelp/wallmount
for information about
receiving a complimentary wall-mount filter.
• The wall-mount filter will come with instructions for connecting the wall-mount filter to
the wall jack and reconnecting your wall-mounted telephone.
Install your filters
A
A
B
B
Plug a filter into the wall jack.
Plug the telephone cord into the filter.
A
A
Filter
B
B
Test the telephone (or the device) to ensure it’s working
properly.
Repeat steps A and B for all telephone devices that are on the
same line (same telephone number) as your Qwest High-Speed
Internet service.
Telephone
Wall Jack
Telephone
(or telephone device)
Not enough filters?
You must disconnect any device that does not have a filter until
you get more filters in order to complete the installation of your
broadband service. To order more filters, call Qwest sales:
1 800-244-1111 (Residential)
1 800-603-6000 (Small Business)
4
4
Devices could include:
• Telephones
• Answering machine
• Caller ID box
• Fax machine
• Satellite TV receiver
• TiVo box
• Dial-up modem
• Automatic water meter
For each telephone or telephone device that is on
the same line (same telephone number) as your
Qwest High-Speed Internet service, find the
telephone wall jack and complete steps A and B.
Important:
All filters must be connected before
setting up your modem. Filters will:
• Ensure the best Internet connection possible
• Prevent static on your telephone
Note:
If you do not have a telephone line for any
of the devices below, you can skip step 4.
Filters separate the voice and high-speed
Interrnet signals so you can talk on the
phone and be online at the same time.
And check that the On/Off
switch on the back of the
modem is set to “On.”
Connect the
power cord
Modem
Wait for the power light on the modem to turn
solid green (about one minute).
The DSL light on the modem will begin blinking.
5
5
• The DSL light on the modem should turn solid green within about one minute
• If the DSL light on the modem turns solid green, then go to step 7
• You can disregard the Internet light at this time
• If the DSL light on the modem does not turn solid green, then repeat step 6
using a different telephone wall jack
Find the telephone wall jack that is
nearest your computer.
If you plugged a filter into this jack,
unplug the filter. Plug the wall-jack
splitter that came in the installation
kit into the wall jack.
Plug one end of the gray phone
cord that came in the installation kit
into the jack labeled “
DSL/HPNA
”
on the wall-jack splitter.
Plug the other end of the gray
phone cord into the jack labeled
“
Line
” on the modem.
A
A
Wall-jack Splitter
“DSL/HPNA”
B
B
“Line”
Gray Phone Cord
C
C
D
D
Connect the gray phone cord
A
A
B
B
C
C
D
D
6
6
Connect a
telephone
(optional)
“Phone”
7
7
Telephone
or
telephone device
7
7
Connect one end of the yellow
Ethernet cable to your computer
Most computers will
use this symbol for
the Ethernet port
Yellow Ethernet Cable
8
8
9
9
Connect the yellow Ethernet cable to the modem
Connect the other end of the yellow Ethernet cable to any one of the four ports labeled
“
Ethernet
” on the modem. The Ethernet light on the modem should turn green and
may flicker.
9
9
“Ethernet”
Insert the Installation CD
Insert the blue (or orange) installation CD
into your computer and follow the
on-screen instructions.
If the blue Quick
Connect
Installation CD does not
automatically start, try the following.
On a Windows PC:
• Open My Computer
• Double-click on Quick
Connect
(which should launch the setup.exe application)
On a Mac:
• Double-click on the Quick
Connect
icon on
your desktop
• Double-click on “Start”
10
10
Do you have a security
alarm system?
If you have a security alarm system that can
automatically contact your security company using
the same telephone line (same telephone number)
as your Qwest High-Speed Internet service, then
you must check that your alarm system is working
properly.
Call your alarm company and tell them you have
installed DSL high-speed Internet service on the
same line as your alarm system.
11
11
Turn on wireless
Your modem was shipped with wireless features turned off.
If you want to use your modem for a wireless connection,
follow these instructions to turn on wireless.
A
A
B
B
C
C
D
D
Using the computer you connected to the modem, open your
Internet browser (for example, open Internet Explorer).
Type in http://192.168.0.1 and press “Enter.”
You should see the modem’s configuration Web page.
Click on “Wireless” on the left side of the page.
You should see the modem’s “Wireless” Web page.
Click the check box to “Enable Wireless.”
E
E
Write the “Wireless ID (
SSID
)” in the box below. You will need it later
when you set up other computers to work with your wireless network.
F
F
In the “Privacy” drop-down list, select “WEP - Manual.”
G
G
For “Encryption Key Size #1”, select “40/64 bit (10 characters).”
H
H
Write the “
Encryption Key #1
” into this box.
Click the “Save Changes” button.
Click the “Yes” button to restart your router and wait for the modem’s
configuration page to reappear.
I
I
J
J
12
12
Set up computers to work
with your wireless network
Using a Qwest wireless card or USB adapter
Insert the Quick
Connect
Installation CD into the computer you want to
connect and follow the on-screen instructions. The instructions will tell you
when to connect the card or USB adapter and when to enter the SSID and
Encryption Key you wrote in the boxes in step 12.
Using a computer with its own internal wireless
Use the wireless configuration software in your computer to configure the
Network Name (the SSID) and the WEP Encryption Key you wrote in the
boxes in step 12.
Note: To set up wireless on a computer that is already
connected to the modem using a cable, first disconnect the
cable.
13
13
NEED HELP?
Call 1 888-777-9569
Version 3347 - 3.7 Copyright ® 2008 Qwest. All rights reserved.
Quick
Connect
Quick
Connect
TM
TM
Installation Guide
Qwest High-Speed Internet
Advanced Networking / Premium Modem


