background image


MCS 2000 Models II & III

68P81083C49-B

page 1


MCS 2000 Models II & III

User Guide


page

General Information   . . . . . . . . . . . . . . . . . . . . . . . . . 2

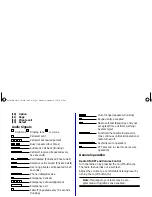
Functions of the Buttons . . . . . . . . . . . . . . . . . . . . . . 2

Audio Signals   . . . . . . . . . . . . . . . . . . . . . . . . . . . . . . 3

General operation  . . . . . . . . . . . . . . . . . . . . . . . . . . . 3

Radio ON/OFF and Volume Control   . . . . . . . . . . 3

Function Selection   . . . . . . . . . . . . . . . . . . . . . . . . . . 4

Function Button Selection  . . . . . . . . . . . . . . . . . . 4

Menu Selection   . . . . . . . . . . . . . . . . . . . . . . . . . . 4

Adjust Display Intensity  . . . . . . . . . . . . . . . . . . . . 5

Tones On/off   . . . . . . . . . . . . . . . . . . . . . . . . . . . . 5

Zone and Mode Selection  . . . . . . . . . . . . . . . . . . 5

Outgoing Calls   . . . . . . . . . . . . . . . . . . . . . . . . . . . . . 5

Scanning  . . . . . . . . . . . . . . . . . . . . . . . . . . . . . . . . . . 6

Turning Scanning On/Off  . . . . . . . . . . . . . . . . . . . 6

Viewing a Scan List  . . . . . . . . . . . . . . . . . . . . . . . 6

Changing Scan Lists   . . . . . . . . . . . . . . . . . . . . . . 7

Telephone Interconnect   . . . . . . . . . . . . . . . . . . . . . . 7

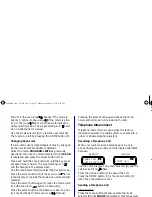
Receiving a Telephone Call  . . . . . . . . . . . . . . . . . 7

Sending a Telephone Call   . . . . . . . . . . . . . . . . . . 7

Keypad Selection (List/Buffered Dialing)  . . . . . . . 8

Private Call   . . . . . . . . . . . . . . . . . . . . . . . . . . . . . . . . 8

Receiving a Private Call  . . . . . . . . . . . . . . . . . . . . 8

Sending a Private Call (trunking only)   . . . . . . . . . 9

Caller ID . . . . . . . . . . . . . . . . . . . . . . . . . . . . . . . . . . 10

Mode Preset Buttons   . . . . . . . . . . . . . . . . . . . . . . . 10

Mode Recall   . . . . . . . . . . . . . . . . . . . . . . . . . . . . . . 10

Automatic Power-Off   . . . . . . . . . . . . . . . . . . . . . . . 10

SmartZone/AMSS Functions   . . . . . . . . . . . . . . . . . 11

Site Search & Site Lock  . . . . . . . . . . . . . . . . . . . 11

Emergency Operation  . . . . . . . . . . . . . . . . . . . . . . . 11

External Alarm  . . . . . . . . . . . . . . . . . . . . . . . . . . . . . 12

Handset Operation  . . . . . . . . . . . . . . . . . . . . . . . . . 12

Car Radio Mute   . . . . . . . . . . . . . . . . . . . . . . . . . . .  12

Failsoft  . . . . . . . . . . . . . . . . . . . . . . . . . . . . . . . . . .  12

Conventional Functions  . . . . . . . . . . . . . . . . . . . . .  12

Repeater/Direct . . . . . . . . . . . . . . . . . . . . . . . . .  12

Monitor  . . . . . . . . . . . . . . . . . . . . . . . . . . . . . . .  13

User-Selectable Private Line (PL)  . . . . . . . . . . .  13

Stat Alert (MDC - 1200/Star Signalling) Features   .  13

PTT ID and Emergency  . . . . . . . . . . . . . . . . . . .  13

Selective Calls . . . . . . . . . . . . . . . . . . . . . . . . . .  13

Group IDs and Wildcard Entry   . . . . . . . . . . . . .  14

Telephone Interconnect   . . . . . . . . . . . . . . . . . .  14

Status/Message   . . . . . . . . . . . . . . . . . . . . . . . .  14

MDC Repeater Access (RAC)  . . . . . . . . . . . . . .  15

Trunking Functions   . . . . . . . . . . . . . . . . . . . . . . . .  15

Sending a Call Alert Page  . . . . . . . . . . . . . . . . .  15

Receiving a Call Alert   . . . . . . . . . . . . . . . . . . . .  15

Reprogram Request  . . . . . . . . . . . . . . . . . . . . .  15

One Touch Button Functions   . . . . . . . . . . . . . .  15

Out of Range . . . . . . . . . . . . . . . . . . . . . . . . . . .  16

Secure Operation  . . . . . . . . . . . . . . . . . . . . . . . . . .  16

Secure Keyload and Erase  . . . . . . . . . . . . . . . .  16

Data Operation  . . . . . . . . . . . . . . . . . . . . . . . . .  17

Radio Care  . . . . . . . . . . . . . . . . . . . . . . . . . . . . . . .  17

Safety Information  . . . . . . . . . . . . . . . . . . . . . . . . .  17

Important Electromagnetic Emission Information 18

Control Station Operation  . . . . . . . . . . . . . . . . .  18

Caution: Vehicles Equipped With Air Bags  . . . .  19

Accessories  . . . . . . . . . . . . . . . . . . . . . . . . . . . . . .  19

Menu Overview   . . . . . . . . . . . . . . . . . . . . . . . . . . .  20

Computer Software Copyrights  . . . . . . . . . . . . . . .  20


Warning


: When installing or removing the 

mobile radio from the vehicle, the radio must be 


switched off or damage to the radio may occur.


MCS2000 2&3-C UG GB  (for US)  Page 1  Monday, December 8, 1997  4:21 PM

Summary of Contents for MCS 2000 II

Page 1: ...larm 12 Car Radio Mute 12 Failsoft 12 Conventional Functions 12 Repeater Direct 12 Monitor 13 User Selectable Private Line PL 13 Stat Alert MDC 1200 Star Signalling Features 13 PTT ID and Emergency 13 Selective Calls 13 Group IDs and Wildcard Entry 14 Telephone Interconnect 14 Status Message 14 MDC Repeater Access RAC 15 Trunking Functions 15 Sending a Call Alert Page 15 Receiving a Call Alert 15 ...

Page 2: ...e of your radio system or your local serv ice representative Functions of the Buttons Numbers in brackets refer to the illustrations on the Depending on the keypad ordered with your radio refer to either E or I for the description of the but tons A Radio ON OFF and Volume control B Three color indicator Green flashing incoming call or Call Alert Page Red continuous radio transmits in clear and sec...

Page 3: ...seconds trunking Out of range repeated trunking Keypad entry accepted Radio self test failed Key entry not accepted Time out timer warning System reject Function Channel Hardware error tone continues until valid operation or radio turned off Keyfail secure operation PTT pressed in clear mode secure operation General operation Radio ON OFF and Volume Control Turn the radio on by pressing the on off...

Page 4: ...t ton or 2 Indirectly via the radio MENU Function Button Selection For direct access to a feature depress the desired function button A triangle in the display points to the function button used If the function requires additional input use the mode selector D to display your choices and press the select button 13 Note Function buttons are usually active Pressing a function button will exit the cu...

Page 5: ...or talkgroup and all its related features A zone is a grouping of modes that can be selected by pressing the zone button 1 Then use the mode selector D to display the desired zone e g where the model III display has the zone name in line one and the channel talkgroup name in line two For model II the zone name is followed by the channel talkgroup name The zone name flashes until you press the sele...

Page 6: ...radio will listen to the channel talkgroup with the highest priority If a channel talkgroup with a higher priority becomes active while the radio is listen ing to a lower priority member the radio will switch to the higher priority channel talkgroup Note If the user is involved in a conversation he will not be interrupted by any normal priority calls Turning Scanning On Off The scanning feature ma...

Page 7: ...lay to include the mode as a normal priority member Press the select button again to make the mode prior ity 2 the scan icon lights continuously Press the select button a third time to make it a prior ity 1 mode the dot in the scan icon flashes Pressing the select button again makes the mode non member mode not included in the list Telephone Interconnect Telephone interconnect is used when the rad...

Page 8: ...an incorrect phone number is entered the digits may be erased using the mode selector D to the left down Continue using the mode selector D to the left down to erase the entire number When the number is complete press the select button 13 or the PTT F to transmit the call model III model II will be in the display while the system is setting up the call Trunking only If the PHONE system is busy the...

Page 9: ...de selector D you can scroll between last received ID Private Call lists and your own radio ID Press the call button 12 or select CALL through the menus The display shows the last ID transmitted or received List Selection Transmit to the displayed ID by pressing the PTT F or choose another ID from the list by using the mode selector D To view the radio s own ID use the mode selector D until the di...

Page 10: ... will allow quick access to com monly used modes Press and hold a mode preset but button for the currently selected mode A short press of a mode preset button will cause the radio to immedi ately change to the mode programmed for that button Mode Recall The radio will always remember the last mode selected Pressing mode recall will cause the radio to switch to the previously selected mode Automati...

Page 11: ... in charge of your radio sys tem for further information Emergency Operation If emergency is enabled on your system the function is invoked by pressing the emergency button 5 Emergency is exited by pressing the emergency but ton for approximately 2 seconds Trunking only Your radio may be programmed to indicate that an emergency call has been received from another mem ber of your talkgroup The disp...

Page 12: ...will be heard through the radio speaker Car Radio Mute If the car radio mute feature is programmed into your MCS 2000 your standard car radio will momentarily mute when your MCS 2000 mobile radio is transmit ting or receiving Please contact the person in charge of your radio system for further information Failsoft The failsoft feature ensures that a conversation is not interrupted if the trunked s...

Page 13: ...e transmission you will hear a tone until the ID transmission is complete This ID may be combined with an emergency alarm that is activated by an emergency button on the radio The dispatcher can quickly identify the radio user in an emergency situation Emergency Operation Emergency is operated as previously described Selective Calls Receiving a Selective Call The radio will display for two seconds...

Page 14: ...e stored access code as soon as the telephone intercon nect button 7 is pressed Delayed Press the select button 13 or the PTT F and the radio sends the pre stored access code After the access code is sent you should get a dial tone If no dial tone sounds press the HOME button 3 or the telephone interconnect button 7 to hang up Now press the select button 13 or the PTT F The radio then transmits th...

Page 15: ...y Receiving a Call Alert When a call alert is received the call alert received tone is heard the green LED and the icon flash in the display until the Call Alert is acknowledged by pressing the PTT F or pressing and releasing the monitor button 2 Status Message Operated as previously described under Conven tional Functions Reprogram Request If dynamic regrouping is programmed into your radio the r...

Page 16: ... button is pressed during a trans mission the transmission is aborted and an alert tone will sound until the PTT is released The operation change will be effective with the next PTT press Incoming Calls When a secure call is received the orange LED conventional only and the secure icon will flash Conventional Functions In monitor only calls from radios with the same encryption key will be heard Ca...

Page 17: ... operation you may send and or receive data messages from a data terminal While sending or receiving data the radio will display Any button press will cause the radio to interrupt the data transfer and return the radio to normal operation Please contact the person in charge of your radio sys tem for further information Radio Care Avoid any physical abuse of the radio The radio exterior should be c...

Page 18: ...g netic energy emitted by FCC regulated equipment Motorola subscribes to this same updated safety standard for the use of its products In keeping with sound installation practice and to maximize radiation efficiency a one quarter 1 4 wave length antenna should be installed at the center of the vehicle roof If it is necessary to mount the antenna on the vehicle s trunk lid an appropriate 3db gain a...

Page 19: ...ments for such installations An air bag s size shape and deploy ment area can vary by vehicle make model and front compartment configuration e g bench seat vs bucket seats Contact the vehicle manufacturer s corporate headquarters if necessary for specific air bag information for the vehicle make model and front compartment configuration involved in your com munication equipment installation Access...

Page 20: ...Area Trunking Site Lock Unlock Disables or enables automatic site switching Conventional Only Repeater or Direct Enables repeater access or talkaround capability Computer Software Copyrights The products described in this manual may include copyrighted computer programmes stored in semiconductor memories or other media Laws in the United States and other countries preserve for Motorola Europe and ...

Reviews: