background image

User Guide

MOTOROLA 

QUENCH  XT3

TM

Summary of Contents for QUENCH XT3

Page 1: ...User Guide MOTOROLA QUENCH XT3 TM ...

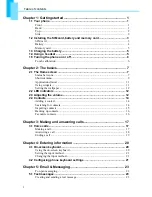
Page 2: ...g the wallpaper 12 2 2 LED indicators 12 2 3 Adjusting the volume 12 2 4 Contacts 14 Adding a contact 14 Searching for contacts 14 Importing contacts 15 Backing up contacts 16 Favourite contacts 16 Chapter 3 Making and answering calls 17 3 1 Voice calls 17 Making a call 17 Answering a call 18 Ending a call 19 Chapter 4 Entering information 20 4 1 On screen keyboard 20 Using the on screen keyboard ...

Page 3: ... the Internet 35 Wi Fi 35 Mobile data network 36 Starting a data connection 37 6 2 Browsing a web page 38 Managing a web page 38 6 3 Market 40 6 4 Java ME apps 40 Online 40 My code 40 Chapter 7 Using Bluetooth 41 7 1 Connecting to Bluetooth devices 41 Chapter 8 Media applications 42 8 1 Photos and videos 42 Taking a photo 42 Recording video 43 Reviewing a photo 43 Reviewing a video 44 Configuring ...

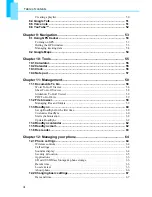
Page 4: ...58 Sheet To Go Viewer 58 Slideshow To Go Viewer 59 PDF To Go Lite 59 11 2 File browser 59 Managing files and folders 59 11 3 RoadSync 60 Set up RoadSync for the first time 60 Customise RoadSync 60 Start synchronisation 62 Update RoadSync 62 11 4 RoadSync calendar 62 11 5 RoadSync mail 62 11 6 Rss reader 63 Chapter 12 Managing your phone 64 12 1 Phone settings 64 Wireless controls 64 Call settings ...

Page 5: ...Ring settings 68 12 3 Using wireless control 68 12 4 Protecting your phone 69 Enable or disable SIM card PIN 69 Enabling password protection 69 12 5 Resetting the phone 69 12 6 Transferring files to your computer 70 Safety regulatory legal 71 Specifications 85 ...

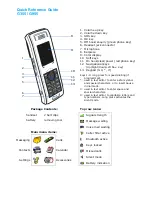
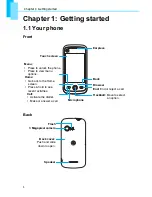
Page 6: ...Make or answer a call End End or reject a call Home Go back to the Home screen Press hold to see recent activities Back Microphone Menu Press to unlock the phone Press to view menu options Browser Trackball Move to select an option Touch screen Back cover Push and slide down to open 3 Megapixel camera Flash Speaker ...

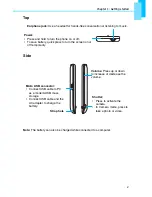
Page 7: ...ss and hold to turn the phone on or off To save battery quick press to turn the screen on or off temporarily Volume Press up or down to increase or decrease the volume Shutter Press to activate the camera In Camera mode press to take a photo or video Micro USB connector Connect USB cable to PC as a modem USB mass storage Connect USB cable and the AC adapter to charge the battery Strap hole ...

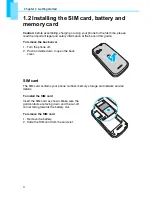
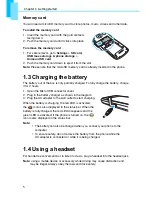
Page 8: ...is guide To remove the back cover 1 Turn the phone off 2 Push and slide down to open the back cover SIM card The SIM card contains your phone number memory storage and network service details To install the SIM card Insert the SIM card as shown Make sure the gold contacts are facing down and the cut off corner facing towards the battery slot To remove the SIM card 1 Remove the battery 2 Slide the ...

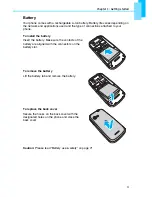
Page 9: ...hed to your phone To install the battery Insert the battery Make sure the contacts of the battery are aligned with the connectors on the battery slot To remove the battery Lift the battery tab and remove the battery To replace the back cover Secure the hooks on the back cover with the designated holes on the phone and close the back cover Caution Please read Battery use safety on page 71 ...

Page 10: ...the Micro USB connector cover 2 Plug in the battery charger as shown in the diagram 3 Plug the AC adapter to the wall outlet to start charging When the battery is charging the red LED is activated the icon is also displayed in the status bar When the battery is fully charged the red LED disappears and the green LED is activated if the phone is turned on the icon is also displayed in the status bar...

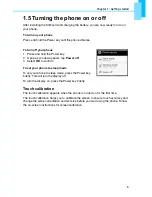
Page 11: ...wer off 3 Select OK to confirm To set your phone to sleep mode To set your phone to sleep mode press the Power key briefly This will turn the display off To turn the display on press the Power key briefly Touch calibration The touch calibration appears when the phone is turned on for the first time The touch calibration helps you to calibrate the screen to ensure touch accuracy and change the scre...

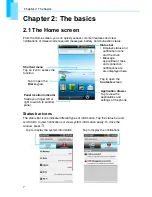
Page 12: ...ons or view system information easily To close the window press Shortcut menu Tap an icon to access the function Application drawer Tap to view the applications and settings of the phone Status bar Displays status and notification icons and the clock Message appointment task and connection notifications are also displayed here Tap to open the Contacts screen Tap to open the Dial keypad Panel locat...

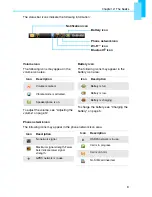
Page 13: ...the battery icon area To charge the battery see Charging the battery on page 5 Icon Description Volume is muted Vibrate mode is activated Speakerphone is on Icon Description Battery is full Battery is low Battery is charging Phone network icon The following icons may appear in the phone network icon area Icon Description No network signal Maximum signal strength Fewer bars indicate lower signal st...

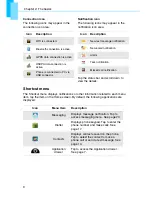
Page 14: ...e Tap to select the contact to make a phone call or send a text message See page 14 Application drawer Tap to access the Application drawer See page 7 Connection icon The following icons may appear in the connection icon area Notification icon The following icons may appear in the notification icon area Tap the status bar and scroll down to view the details Icon Description WiFi is connected Bluet...

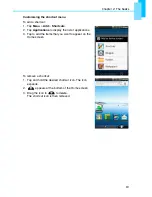
Page 15: ...ap Applications to display the list of applications 3 Tap to add the items that you want to appear on the Home screen To remove a shortcut 1 Tap and hold the desired shortcut icon The icon expands 2 appears at the bottom of the Home screen 3 Drag the icon to to delete The shortcut icon is then removed ...

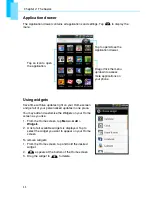
Page 16: ...ets on your Home screen as you like 1 From the Home screen tap Menu Add Widgets 2 A list of all available widgets is displayed Tap to select the widget you want to appear on your Home screen To remove widgets 1 From the Home screen tap and hold the desired widget 2 appears at the bottom of the Home screen 3 Drag the widget to to delete Tap to open close the Application drawer Drag or flick the men...

Page 17: ...een tap Menu Wallpaper 2 Select wallpaper from is displayed on screen 3 Tap Wallpaper gallery 4 All system wallpapers are displayed Tap to preview the wallpaper 5 Tap Set wallpaper to apply your selection 2 2 LED indicators Your phone has two LED indicators green and red Whether your phone is turned on or off the LED indicators provide useful information Note When the phone is on pressing the Call...

Page 18: ... silent mode all sounds are turned off except media and alarm 3 Tap OK to save your settings 4 Tap to exit the menu To adjust in call volume 1 During a phone call press the Volume key on the right side of your phone 2 Increase or decrease the volume by Pressing the Volume key up or down Using your finger to drag the slider left or right To adjust media volume 1 Tap Application drawer Settings Soun...

Page 19: ...d Tips To add a picture tap Menu Add icon then select a picture file or take a photo of the contact immediately To take a photo of the contact select Menu Capture picture To assign a ring tone tap Ringtone then select a tone from the list 4 Tap Done to save Searching for contacts On the Contacts screen do any of the following to easily search for contacts Tap Menu Search Type the first few letters...

Page 20: ...o copy all contacts tap Menu Import all All contacts on the SIM card are imported Copy microSD contacts to the phone 1 From the Home screen tap Contacts 2 Tap Menu Import SD Card Note To copy a single contact simply tap the contact tap Import one VCard file and tap to select the contact you want to copy Then edit contact information as in Adding a contact To copy all contacts tap Import all VCard ...

Page 21: ...cts from the microSD memory card 1 On the Home screen tap Contacts 2 Tap Menu Import SD card 3 Tap OK 4 The backup contacts are copied to the phone Favourite contacts You can add the most frequently called contacts to the favourite contact list which helps you to access the contacts quickly and easily Add to favourites 1 From the Home screen tap Contacts 2 From the contact list tap and hold the de...

Page 22: ...ne screen 1 From the Home screen tap Dialler 2 Enter the phone number using the keypad Note tap to erase a wrong number Tap and hold to erase the entire number 3 Tap the phone number or press the Call key to dial 4 To end the call press the End key To make a call from contacts 1 From the Home screen tap Contacts 2 Tap the desired contact 3 Tap Call mobile Call work or Call home Alternatively press...

Page 23: ...ng volume is turned on A notification message appears on the screen To accept or reject an incoming call To accept the call press the Call key To reject the call press the End key To put a call on hold If a call comes in while you are already on another call tap Hold to put the first call on hold To unhold a call tap Hold again To switch between calls If a call comes in while you are already on an...

Page 24: ... network provider for the availability of this function To use other voice call features Tap Speaker to activate or deactivate the speakerphone Tap Mute to mute or unmute the microphone To view the call history tap Menu Dialler Call log Ending a call To end a call tap End call or press the End key ...

Page 25: ...isplay the on screen keyboard Use the keys on the on screen keyboard as you would a computer keyboard Tap the keys to enter the characters To toggle between upper and lower case letter display tap To display the numeric and symbols keyboard tap Tap to toggle back Lowercase keyboard default Uppercase keyboard Numbers and symbols CAPs Lock Tap to toggle between upper case or lower case Dictionary ta...

Page 26: ...eld in an application For instance in Messaging tap and hold the field To The input method screen pops up 2 You may select one of the available input methods to use 4 2 Configuring phone keyboard settings You can use the keyboard to help you enter text 1 Tap Application drawer Settings Locale text 2 Tap TouchPal 3 You can check all applicable options Keyboard setting options Setting option Descrip...

Page 27: ...entation function Enable mixed language input Check to enable text input in different languages Select languages Select the languages you want to use and switch between them on the main keyboard Predict next word Automatically predicts the next word when entering text Enable prediction Automatically predicts the word when entering text Correct mistyping Automatically corrects spelling mistakes Sli...

Page 28: ...ls Creating and sending a text message Your phone offers several ways to create and send a new text message From the Messaging screen 1 Tap New message The Compose screen is displayed 2 In the To field enter the recipient s phone number Tip To add recipients from Contacts tap To and enter at least two numbers of a contact number or two characters of a contact name Then the corresponding contact wi...

Page 29: ... exit Messaging before sending the unsent message will automatically be saved as a draft To request message delivery notification 1 In Messaging tap Menu Settings to access SMS and MMS settings 2 Tap to check the Delivery reports check box 3 Tap to exit the menu Receiving and managing messages When you send and receive messages from a contact these messages are grouped as a message thread A messag...

Page 30: ...ter the recipient s phone number 6 Tap Send To delete all text messages You can delete all text threads in Messaging 1 Tap Application Drawer Messaging To delete one message thread tap and hold the message thread you want to delete and tap Del thread To delete a message within a thread tap the message thread to open it Then tap and hold the message and tap Del message 2 Tap Menu Del threads 3 Tap ...

Page 31: ...message to a new message you are composing 1 Tap Application Drawer Messaging 2 Tap a message thread to open it 3 Tap and hold the message to display the submenu options 4 Tap Copy message text 5 Go to New Message 6 Tap and hold Type to compose 7 Tap Paste to paste the copied text to your new message ...

Page 32: ...nter at least two numbers of a contact number or two characters of a contact name Then the corresponding contact will be listed for you to select 5 Enter the Subject 6 To insert a picture or video file tap Menu Attach 7 To insert text tap Type to Compose then enter your message 8 To insert an audio file tap Menu Attach Audio 9 Tap Send From Contacts 1 From the Home screen tap Contacts 2 Tap a cont...

Page 33: ... message with the on screen keyboard 9 Tap Send 5 3 Voice messages Your phone can be used to send voice messages To create a voice message 1 Tap Application Drawer Messaging 2 Tap New Message 3 Tap Menu Attach Record audio 4 Tap to record your message 5 Tap to stop recording 6 Tap to listen to your recording 7 Tap Save to proceed or Discard to return to the compose message screen 8 Tap Play to lis...

Page 34: ...ap to play voice 3 Tap Send 4 In the To field enter the mobile phone number 5 Tap Send Managing recorded voice To listen to the recording tap to play To redo the recording tap to record To save the recording tap Save To stop recording tap to stop Displays recording information Tap buttons to record stop and play Equaliser ...

Page 35: ...mail settings If the email settings are pre configured the Email setup wizard displays a successful message tap Next If the email settings are not found tap Manual setup 6 Enter Your Name and the Account display name then tap Next Note the Account display name is the name shown on the Home screen and the Email screen 7 In Automatic Send Receive select how often you want the phone to connect to the...

Page 36: ... 2 Tap Menu Settings to open the email settings menu 5 5 Using email Composing and sending an email 1 Tap Application drawer Email then tap an email account 2 Tap Menu Compose 3 In the To field enter the recipient s email address Tip to add recipients from Contacts tap To or tap Menu Add recipient then select the names 4 Enter the Subject 5 Compose your email 6 Tap Send ...

Page 37: ...hone connects to a wireless network To receive emails manually 1 Tap Application drawer Email then tap an email account 2 Tap Menu Send Receive Reading and replying to emails The Inbox displays the email headers When you open the email it shows only a part of the message unless it is a very short message Download the email to view the complete content To download attachments With POP3 email accoun...

Page 38: ... If you are viewing the messaging list screen of one account and you want to view the list of another account tap Menu Accounts then tap the account you want to view Customising email settings You can configure the general settings of your email account such as Account name email checking frequency default account and server settings To set up your account name 1 Tap an email account 2 Tap Menu Se...

Page 39: ...ation drawer Email 2 Tap and hold the account to delete 3 Tap Remove account 4 Tap OK to confirm 5 6 Google Mail Google Mail is Google s web based email service Google Mail is configured when you first set up your phone Depending on your synchronisation settings Google Mail on your phone is automatically synchronised with your Google Mail account on the web 1 Tap Application drawer Google Mail 2 T...

Page 40: ... and turn Wi Fi on or off To connect to a Wi Fi network 1 Turn Wi Fi on 2 Tap Wi Fi settings The phone scans for Wi Fi signals 3 Detected networks are displayed below Tap a network connection then tap Connect 4 If you select an unsecure network the connection is automatically established Otherwise proceed to the next step 5 To connect to a secured connection you will be prompted for the network ke...

Page 41: ...store settings To configure Wi Fi settings 1 From the Home screen tap Application drawer Settings to access Wireless Controls 2 Tap Wi Fi settings 3 Tap Menu Advanced Note if you use static IP enter the IP settings as required 4 In IP settings enter the information for IP address gateway netmask and DNS Tap OK to save your settings Mobile data network Check the availability of these connections wi...

Page 42: ... Enter the APN then tap OK 7 Enter the Proxy Port Username and Password if available etc then tap OK to save your settings Starting a data connection A data connection is automatically activated when the phone is turned on If you set up multiple data connections select the connection you want to use manually To start a data connection manually 1 Tap Application drawer Settings 2 Tap Wireless contr...

Page 43: ...o set as home page 3 Tap OK to save your settings Managing a web page While viewing a web page tap Menu to change view settings or apply other functions The following table lists the menu options Depending on the function some options may be unavailable Go Tap to enter the URL of a web page Bookmarks Tap to select from the list of saved favourite web pages New Window Open a web page in a new windo...

Page 44: ...g Available options are Auto fit page Normal and Auto fit screen width Enable JavaScript enables disables JavaScript on the web page Open in background opens a new web page window behind the current one Set home page enters URL and sets as home page Privacy settings Tap to configure privacy settings Clear cache deletes all cached contents Clear history clears the browser navigation history Accept ...

Page 45: ...t 5 Once you are signed in you can begin searching and downloading applications from the market Tap Apps to view the list of applications available and tap Games to view the list of games available You can also tap Downloads to view the applications you have previously downloaded 6 4 Java ME apps Use Java Me Apps to download and install Java applications in your phone Online Online is a Java appli...

Page 46: ...d create a partnership with a Bluetooth device to exchange information 1 Tap Application drawer Settings Wireless controls 2 Tap Bluetooth settings to view the menu options 3 To search for a new device tap Scan for devices 4 Tap the device to connect 5 To start pairing enter the Passcode then tap OK Note the passcode you enter on your phone must be the same passcode that will be entered on the oth...

Page 47: ...ape view Note to activate the camera at anytime press and hold the Shutter key on the side 2 Aim the phone at the subject then half press the Shutter key or tap and hold to focus 3 The focus frame turns white to indicate focus is set fully press the Shutter key or tap to take the shot Displays the last image Tap or to zoom the image in or out Tap to take a photo Tap to adjust the brightness of the...

Page 48: ...photo After taking a shot a thumbnail image is displayed in the lower left corner of the screen 1 Tap the thumbnail to view the image in full screen size Tap DELETE to delete the picture and view the next picture Tap SHARE to share the picture via Email or Messaging Tap SET AS to set the image as Contact icon or Wallpaper Tap DONE to save your settings Indicates capture mode Indicates remaining re...

Page 49: ...nail to playback the video in full screen mode Tap DELETE to delete the picture and view the next picture Tap SHARE to share the picture via Email or Messaging Tap PLAY to playback the video clip Tap DONE to save your settings Configuring camera settings On the camera screen tap Menu Settings Use the slider to scroll the page for more options Tap an option to select ...

Page 50: ... the shutter sound on off Anti banding Off 50 Hz 60 Hz Auto Resolution 5M 2560 x 1920 3M 2048 x 1536 2M 1600 x 1200 1M 1280 x 960 L 640 x 480 M 320 x 240 White balance lighting Auto Incandesce Fluorescent Daylight Cloudy Colour effect None Sepia Negative B W Bluish Reddish Greenish Flashlight Off Auto On Video mode Resolution Record in H263 or MPEG4 format Prompt after capture No limit No preview ...

Page 51: ...awer Gallery 2 Tap Camera pictures to view the images as thumbnails 3 Tap an image to view 4 To view previous next image tap the left right arrow keys on the screen To play a slideshow 1 While viewing an image tap Menu Play slide Show 2 Tap the screen again to stop the slideshow To zoom the image While viewing the image tap the screen to show the zoom bar Tap to zoom out Tap to view the previous i...

Page 52: ... crop the image 4 Tap Save to save the image as contact icon To edit an image While viewing an image tap Menu Rotate To rotate the image tap Rotate To crop the image tap Menu Crop Drag your finger to select the crop area Tap inside the box to crop Tap Menu Save as to save the image To flip the image tap Flip the image upside down To mirror the image tap Mirror To change the image size tap Resize T...

Page 53: ...to playback 8 3 Using the music player You can play music stored on your memory card Tap Application drawer Music Note You can transfer your music files from the computer onto your memory card See Transferring files to your computer on page 70 Controlling the music player While listening to your music tap the respective icon to control the music player Audio information display area Tap to go to P...

Page 54: ...ayback Use the icons on the left of each media file to arrange the sequence of files for playback Playing music 1 Tap Application drawer Music The Library screen is displayed 2 Tap Songs and all songs on the phone will be displayed 3 Tap to select the song then tap Play Changing playback options While on the Playback screen tap Menu Tap Library to go to the Music Library screen Tap Party shuffle t...

Page 55: ... to add 3 Tap Add to playlist 4 Select from the current playlist or tap New to create a new playlist 5 The song is added to the playlist Note if you create a new playlist enter the playlist name now To remove a song from a playlist 1 Tap Application drawer Music The Library screen is displayed 2 Tap and hold the song you want to delete 3 Tap Remove from playlist The song is removed from the playli...

Page 56: ...ends list tap Menu Add friends To switch to different chats tap Menu Switch chats To block a person tap Menu Blocks To invite a person to your chat tap Menu Invites To configure Google Talk settings tap Menu More Settings To sign out tap Menu More Sign out To view terms and privacy tap Menu More Terms Privacy 8 5 Voice note To record a voice note 1 Tap Menu Voice note 2 Tap Menu Record The recordi...

Page 57: ... that allows you to view search and upload videos To start using YouTube 1 Tap Application drawer YouTube 2 Videos are grouped into categories such as Featured Most popular Most viewed Top rated and more Tap a category to see the available videos for that category 3 Tap a video to play it ...

Page 58: ...on drawer GPS tracker 2 When GPS is connected tap to set POI 3 Tap to start tracking 4 You can view your tracking distance speed trackers and the number of POIs on screen 5 Tap Menu Mode to set your mode Walk Bicycle or Car Hiding the GPS window To use other applications and keep the GPS tracking 1 In the GPS Tracker tap Menu 2 Tap Hide to hide the tracking application in the background Note if yo...

Page 59: ... 2 Google Maps Goole Maps is Google s mapping service to search for places of interest To open Google Maps 1 Tap Application drawer Google Maps 2 Do any of the following To search for a place of interest tap Menu Search then type in a keyword to begin the search To get direction tap Menu Directions To select a map mode tap Menu Map mode then tap Map Satellite or Traffic To go back to my location t...

Page 60: ...n all day event check All day 5 To set repetition select the repetition from the list 6 To set a reminder select the reminder time from the list 7 When finished tap Save to return to the calendar Tip from the Calendar screen tap a day or a time slot then tap Menu New event to set a new appointment on the tapped date or time To add a new task 1 On the Calendar screen tap Menu New task 2 Enter event...

Page 61: ...rent time of selected cities is displayed on the world clock tab 3 Tap Menu Add to select from the world cities list 4 The current time of the selected cities is shown on the atlas screen Using stop watch 1 Tap Application drawer Clock 2 Tap the stop watch tab Tap Start to start and time elapsed will appear on screen Tap Lap to record the time for finishing one lap Tap Restart to continue counting...

Page 62: ...when the time is up 10 4 Note pad Use the note pad to write down notes as you would on a note pad To create a note 1 Tap Application drawer Note pad 2 Tap Add note 3 Enter your notes using the on screen keyboard 4 Tap Menu Edit title to add a title to the note 5 When you are done tap to return to the Note pad screen The note is automatically saved Saved notes are displayed here Tap to add a new no...

Page 63: ...le tap Back Note to create a new document or edit an existing document purchase the full version of Documents To Go Sheet To Go Viewer Sheet To Go Viewer allows you to view Microsoft Excel spreadsheets xls and xlsx It supports cell and number formatting row and column alignment formulas and fast finger friendly panning To open Sheet To Go Viewer 1 Tap Application drawer Documents To Go Sheet To Go...

Page 64: ...uto rotate embedded images and more To open PDF To Go Lite 1 Tap Application drawer Documents To Go PDF To Go Lite 2 Tap Open File 3 Tap the file you want to open Tap the screen to bring up the zoom controls Slide your finger up or down to view the next or previous page 4 To close the file tap Back Purchase Documents To Go To get the full version of Documents To Go 1 Tap the lock tab 2 Tap Buy Bro...

Page 65: ...in and SSL option 6 Tap Finish Customise RoadSync After registering RoadSync for the first time the Preferences screen is displayed automatically Use the Preferences screen to customise synchronisation settings To access the Preferences screen at any other time tap Application drawer RoadSync Settings Server Settings Tap to edit server settings such as User name Password Server address Domain and ...

Page 66: ...of the email to download Auto download to download incomplete messages automatically when they are opened Signature to customise and add your signature to emails you send My email address to enter the email address to exclude when sending or replying emails to all Status bar select this check box to display a notification in the status bar when a new email arrives Select ringtone to set the email ...

Page 67: ...add an event tap Menu New event Slide your finger on screen to pan the calendar To change the calendar view tap Menu Agenda Day Week or Today To edit email settings tap Menu Settings 11 5 RoadSync mail Use the RoadSync mail to send and receive emails on your phone Note RoadSync must be set up first to use this application See RoadSync on page 60 To open RoadSync mail 1 Tap Application drawer RoadS...

Page 68: ... import option Import from OPML file select a file from the SD card Import OPML from Internet enter the URL to import OPML from Manual Add manually enter a URL Import from Google reader sign in to Google reader to import feed 4 Tap OK to confirm Update Rss feed 1 Tap Application drawer Rss reader 2 Tap Menu Update all to update the RSS feeds New feeds will be displayed in the RSS feed inbox ...

Page 69: ...discoverability Mobile networks Set options for roaming networks and Access point names Flight mode Disable all wireless connections Application Description Fixed Dialling Numbers Managed fixed dialling numbers Voicemail Set voice mail number GSM call settings Additional GSM only call settings Application Description Silent mode Turn silent mode on off All sounds except media alarms are silenced R...

Page 70: ...ication Description Use wireless networks Set location in applications such as maps using wireless networks Enable GPS satellites Check to enable GPS satellites GPS Ephemeris auto download Enable Disable Ephemeris update download from server AGPS Adjust AGPS settings Share with Google Allow Disallow Google to use location for improved search and other services Require pattern Check to enable scree...

Page 71: ...eature will clear all data stored on your memory card Factory data reset Delete all data on the phone and restore to factory default settings Warning this feature will clear all data stored on your phone Unmount Eject UMS device Select the UMS USB Mass Storage device to unmount for safe removal Application Description Automatic Check to use network provided values Set date Tap to set date for your...

Page 72: ...s or tap Menu Add alarm to set up a new alarm 3 Tap Time open a clock and set the time for the alarm To enter the time numerically tap the hour minute or AM PM field and use the up and down arrows to change the values 4 Tap Ringtone to set up the preferred ringtone when your alarm sounds 5 Tap Vibrate to enable disable vibration when the alarm sounds 6 Tap Repeat to select a day to sound the alarm...

Page 73: ...h the screen orientation automatically when rotating the phone Ring settings You can assign a ring tone and a ring tone type for various events such as an incoming call new message received etc To change the ring tone and ring type of an incoming call 1 Tap Application drawer Settings Sound Display 2 On the Sound settings tab tap Phone ringtone 3 Select the Ring tone from the lists 4 Tap OK when f...

Page 74: ...current PIN code 5 To change the PIN code tap Change PIN 6 Enter the old PIN code 7 Enter the new PIN code and confirm Enabling password protection When password is enabled you are required to enter the password every time the phone is turned on 1 Tap Application drawer Settings Security location 2 Tap Set security question and answer 3 Enter your question and answer tap Next to save your settings...

Page 75: ...e CD drive 6 Browse and double click Setup exe 7 Follow the on screen instructions to complete the driver installation 8 Locate the Removable disk drive 9 Double click on the Removable disk drive and locate the DCIM folder 10 Double click on the DCIM folder to open it to find more folders Your recorded images and video clips will be inside these folders 11 Copy and paste the image and video files ...

Page 76: ...our car in high temperatures DOs Do avoid dropping the battery or phone Dropping these items especially on a hard surface can potentially cause damage Do contact your service provider or Motorola if your phone or battery has been damaged from dropping or high temperatures Note if the product guide expressly states that your phone is designed to resist damage from exposure to certain rugged conditi...

Page 77: ...of batteries in a fire because they may explode Battery charging Notes for charging your phone s battery When charging your battery keep it near room temperature Never expose batteries to temperatures below 0ºC 32ºF or above 45ºC 113ºF when charging New batteries are not fully charged New batteries or batteries stored for a long time may take more time to charge Motorola batteries and charging sys...

Page 78: ... precautions for the use of mobile devices They note that if you want to reduce your exposure then you can do so by limiting the length of calls or using a hands free device to keep the mobile device away from the head and body Additional information can be found on the Web sites of the World Health Organisation http www who int emf and Motorola Inc http www motorola com rfhealth European Union Di...

Page 79: ...mobile device you may send your request in writing to the address below Please make sure that the request includes the model number and the software version number MOTOROLA INC OSS Management 600 North US Hwy 45 Libertyville IL 60048 USA The Motorola website opensource motorola com also contains information regarding Motorola s use of open source Motorola has created the opensource motorola com we...

Page 80: ... device to tell the emergency responders your approximate location AGPS has limitations and might not work in your area Therefore Always tell the emergency responder your location to the best of your ability and Remain on the phone for as long as the emergency responder instructs you Performance tips Go outside and away from underground locations covered vehicles structures with metal or concrete ...

Page 81: ...f you wear the mobile device on your body always place the mobile device in a Motorola supplied or approved clip holder holster case or body harness If you do not use a body worn accessory supplied or approved by Motorola keep the mobile device and its antenna at least 2 5 centimeters 1 inch from your body when transmitting Using accessories not supplied or approved by Motorola may cause your mobi...

Page 82: ...e while driving may cause distraction End a call if you can t concentrate on driving Input information about your destination and route prior to your drive Do not input data or engage in text messaging while driving Keep your eyes on the road while driving Listen to the audible turn by turn directions if available Also using a mobile device or accessory may be prohibited or restricted in certain a...

Page 83: ...center Seizures blackouts Some people may be susceptible to epileptic seizures or blackouts when exposed to flashing lights such as when playing video games These may occur even if a person has never had a previous seizure or blackout If you have experienced seizures or blackouts or if you have a family history of such occurrences please consult with your physician before playing video games or en...

Page 84: ...ur body If you continue to have discomfort during or after such use stop use and see a physician Nov0109 FCC notice to users The following statement applies to all products that have received FCC approval Applicable products bear the FCC logo and or an FCC ID in the format FCC ID xxxxxx on the product label Motorola has not approved any changes or modifications to this device by the user Any chang...

Page 85: ...ven or dryer as this may damage the mobile device extreme heat or cold Avoid temperatures below 0ºC 32ºF or above 45ºC 113ºF microwaves Don t try to dry your mobile device in a microwave oven dust and dirt Don t expose your mobile device to dust dirt sand food or other inappropriate materials cleaning solutions To clean your mobile device use only a dry soft cloth Don t use alcohol or other cleani...

Page 86: ... accordance with the national collection and recycling schemes operated by your local or regional authority Alternatively you may return unwanted mobile devices and electrical accessories to any Motorola approved service centre in your region Details of Motorola approved national recycling schemes and further information on Motorola recycling activities can be found at www motorola com recycling D...

Page 87: ...rties providing services Other information your device may transmit Your device may also transmit testing and other diagnostic including location based information and other non personal information to Motorola or other third party servers This information is used to help improve products and services offered by Motorola If you have further questions regarding how the use of your mobile device may...

Page 88: ...ontinue Do not engage in stressful or emotional conversations that may be distracting Make people you are talking with aware you are driving and suspend conversations that can divert your attention away from the road Use your mobile device to call for help Dial 911 or other local emergency number in the case of fire traffic accident or medical emergencies wherever wireless phone service is availab...

Page 89: ...s without notice or obligation MOTOROLA and the Stylised M Logo are registered in the US Patent Trademark Office The MOTOBLUR logo is a trademark of Motorola Inc Facebook is a trademark of Facebook Inc The Bluetooth trademarks are owned by their proprietor and used by Motorola Inc under license Microsoft Windows Windows Me and Windows Vista are registered trademarks of Microsoft Corporation in the...

Page 90: ...S Wi Fi 802 11 b g Bluetooth 2 0 EDR USB USB 2 0 Power Battery Rechargeable Li Ion 1270mAh Power adapter AC input 100 240V 50 60Hz 0 2A max DC output 5V 1A Temperature Operating 15ºC to 55ºC Non operating Storage 20ºC to 70ºC Charging 0ºC to 40ºC Humidity Operating 10 to 90 non condensing Non operating Storage 5 to 95 non condensing ...

Page 91: ......

Page 92: ......

Reviews: