background image

BOB SLAY

(assembly instructions)

Items included:

7 x Acrylic cutouts labeled A-G
1 x Acrylic IO Panel
1 x Acrylic locking plate of PCI cards
2 x Acrylic 5.25 spacers
2 x momentary switches (power/reset)
2 x blue tailed LED w/chrome bezels
1 x stainless steel handle w/2 mounting screws
6 x PCI cover plates
1 x bag of motherboard mounting hardware (10 standoffs, 10 screws)
1 x bag of left sided acrylic blocks (10 pcs – labeled “L”)
1 x bag of right sided acrylic blocks (10 pcs – labeled “R”)
1 x bag of long 3mm screws (60 pcs)
1 x bag of long 6/32 screws (16 pcs)
1 x bag of long fan screws (8 pcs)

Assembly:

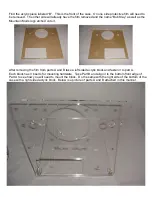
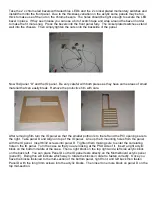
Find the acrylic cutout labeled “A” on one side.  This is the bottom of the case.  On one side protective
film will need to be removed from the acrylic while the other side will already have the film removed and
4 long sled like feet adhered to the plate.

Summary of Contents for BOB SLAY

Page 1: ...herboard mounting hardware 10 standoffs 10 screws 1 x bag of left sided acrylic blocks 10 pcs labeled L 1 x bag of right sided acrylic blocks 10 pcs labeled R 1 x bag of long 3mm screws 60 pcs 1 x bag of long 6 32 screws 16 pcs 1 x bag of long fan screws 8 pcs Assembly Find the acrylic cutout labeled A on one side This is the bottom of the case On one side protective film will need to be removed f...

Page 2: ...ogo etched onto it After removing the film from parts A and B take a left sided acrylic block and fasten it to part A Each block has 3 inserts for mounting hardware Take Part B and align it to the bottom front edge of Part A to see how you will need to mount the block Do the same with the right side of the bottom of the case with a right sided acrylic block Below is a picture of parts A and B atta...

Page 3: ...ckside take another left sided acrylic block and fasten it to the left side of the back panel on the midsection There are 4 blocks on the midsection of the case that act as platform for the motherboard tray to sit upon The midsection blocks will need to sit 90 degrees in difference from the bottom level blocks as the motherboard tray mounts to the inserts on them Mount the right backside acrylic b...

Page 4: ...over tighten Over tightening may result in stripping of the threads on the acrylic Next place the tray into the midsection of the case so that the PCI plate cutouts are on the right front side angle of the case Insert 3mm screws in each corner and tighten the tray Align the edges of the tray to the outside of the acrylic blocks as best as possible Also apply pressure to the front and back panels w...

Page 5: ...upright and slide your Power Supply PSU into the left side opening of the case Move the PSU so that the mounting holes align up to the mounting holes on the back panel Mountain Mods suggests using a power supply that includes an intake fan to help remove heat from the hard drive s Take 4 long 6 32 screws and tighten the PSU into place Next take your hard drive HD and mount it to the bottom of the ...

Page 6: ... with care After removing film turn the IO panel so that the smaller portion is to the left and the PCI openings are to the right Take panel D and Align on top of the IO panel Line up the 6 mounting holes from the panel with the IO panel Insert 6 32 screws into panel D Tighten them making sure to enter the correlating hole on the IO panel Turn the case so that you are looking at the PSU side of it...

Page 7: ...sary Take the short 3mm screws from the motherboard mounting hardware bag and tighten them into the brass standoffs securing your motherboard in place Next you can start routing your cables and inserting PCI cards and blank cover plates You will probably need to tweak the cover plates a bit by hand prior to placing them in their slot They are of thinner material than most PCI cards Given that the ...

Page 8: ...needed If your CPU heat sink extend past the front of your motherboard you will have need to externally mount the intake fan This would can be done easier prior to mounting the motherboard into place The maximum height of your CPU heat sink fan can not exceed 4 5 inches without interfering with the top of the case Placing an aluminum mesh fan filter on the intake fan will help keeping the interior...

Page 9: ...sten to the top side walls The left side block fastens to the left side and vice versa Then place the lid into place and fasten all 10 screws into the acrylic blocks CONGRATULATIONS you should now have something that looks like this Using the Bob Slay is much easier once it is assembled To add new cards or manipulate the motherboard portion just remove the top shell If you need to throw in a cable...

Reviews: