background image

Artisan Technology Group 

is your source for quality 

new and certified-used/pre-owned equipment

• 

FAST SHIPPING AND 

DELIVERY

• 

TENS OF THOUSANDS OF 

IN-STOCK ITEMS

•  EQUIPMENT DEMOS
• 

HUNDREDS OF 

MANUFACTURERS 

SUPPORTED

•  LEASING/MONTHLY


RENTALS

•  ITAR CERTIFIED


SECURE ASSET 

SOLUTIONS

SERVICE CENTER REPAIRS

Experienced engineers and technicians on staff 

at our full-service, in-house repair center

WE BUY USED EQUIPMENT

Sell your excess, underutilized, and idle used equipment 

We also offer credit for buy-backs and trade-ins

www.artisantg.com/WeBuyEquipment


REMOTE INSPECTION

Remotely inspect equipment before purchasing with 

our interactive website at


www.instraview.com

LOOKING FOR MORE INFORMATION? 

Visit us on the web at


www.artisantg.com


for more 

information on price quotations, drivers, technical 

specifications, manuals, and documentation

Contact us:


(888) 88-SOURCE  |  sales@artisantg.com  |  www.artisantg.com

SM

View

Instra

Summary of Contents for CompactDAQ cDAQ-9185

Page 1: ...service in house repair center WE BUY USED EQUIPMENT Sell your excess underutilized and idle used equipment We also offer credit for buy backs and trade ins www artisantg com WeBuyEquipment REMOTE IN...

Page 2: ...User Manual 4 Slot and 8 Slot Extended Temperature Ethernet CompactDAQ Chassis cDAQ 9185 9189 User Manual May 2017 376610A 01 Artisan Technology Group Quality Instrumentation Guaranteed 888 88 SOURCE...

Page 3: ...events National Instruments Corporate Headquarters 11500 North Mopac Expressway Austin Texas 78759 3504 USA Tel 512 683 0100 For further support information refer to the NI Services appendix To commen...

Page 4: ...T MAY ARISE FROM USAGE OF TRADE OR COURSE OF DEALING NI DOES NOT WARRANT GUARANTEE OR MAKE ANY REPRESENTATIONS REGARDING THE USE OF OR THE RESULTS OF THE USE OF THE PRODUCTS IN TERMS OF CORRECTNESS AC...

Page 5: ...p or joint venture relationship with NI Patents For patents covering NI products technology refer to the appropriate location Help Patents in your software the patents txt file on your media or the Na...

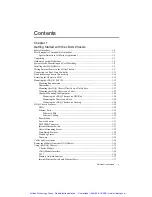
Page 6: ...Mounting the cDAQ Chassis on a Panel 1 22 Alternate Mounting Configurations 1 24 Mounting the cDAQ Chassis on a DIN Rail 1 24 Mounting the Chassis on a Rack 1 26 Mounting the cDAQ Chassis on a Deskto...

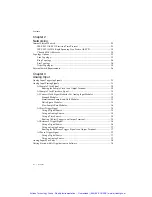
Page 7: ...Convert Clock Signal Behavior For Analog Input Modules 3 3 Scanned Modules 3 3 Simultaneous Sample and Hold Modules 3 3 Delta Sigma Modules 3 3 Slow Sample Rate Modules 3 4 AI Start Trigger Signal 3 5...

Page 8: ...rce 4 6 Using an Analog Source 4 7 Analog Output Sync Pulse 4 7 Minimizing Glitches on the Output Signal 4 7 Using the Watchdog Timer 4 8 Getting Started with AO Applications in Software 4 8 Chapter 5...

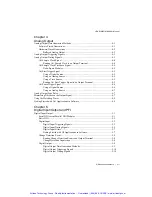
Page 9: ...asurement 6 10 Single Semi Period Measurement 6 10 Implicit Buffered Semi Period Measurement 6 10 Pulse versus Semi Period Measurements 6 11 Frequency Measurement 6 11 Low Frequency with One Counter 6...

Page 10: ...ource 6 34 Routing Counter n Source to an Output Terminal 6 34 Counter n Gate Signal 6 34 Routing a Signal to Counter n Gate 6 35 Routing Counter n Gate to an Output Terminal 6 35 Counter n Aux Signal...

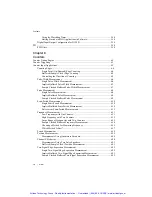
Page 11: ...ation Digital Routing 7 1 Clock Routing 7 2 80 MHz Timebase 7 2 20 MHz and 100 kHz Timebases 7 2 13 1072 MHz 12 8 MHz and 10 MHz Timebases 7 2 Synchronization across a Network 7 3 More Information abo...

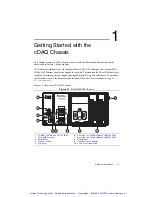
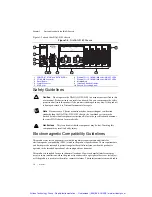
Page 12: ...9185 chassis Figure 1 1 NI cDAQ 9185 Chassis 1 POWER STATUS and ACTIVE LEDs 2 PFI 0 SMB Connector 3 Reset Button 4 Power Connector 5 SYNC Logo 6 Ethernet Port 1 10 100 1000 and LINK ACT LEDs 7 Ethern...

Page 13: ...ications These requirements and limits provide reasonable protection against harmful interference when the product is operated in the intended operational electromagnetic environment This product is i...

Page 14: ...cable connected to the PFI port must be no longer than 3 m 10 ft Special Guidelines for Marine Applications Some products are Lloyd s Register LR Type Approved for marine shipboard applications To ver...

Page 15: ...2002 96 EC on Waste and Electronic Equipment visit ni com environment weee System Health Monitoring and User Watchdog NI recommends the use of system health monitoring and a user watchdog to ensure po...

Page 16: ...o install more NI software or documentation Shut Down or Restart if you are ready to install your device Restart if you are using a system running the LabVIEW Real Time Module Download NI DAQmx to the...

Page 17: ...sing the chassis grounding screw as shown in Figure 1 3 Attach the other end of the wire to the grounding electrode system of your facility Refer to the Chassis Grounding Screw section for more inform...

Page 18: ...ernal power source to the power connector refer to the Wiring External Power to the cDAQ Chassis section The cDAQ chassis requires an external power supply that meets the specifications listed in the...

Page 19: ...twork NI DAQmx Devices If you know the chassis IP address such as 192 168 0 2 enter it into the Add Device Manually field of the Find Network NI DAQmx Devices window and click the button Enter the hos...

Page 20: ...Self test performs a brief test to determine successful chassis installation When the self test finishes a message indicates successful verification or if an error occurred If an error occurs refer t...

Page 21: ...ive lead of the power source to the C terminal of the power screw terminal connector plug and tighten the terminal screw 5 Install the power connector plug on the front panel of the cDAQ chassis and t...

Page 22: ...89 chassis Shielded Category 5 Ethernet cable Complete the following steps 1 Install the LabVIEW LabVIEW Real Time Module and driver software on the host machine as instructed in the getting started o...

Page 23: ...ee expand Remote Systems Real Time Controller Devices and Interfaces Network Devices 8 Click Add Network Device and then Find Network NI DAQmx Devices 9 In the Find Network NI DAQmx Devices dialog box...

Page 24: ...the chassis and click the Reserve Chassis button Refer to the Reserving the Chassis in MAX section for more information After the chassis is reserved by the real time controller the modules in the cha...

Page 25: ...panel Troubleshooting Chassis Connectivity If your cDAQ chassis becomes disconnected from the network try the following After moving the chassis to a new network NI DAQmx may lose connection to the c...

Page 26: ...ces Network Devices selecting the chassis and clicking the Reserve Chassis button The Override Reservation dialog box appears when you attempt to explicitly reserve a chassis Agreeing to override the...

Page 27: ...ll edges of the device Use the NI 9904 or NI 9905 Panel Mounting Kit to mount the cDAQ chassis to a metallic surface that is at least 1 6 mm 0 062 in thick and extends a minimum of 101 6 mm 4 in beyon...

Page 28: ...ing Dimensions cDAQ 9189 Shown Allow the appropriate space in front of C Series modules for cabling clearance as shown in the following figure The different connector types on C Series modules require...

Page 29: ...gs and 3D models visit ni com dimensions and search for cDAQ 9185 or cDAQ 9189 1 Measure the ambient temperature here 29 1 mm 1 14 in Cabling Clearance LINK LINK ACT ACT 10 100 10 100 1000 1000 1 2 LI...

Page 30: ...D WHEN ENERGIZED IN HAZARDOUS IN HAZARDOUS LOCATIONS LOCATIONS 2 1 ACTIVE ACTIVE 4 3 INPUT INPUT 9 30 V 9 30 V 16 W MAX 16 W MAX 88 1 mm 3 47 in 47 2 mm 1 86 in 47 0 mm 1 85 in 41 1 mm 1 62 in 30 6 mm...

Page 31: ...E 8 7 6 5 4 3 INPUT INPUT 9 30 V 9 30 V 16 W MAX 16 W MAX 88 1 mm 3 47 in 272 8 mm 10 74 in 4 1 mm 0 16 in LINK LINK ACT ACT 10 100 10 100 1000 1000 1 2 LINK LINK ACT ACT 10 100 10 100 1000 1000 SYNC...

Page 32: ...or mounting the cDAQ chassis using the surface mounting dimensions listed in Figure 1 18 or 1 19 2 Align the cDAQ chassis on the surface 3 Fasten the cDAQ chassis to the surface using the M4 screws ap...

Page 33: ...ing kit 779097 01 Panel mounting plate M4x25 screws x2 NI CompactDAQ NI cDAQ 9185 POWER STATUS PFI 0 RESET DO NOT SEPARATE CONNECTORS WHEN ENERGIZED IN HAZARDOUS LOCATIONS 2 1 ACTIVE 4 3 INPUT 9 30 V...

Page 34: ...surface using the screwdriver and screws that are appropriate for the surface The maximum screw size is M5 or number 10 The following figures show the panel mounting dimensions for the cDAQ 9185 and...

Page 35: ...ing the impact of common alternate mounting configurations on maximum operating temperature and module accuracy Mounting the cDAQ Chassis on a DIN Rail You can use the NI DIN rail mounting kit to moun...

Page 36: ...que of 1 3 N m 11 5 lb in You must use the screws provided with the NI DIN rail kit because they are the correct depth and thread for the DIN rail clip Figure 1 24 Clipping the Chassis on a DIN Rail 3...

Page 37: ...te You must order the NI 9912 DIN rail mounting kit 779019 01 or NI 9915 DIN rail mounting kit 779018 01 in addition to a rack mount kit Mounting the cDAQ Chassis on a Desktop You can use the NI 9901...

Page 38: ...s from the back of the chassis on the front panel side 2 Use the screwdriver and the two M3x20 screws to attach the adapter bracket to the chassis 3 Align one of the end brackets with the mounting hol...

Page 39: ...utton two Ethernet ports power connector and one PFI SMB connector Refer to Figure 1 1 or 1 2 for locations of the cDAQ chassis features LEDs The statuses for the POWER STATUS and ACTIVE LED indicator...

Page 40: ...le 1 3 LED State Chassis Status LED Color LED State Chassis Status POWER Green On Power on Off Power off STATUS Yellow On Chassis firmware booting updating or resetting to factory default Off Normal o...

Page 41: ...s Pin Connector 1 Connector 2 Straight Through Crossover 1 white orange white orange white green 2 orange orange green 3 white green white green white orange 4 blue blue blue 5 white blue white blue w...

Page 42: ...d for hazardous locations The power supply included in the cDAQ 9185 9189 kit is intended only for desktop use For all other applications use the included 2 position power connector plug and a power s...

Page 43: ...n and all chassis timebases will be automatically synchronized Refer to Chapter 2 Networking and the Synchronization across a Network section of Chapter 7 Digital Routing Clock Generation and Synchron...

Page 44: ...eout period to specify the amount of time that must elapse before the watchdog timer expires Set to expire upon loss of network connectivity The counter on the watchdog timer is configurable up to 232...

Page 45: ...nonhazardous location the chassis power can be on when you remove modules 2 Squeeze the latches on both sides of the module and pull the module out of the chassis Table 1 7 Cables and Accessories Acc...

Page 46: ...em to meet your application needs C Series modules are hot swappable and automatically detected by the cDAQ chassis I O channels are accessible using the NI DAQmx driver software Because the modules c...

Page 47: ...ch as start trigger reference trigger and pause trigger with analog digital or software sources Refer to the following sections for more information The Analog Input Triggering Signals section of Chap...

Page 48: ...ernet Network Interface transfers analog input analog output and digital I O data between the STC3 and the network It gathers the data into TCP IP packets that can be sent across the network and inter...

Page 49: ...ol RSTP algorithm enabling ring topologies Refer to the Topology Options section for more details IEEE 802 1AS 2011 Precision Time Protocol The internal Ethernet switch is an 802 1AS time aware bridge...

Page 50: ...TP and disabling BPDU guards on the switch Chassis MAC Addresses The cDAQ chassis is associated with two MAC addresses both of which are labeled on the chassis device and switch These MAC addresses ar...

Page 51: ...vices will compete for network bandwidth with the cDAQ chassis Reliable system design requires awareness of the bandwidth consumed by each device during operations This topology offers no redundant li...

Page 52: ...ng require careful consideration Visit ni com info and enter cdaqenet for information about exploiting link redundancy and automatically improving reliability Disadvantages Network traffic patterns ca...

Page 53: ...ork configuration and programming require careful consideration Visit ni com info and enter cdaqenet for information about exploiting link redundancy and automatically improving reliability Disadvanta...

Page 54: ...ime based triggers timestamping and multi device tasks between chassis across the network IEEE 802 1Q 2014 Rapid Spanning Tree Protocol support Supports network redundancy functionality in ring and st...

Page 55: ...ition of data When you configure a trigger you must decide how you want to produce the trigger and the action you want the trigger to cause The cDAQ chassis supports internal software triggering exter...

Page 56: ...I Sample Clock Timing Options Routing the Sample Clock to an Output Terminal You can route Sample Clock to any output PFI terminal Sample Clock is an active high pulse by default AI Sample Clock Timeb...

Page 57: ...onvert Clock Rate properties using the DAQmx Timing property node or functions Simultaneous Sample and Hold Modules Simultaneous sample and hold SSH C Series analog input modules contain multiple A D...

Page 58: ...k to operate at or slower than their maximum rate When using such a module in the cDAQ chassis the maximum Sample Clock rate can run faster than the maximum rate for the module When operating at a rat...

Page 59: ...llowing signals as the source Any PFI terminal Counter n Internal Output The source also can be one of several other internal signals on your cDAQ chassis Refer to the Device Routing in MAX topic in t...

Page 60: ...y discards the oldest samples in the buffer to make space for the next sample This data can be accessed with some limitations before the cDAQ chassis discards it Refer to the Can a Pretriggered Acquis...

Page 61: ...gnal is active and resumes when the signal is inactive You can program the active level of the pause trigger to be high or low Using a Digital Source To use the Pause Trigger specify a source and a po...

Page 62: ...ulse Otherwise a sync pulse is initiated by software implicitly even if time start triggers are specified for the tasks However for multichassis tasks the sync pulses and start triggers are automatica...

Page 63: ...n you either can perform software timed or hardware timed generations Hardware timed generations must be buffered Software Timed Generations With a software timed generation software controls the rate...

Page 64: ...p the operation There are three different continuous generation modes that control how the data is written These modes are regeneration onboard regeneration and non regeneration In regeneration mode y...

Page 65: ...me can also initiate the Start Trigger Up to two C Series parallel digital input modules can be used in any chassis slot to supply a digital trigger An analog trigger can be supplied by some C Series...

Page 66: ...ot available as an output from the chassis Delta Sigma Modules The oversample clock is used as the AO Sample Clock Timebase The cDAQ chassis supplies 10 MHz 12 8 MHz and 13 1072 MHz timebases When del...

Page 67: ...falling edge of AO Start Trigger Using an Analog Source Some C Series modules can generate a trigger based on an analog signal In NI DAQmx this is called the Analog Comparison Event depending on the t...

Page 68: ...Clock Source If you are using any signal other than the onboard clock as the source of the sample clock the generation resumes as soon as the pause trigger is deasserted and another edge of the sample...

Page 69: ...p for more information on accessing time based features in the NI DAQmx API Note To accurately synchronize delta sigma devices in two or more separate tasks you must specify the same sync pulse Otherw...

Page 70: ...tarted with AO Applications in Software You can use the cDAQ chassis in the following analog output applications Single point on demand generation Finite generation Continuous generation Waveform gene...

Page 71: ...digital input output tasks Parallel digital modules can be used in any chassis slot and can perform the following tasks Software timed and hardware timed digital input output tasks Counter timer tasks...

Page 72: ...g triggering and internal time triggering Three triggers are available Start Trigger Reference Trigger and Pause Trigger An analog or digital trigger can initiate these three trigger actions Time can...

Page 73: ...erminal DI Sample Clock Timebase Signal The DI Sample Clock Timebase di SampleClockTimebase signal is divided down to provide a source for DI Sample Clock DI Sample Clock Timebase can be generated fro...

Page 74: ...s been sampled in finite mode After a hardware reference trigger in finite mode With a software command in continuous mode An acquisition that uses a start trigger but not a reference trigger is somet...

Page 75: ...ples Once the acquisition begins the cDAQ chassis writes samples to the buffer After the cDAQ chassis captures the specified number of pretrigger samples the chassis begins to look for the reference t...

Page 76: ...gnal You can use the DI Pause Trigger di PauseTrigger signal to pause and resume a measurement acquisition The internal sample clock pauses while the external trigger signal is active and resumes when...

Page 77: ...end on the phase of the Filter Clock relative to the input signal Figure 5 3 shows an example of low to high transitions of the input signal High to low transitions work similarly Assume that an input...

Page 78: ...fer Buffered acquisitions typically allow for much faster transfer rates than nonbuffered acquisitions because data accumulates and is transferred in blocks rather than one sample at a time Digital Ou...

Page 79: ...ween samples is deterministic Hardware timed acquisitions can use hardware triggering Hardware timed DO operations on the cDAQ chassis must be buffered Buffered Digital Output A buffer is a temporary...

Page 80: ...action such as starting or stopping the acquisition of data When you configure a trigger you must decide how you want to produce the trigger and the action you want the trigger to cause The cDAQ chass...

Page 81: ...mple Clock Timebase can be generated from external or internal sources and is not available as an output from the chassis DO Start Trigger Signal Use the DO Start Trigger do StartTrigger signal to ini...

Page 82: ...dge of the Analog Comparison Event signal depending on the trigger properties The analog trigger circuit must be configured by a simultaneously running analog input task Note Depending on the C Series...

Page 83: ...ne of several other internal signals on the cDAQ chassis You also can specify whether the samples are paused when DO Pause Trigger is at a logic high or low level Refer to the Device Routing in MAX to...

Page 84: ...the module to avoid interfering with the other task NI DAQmx generates an error instead of sending the line configuration command During the line configuration command the output lines are maintained...

Page 85: ...to N 5 Figure 5 7 PFI Filter Example Table 5 1 Selectable PFI Filter Settings Filter Setting Filter Clock Jitter Min Pulse Width to Pass Max Pulse Width to Not Pass 112 5 ns short 80 MHz 12 5 ns 112 5...

Page 86: ...er Routing section Each counter has a FIFO that can be used for buffered acquisition and generation Each counter also contains an embedded counter Embedded Ctrn for use in what are traditionally two c...

Page 87: ...simple buffered pulse width measurement latches in data on each edge of a pulse For this measurement the measured signal determines when data is latched in These operations are referred to as implicit...

Page 88: ...ions the specified number of pulses is generated and the generation stops unless you use the retriggerable attribute When you use this attribute subsequent start triggers cause the generation to resta...

Page 89: ...med On demand refers to the fact that software can read the counter contents at any time without disturbing the counting process Figure 6 2 shows an example of single point edge counting Figure 6 2 Si...

Page 90: ...ising or falling edge of the sample clock Figure 6 4 shows an example of buffered edge counting Notice that counting begins when the counter is armed which occurs before the first active edge on Sampl...

Page 91: ...er is armed while the pulse is in the active state it will wait for the next transition to the active state to begin the measurement Refer to the following sections for more information about cDAQ cha...

Page 92: ...ment is similar to single pulse width measurement but buffered pulse width measurement takes measurements over multiple pulses correlated to a sample clock The counter counts the number of edges on th...

Page 93: ...ssis pulse measurement options Single Pulse Measurement Implicit Buffered Pulse Measurement Sample Clocked Buffered Pulse Measurement Single Pulse Measurement Single on demand pulse measurement is equ...

Page 94: ...d low ticks in the FIFO of the last pulse to complete The STC3 transfers the sampled values to host memory using a high speed data stream Figure 6 10 shows an example of a sample clocked buffered puls...

Page 95: ...he differences between semi period measurement and pulse measurement Single Semi Period Measurement Single semi period measurement is equivalent to single pulse width measurement Implicit Buffered Sem...

Page 96: ...an array of 10 pairs of high and low times Also pulse measurements support sample clock timing while semi period measurements do not Frequency Measurement You can use the counters to measure frequency...

Page 97: ...with Counter 3 In this method you route a pulse of known duration T to the Gate of a counter You can generate the pulse using a second counter You also can generate the pulse externally and connect it...

Page 98: ...ocal frequency measurement When measuring a large range of frequencies with two counters you generate a long pulse using the signal to measure You then measure the long pulse with a known timebase The...

Page 99: ...ample clocked buffered point frequency measurements can either be a single frequency measurement or an average between sample clocks Use CI Freq EnableAveraging to set the behavior For buffered freque...

Page 100: ...t a measurement overflow Choosing a Method for Measuring Frequency The best method to measure frequency depends on several factors including the expected frequency of the signal to measure the desired...

Page 101: ...wn of the signal An internal timebase is still used for the source frequency fk but the divide down means that the measurement time is the period of the divided down signal or N fx where N is the divi...

Page 102: ...ounter large range measurements For another example Table 6 4 shows the results for 5 MHz Table 6 3 50 kHz Frequency Measurement Methods Variable Sample Clocked One Counter Two Counters High Frequency...

Page 103: ...y to be measured occurs between sample clocks Low frequency measurements with one counter is a good method for many applications However the accuracy of the measurement decreases as the frequency incr...

Page 104: ...the Frequency Measurement section for more information Position Measurement You can use the counters to perform position measurements with quadrature encoders or two pulse encoders You can measure an...

Page 105: ...ts or decrements on each edge of channel A depending on which channel leads the other Each cycle results in two increments or decrements as shown in Figure 6 18 Figure 6 18 X2 Encoding X4 Encoding Sim...

Page 106: ...continues to count as before The figure illustrates channel Z reload with X4 decoding Figure 6 20 Channel Z Reload with X4 Decoding Measurements Using Two Pulse Encoders The counter supports two pulse...

Page 107: ...lling edges on the Source The counter ignores additional edges on the Aux input The counter stops counting upon receiving an active edge on the Gate input The counter stores the count in the FIFO You...

Page 108: ...rring between an active edge of the Gate signal and an active edge of the Aux signal The counter then stores the count in the FIFO On the next active edge of the Gate signal the counter begins another...

Page 109: ...ge on the Aux does not occur between sample clocks an overrun error occurs For information about connecting counter signals refer to the Default Counter Timer Routing section Counter Output Applicatio...

Page 110: ...se Generation with Start Trigger The counter can output a single pulse in response to one pulse on a hardware Start Trigger signal The pulse appears on the Counter n Internal Output signal of the coun...

Page 111: ...reaches the specified tick count it generates a trigger that stops the primary counter generation Figure 6 28 Finite Pulse Train Generation Four Ticks Initial Delay Four Pulses Retriggerable Pulse or...

Page 112: ...er set to the default False Figure 6 30 Retriggerable Single Pulse Generation False Note The minimum time between the trigger and the first active edge is two ticks of the source For information about...

Page 113: ...ivided by M N For information about connecting counter signals refer to the Default Counter Timer Routing section Buffered Pulse Train Generation The cDAQ chassis counters can use the FIFO to perform...

Page 114: ...er of data samples and stopping a continuous generation continues until you stop the operation Each point you write generates a single pulse All points are generated back to back to create a user defi...

Page 115: ...ed to the FIFO and regenerated from there Once the data is downloaded new data cannot be written to the FIFO To use FIFO regeneration the entire buffer must fit within the FIFO size The advantage of u...

Page 116: ...four general purpose 32 bit counter timer modules on the cDAQ chassis Figure 6 34 shows a block diagram of the frequency generator Figure 6 34 Frequency Generator Block Diagram The frequency generator...

Page 117: ...unter cumulatively increments the delay between the Gate and the pulse on the output by a specified amount Thus the delay between the Gate and the pulse produced successively increases The increase in...

Page 118: ...the cDAQ chassis Counter 0 1 2 or 3 For example Counter n Source refers to four signals Counter 0 Source the source input to Counter 0 Counter 1 Source the source input to Counter 1 Counter 2 Source...

Page 119: ...lp or the LabVIEW Help for more information about available routing options Routing Counter n Source to an Output Terminal You can route Counter n Source out to any PFI terminal Counter n Gate Signal...

Page 120: ...te to an Output Terminal You can route Counter n Gate out to any PFI terminal Counter n Aux Signal The Counter n Aux signal indicates the first edge in a two signal edge separation measurement Routing...

Page 121: ...counter input or output function you must first enable or arm the counter In some applications such as a buffered edge count the counter begins counting when it is armed In other applications such as...

Page 122: ...internal source specify the signal source and the polarity of the signal The source can be any of the following signals DI Sample Clock DO Sample Clock AI Sample Clock ai SampleClock te0 SampleClock...

Page 123: ...determine the signal routing options for modules installed in your system refer to the Device Routes tab in MAX You can use these defaults or select other sources and destinations for the counter time...

Page 124: ...ad therefore you cannot determine how many edges have occurred since the previous rollover Prescaling can be used for event counting provided it is acceptable to have an error of up to seven or one ti...

Page 125: ...With an external or internal source less than 20 MHz the module generates a delayed Source signal by delaying the Source signal by several nanoseconds The chassis synchronizes signals on the rising ed...

Page 126: ...The digital routing circuitry uses FIFOs if present in each sub system to ensure efficient data movement Routes timing and control signals The acquisition generation sub systems use these signals to...

Page 127: ...the 32 bit general purpose counter timers The 20 MHz and 100 kHz Timebases are generated by dividing down the 80 MHz Timebase as shown in Figure 7 1 13 1072 MHz 12 8 MHz and 10 MHz Timebases The 13 1...

Page 128: ...EE 802 1AS Note For chassis or networks that do not support network synchronization the NI 9469 C Series synchronization module can be used to synchronize timebases and clocks across chassis More Info...

Page 129: ...taking measurements and controlling measurement devices The following references to documents assume you have NI DAQmx 17 1 or later NI cDAQ Chassis Documentation The cDAQ 9185 9189 Quick Start packa...

Page 130: ...ollowing locations on the Contents tab of the LabVIEW Help for information about NI DAQmx VI and Function Reference Measurement I O VIs and Functions DAQmx Data Acquisition VIs and Functions Describes...

Page 131: ...el namespace For conceptual help with NI DAQmx refer to Using the Measurement Studio NI DAQmx NET Library and Creating Projects with Measurement Studio NI DAQmx For general help with programming in Me...

Page 132: ...detailed course outline refer to ni com training Technical Support on the Web For additional support refer to ni com support or ni com examples Note You can download these documents at ni com manuals...

Page 133: ...rements and provides warranty sparing and calibration services to help you maintain accuracy and minimize downtime over the life of your system Visit ni com services for more information Warranty and...

Page 134: ...tted online receives an answer Software Support Service Membership The Standard Service Program SSP is a renewable one year subscription included with almost every NI software product including NI Dev...

Page 135: ...r output 6 24 edge counting 6 4 arm start trigger 6 3 B buffered edge counting 6 4 hardware timed generations analog output 4 2 digital output 5 9 position measurement 6 21 two signal edge separation...

Page 136: ...getting started with applications in software 5 7 timing signals 5 2 triggering 5 2 digital input signals DI Pause Trigger 5 6 DI Reference Trigger 5 5 DI Sample Clock 5 3 DI Sample Clock Timebase 5...

Page 137: ...ut 4 2 digital output 5 9 I implicit buffered pulse width measurement 6 7 semi period measurement 6 10 installation 1 4 internal source less than 40 MHz 6 39 L LabVIEW documentation A 2 LabWindows CVI...

Page 138: ...ent 6 21 semi period measurement 6 10 implicit buffered 6 10 single 6 10 simple pulse generation 6 24 single point edge counting 6 4 pulse generation 6 25 retriggerable 6 26 with start trigger 6 25 pu...

Page 139: ...cDAQ 9185 9189 User Manual National Instruments I 5 X X1 encoding 6 20 X2 encoding 6 20 X4 encoding 6 20 Artisan Technology Group Quality Instrumentation Guaranteed 888 88 SOURCE www artisantg com...

Page 140: ...service in house repair center WE BUY USED EQUIPMENT Sell your excess underutilized and idle used equipment We also offer credit for buy backs and trade ins www artisantg com WeBuyEquipment REMOTE IN...

Reviews: