background image

National Instruments

and ni.com

are trademarks of National Instruments Corporation. Product and company names mentioned herein are

trademarks or trade names of their respective companies.

322836A-01

Copyright

©

2001 National Instruments Corp. All rights reserved.

February 2001

INSTALLATION GUIDE

VXI-1501 A

DVANCED

R

ACK

M

OUNT

K

IT

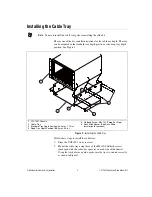
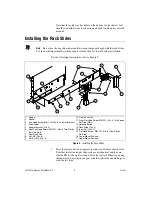
This kit includes heavy-duty slides for mounting the VXI-1501 chassis into
a VXI cabinet, a cable tray kit, a horizontal filler panel, flanges for
mounting the chassis to the cabinet, and handles for easy handling of the
chassis when sliding the chassis into and out of the VXI cabinet.

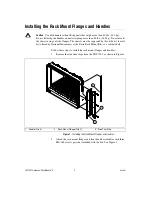
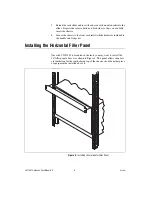
For installation instructions, see the

Installing the Rack Mount Flanges and

Handles

section. You must install all accessories in the order shown in this

installation guide (with the exception of the horizontal filler panel, which
is optional).

Note

When installing the separate components of this rack mount kit, refer to this

installation guide only. Disregard any other instructions included with each individual
component.

Summary of Contents for VXI-1501

Page 1: ...t a cable tray kit a horizontal filler panel flanges for mounting the chassis to the cabinet and handles for easy handling of the chassis when sliding the chassis into and out of the VXI cabinet For installation instructions see the Installing the Rack Mount Flanges and Handles section You must install all accessories in the order shown in this installation guide with the exception of the horizont...

Page 2: ... be supported by this slide kit the rail kit offered by National Instruments as the Basic Rack Mount Kit or a cabinet shelf Follow these steps to install the rack mount flanges and handles 1 Remove the side trim strips from the VXI 1501 as shown in Figure 1 Figure 1 Installing the Rack Mount Flanges and Handles 2 Attach the rack mount flanges and front handle assemblies with three M4 16L screws pe...

Page 3: ...ng the Cable Tray Follow these steps to install the cable tray 1 Place the VXI 1501 on its rear feet 2 Mount the cable tray using three of the M5 10L flathead screws packaged with the cable tray spacers on each side of the chassis Using the tray holes as a guide make sure the tray is oriented correctly as shown in Figure 2 1 VXI 1501 Chassis 2 Cable Tray 3 Standard Tray Depth Position 44 5 mm 1 75...

Page 4: ... rack slide Note that the left and right slide rails are not identical and thus are labeled RH for the right rail and LH for the left rail When separating the inner rails note which one goes with the right slide and which goes with the left slide 1 Flange 2 Spacer 3 Pan Head Screw M5 12L Qty 8 Two Per Bracket 4 Slide Label 5 Adapter Bracket Qty 4 6 Rear Pan Head Screw M5 12L Qty 4 Two Places Per R...

Page 5: ...12L pan head screws and two M5 hex nuts per bracket included with the adapter kit Some adjustments may be necessary depending on your particular rack Tighten the nuts after making any adjustments Note Depending on your particular VXI rack you may be able to mount the slide rack assembly directly to the cabinet rails without using the adapter kit Should you try this remember that depending on which...

Page 6: ...sis to the front rack rails with the hardware included in the handle and flange kit Installing the Horizontal Filler Panel Once the VXI 1501 is mounted in the rack you may want to install the 1U filler panel above it as shown in Figure 4 This panel allows adequate air ventilation for the vent holes on top of the chassis should another piece of equipment be installed above it Figure 4 Installing th...

Reviews: