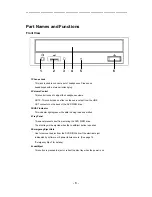
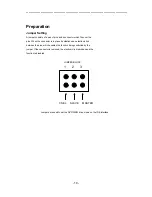
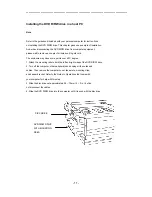
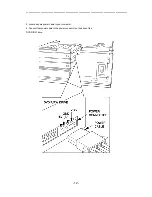
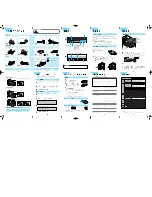
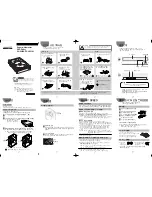
background image

--------------------------------------------------------------------------------------------- 


- 1 - 


Internal DVD R/RW Drive 

ND-2100 

User's Manual 


Summary of Contents for ND-2100

Page 1: ... 1 Internal DVD R RW Drive ND 2100 User s Manual ...

Page 2: ...performance of procedures other than those specified herein may result in hazardous radiation exposure This label is located on top enclosure of this drive Laser Specification for CD Type Semiconductor laser GaAlAs Wave length 783 nm Typical at 25 C Output Max 200 mW Pulse width 70ns Duty 50 for DVD Type Semiconductor laser AlGaInP Wave length 658 nm Typical at 25 C Output 140 mW Pulse width 100ns...

Page 3: ...he separation between the equipment and receiver Connect the equipment into an outlet on a circuit different from that to which the receiver is connected Consult the dealer or an experienced radio TV technician for help This digital apparatus does not exceed the Class B limits for radio noise emissions from digital apparatus as set out in the Radio Interference Regulations of the Canadian Departme...

Page 4: ...w 8 Rear View 9 Preparation Jumper Setting 10 Installing the DVD R RW drive in a host PC 11 Inserting Removing a Disc Using the DVD R RW Drive Installed Vertically 14 Inserting a Disc 15 Removing a Disc 15 Emergency Eject 15 Specifications DVD Section 16 CD Section 17 IDE Interface Section 18 Audio Section 18 Environment 18 General 18 ...

Page 5: ... the unit as this will lead to fires or electric shocks If a foreign object should get in the unit immediately turn off the power of the computer on which the unit is installed and request servicing Do not let fluids get in the unit or let the unit get wet as this will lead to fires or electric shocks If fluid should get in the unit immediately turn off the power of the computer on which the unit ...

Page 6: ...oing so could lead to fires or electric shocks Do not store or use the unit with heavy objects or objects that stick out passed the frame on top of it The object or unit may lose its balance and tip over or fall resulting in injury Do not let stick your hands into the disc insertion slot as this could cause injury Do not use cracked or misshapen discs or discs that have been repaired with adhesive...

Page 7: ...of the disc the side of the disc with no label or printing Do not apply paper labels or write on any part of the disc data side or label side Do not use the disc leaved a mark strip paper labels If dust or fingerprints get on the disc wipe it with a soft cloth from the center to the edge Do not use benzine paint thinner record cleaner or static repellent This can damage the disc Do not place the d...

Page 8: ...DVD R RW drive 3 BUSY Indicator This indicator lights green while data is being read and written 4 Tray Panel This panel prevents dust from entering the DVD R RW drive The disc tray will be ejected when the Load Eject button is pushed 5 Emergency Eject Hole Use to remove the disc from the DVD R RW drive if the electrical eject is disabled by software or if power failure occurs See page 14 Emergenc...

Page 9: ... audio board 9 Line Out Connector This connector is used to connect CD Audio to an audio board 10 I O BUS Connector This BUS connector is used to control the DVD R RW drive and sent data Use a flat ribbon cable to connect your computer to the DVD R RW drive Connect the colored side of the ribbon cable to the side marked with the arrow 11 Power Connector Use this to provide operating power from the...

Page 10: ...nnector is in place it establishes an electronic link between the pins which enables the function being controlled by the jumper If the connector is removed the electronic link is broken and the function is disabled JUMPER BLOCK Jumpers are used to set the DVD R RW drive mode on the IDE interface 1 2 3 CSEL SLAVE MASTER ...

Page 11: ...e points over 60 C degree 1 Attach the mounting rails to both the left and right sides of the DVD R RW drive 2 Turn off the computer other peripherals and unplug all the cords and cables Then remove the computer cover face plate mounting clips and keeper bracket Refer to the Guide to Operations that came with your computer for help with this step 3 Slide the disc drive out approximately 50 70mm 2 ...

Page 12: ... 12 5 Locate a spare power cable in your computer 6 Connect that power cable to the power connector on the back of the DVD R RW drive ...

Page 13: ...he DVD R RW drive and the IDE connector Connect the colored stripe side of the cable to the side marked with the arrow 8 Slide the disc drive and DVD R RW drive into the computer 9 Replace the mounting clips keeper bracket and computer cover ...

Page 14: ...position load and unload discs as shown on the diagram below Caution Only 12cm discs can be used when the DVD R RW drive is installed vertically Do not place 8cm discs in the tray when using the DVD R RW drive installed in this way DVD R RW drive installed vertically left side DVD R RW drive installed vertically right side ...

Page 15: ...prohibit command has been received from the computer the disc tray will not be ejected even if the Load Eject button is pressed Emergency Eject The procedure described below can be used to remove a disc from the DVD R RW drive if the Load Eject button is disabled by software or a power failure occurs 1 Turn off the power to the computer installed the DVD R RW drive 2 The disc that is inside may st...

Page 16: ...xell TDK T B D b DVD RW Media 4X 2X 1X Ver1 0 1 1 JVC Pioneer Mitsubishi TDK T B D c DVD R Media 8X 4X 2 4X RICOH Mitsubishi TDK MAXELL YUDEN Verbatim T B D d DVD RW Media 4X 2 4X RICOH Mitsubishi TDK Philips Verbatim T B D e DVD RW Rewrite 1000 times f DVD RW Rewrite 1000 times Write Speed and Transfer Rate DVD R Write 8X ZCLV 5 5 11 MBytes sec 4X CLV 5 5 MBytes sec 2 4X CLV 3 3 MBytes sec DVD RW...

Page 17: ... Write 24X ZCLV US RW 2400 3600KBytes sec 16X ZCLV US RW 1200 2400 KBytes sec 10X CLV HS RW 1500 KBytes sec 4X CLV 600 KBytes sec Writable Format Modes and Block Length Supported Format and Modes Supported CD Audio 8cm 12cm CD ROM mode 1 and mode 2 CD ROM XA mode2 form 1 and form 2 Photo CD TM single or multiple sessions CD I FMV Video CD CD Extra CD TEXT Block Length Supported CD Audio 2352 Bytes...

Page 18: ...3 0 dB 10 kÙ load at 1 kHz 0 dB Environment Ambient conditions for use Temperature 5 C degree to 50 C degree Humidity Max 70 no condensation Ambient conditions for storage Temperature 40 C degree to 65 C degree Humidity 20 to 90 no condensation General Power Supply 5V 1 6A 12V 1 8A Dimensions W x H x D 14 82 x 4 2 x 19 0cm 5 13 16 x 1 5 8 x 7 4 5 inch Weight 1 0 Kg 2 20 lbs T B D Note Above specif...

Reviews: