background image

Portable Projector

NP610/NP510/NP410/NP405/

NP310/NP305/NP510W/NP410W 

NP610S/NP510WS

User’s Manual

The projector’s model name indicated on the projector’s label is NP610, 
NP510, NP410, NP405, NP310, NP305, NP510W, NP410W, NP610S, 
NP510WS, NP610G, NP510G, NP410G, NP405G, NP310G, NP305G, 
NP510WG, NP410WG, NP610SG, and NP510WSG respectively.
All  the  models  are  referred  to  as  NP610,  NP510,  NP410,  NP405, 
NP310, NP305, NP510W, NP410W, NP610S, and NP510WS through-
out the user’s manual except some of the specification pages.

The NP405 and NP305 are not distributed in North America. 

NP610/NP510/NP410/NP405/NP310/NP305/NP510W/NP410W

NP610S/NP510WS

Summary of Contents for NP610 Series

Page 1: ...P410W NP610S NP510WS NP610G NP510G NP410G NP405G NP310G NP305G NP510WG NP410WG NP610SG and NP510WSG respectively All the models are referred to as NP610 NP510 NP410 NP405 NP310 NP305 NP510W NP410W NP6...

Page 2: ...on of ACCO Brands Virtual Remote Tool uses WinI2C DDC library Nicomsoft Ltd Other product and company names mentioned in this user s manual may be the trademarks or registered trademarks of their resp...

Page 3: ...liance Notice for Canada only This Class B digital apparatus meets all requirements of the Canadian Interference Causing Equipment Regula tions Machine Noise Information Regulation 3 GPSGV The highest...

Page 4: ...ouraged to try to correct the interference by one or more of the following measures Reorient or relocate the receiving antenna Increase the separation between the equipment and receiver Connect the eq...

Page 5: ...0G NP410G NP405G NP310G NP305G NP510WG NP410WG NP610SG NP510WSG Ensure that your power supply fits this requirement before attempting to use your projector Do not look into the lens while the projecto...

Page 6: ...When using a LAN cable only models with the RJ 45 LAN port For safety do not connect to the connector for peripheral device wiring that might have excessive voltage CAUTION Do not use the tilt foot f...

Page 7: ...ng the lamp from a ceiling mounted projector make sure that no one is under the projector Glass fragments could fall if the lamp has been burned out About High Altitude mode Set FAN MODE to HIGH ALTIT...

Page 8: ...lay 17 Connecting Your PC or Macintosh Computer 17 When Viewing a DVI Digital Signal except NP405 and NP305 19 Using Two Analog COMPUTER Inputs Simultaneously 20 Connecting an External Monitor 21 Conn...

Page 9: ...r Virtual Remote 51 5 Using On Screen Menu 56 Using the Menus 56 2 Menu Elements 57 3 List of Menu Items 58 4 Menu Descriptions Functions SOURCE 60 5 Menu Descriptions Functions ADJUST 61 6 Menu Descr...

Page 10: ...anty For customers in Europe You will find our current valid Guar antee Policy on our Web Site www nec display solutions com Important Infomation For North America 7N8P9731 For Other countries than No...

Page 11: ...ctor is turned off from the remote control or cabinet control panel Direct Power Off The projector has a feature called Direct Power Off This feature allows the projector to be turned off even when pr...

Page 12: ...45 connector is equipped as standard feature Auto vertical keystone correction Auto Keystone feature allows the projector to detect its tilt and correct vertical distortion automatically LCD projecto...

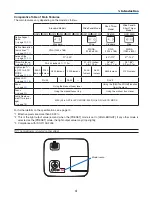
Page 13: ...DE page 90 92 3500 lumens 3000 lumens 2600 lumens 2200 lumens 3000 lumens 2600 lumens 2600 lumens 2100 lumens Wired LAN page 24 48 RJ 45 RJ 45 RJ 45 Zoom page 32 Using the manual zoom lever Using the...

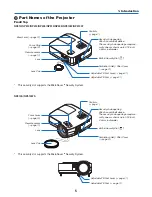
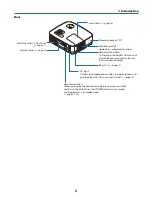
Page 14: ...page 31 Security chain opening Attach an anti theft device The security chain opening accepts se curity wires or chains up to 0 18 inch 4 6 mm in diameter NP610S NP510WS FO CU S Controls page 7 Lens L...

Page 15: ...tlet and turn on the Main Power the POWER indicator turns orange and the projector is in standby mode page 26 38 Terminal Panel page 8 Monaural Speaker 7W Ventilation outlet Heated air is exhausted fr...

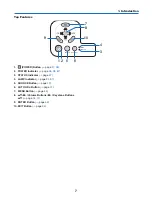
Page 16: ...3 1 POWER Button page 27 38 2 POWER Indicator page 26 38 87 3 STATUS Indicator page 87 4 LAMP Indicator page 84 87 5 SOURCE Button page 29 6 AUTO ADJ Button page 37 7 MENU Button page 56 8 Volume Butt...

Page 17: ...Pin page 17 20 22 NP405 NP305 3 AUDIO IN Mini Jack Stereo Mini page 17 19 22 4 AUDIO OUT Mini Jack Stereo Mini page 21 5 MONITOR OUT COMP 1 Connector Mini D Sub 15 Pin page 21 6 S VIDEO IN Connector M...

Page 18: ...age 40 6 PAGE UP DOWN Button page 46 47 7 MENU Button page 56 8 SELECT Button page 56 9 ENTER Button page 56 10 EXIT Button page 56 11 MOUSE L CLICK Button page 46 47 12 MOUSE R CLICK Button page 46 4...

Page 19: ...firmly and slide the battery cover off 2 Install new batteries AAA Ensure that you have the batteries polarity aligned correctly The infrared signal operates by line of sight up to a distance of about...

Page 20: ...age can be is approximately 21 0 53 m measured diagonally when the projector is roughly 30 inches 0 8 m from the wall or screen The largest the image can be is 300 7 6 m when the projector is about 40...

Page 21: ...cm inch 200 180 150 120 100 80 1 1 0 4 3 1 8 8 3 4 5 6 6 2 5 8 5 5 2 1 5 4 4 1 7 2 3 6 1 4 3 2 9 1 1 4 2 2 8 5 1 4 5 6 40 7 3 2 8 7 60 30 21 0 9 4 2 0 8 3 1 646 2 W 403 9 H 254 W 159 H 516 9 W 323 1...

Page 22: ...D i s t a n c e U n i t m i n c h Lens center Screen Size Screen Size Unit cm inch 223 5 W 167 6 H 88 W 66 H 203 2 W 152 4 H 80 W 60 H 182 9 W 137 2 H 72 W 54 H 162 6 W 121 9 H 64 W 48 H 156 5 W 117...

Page 23: ...4 D i s t a n c e U n i t m i n c h Lens center Screen Size Screen Size Unit cm inch 224 0 W 140 0 H 88 W 55 H 215 4 W 134 6 H 85 W 53 H 193 9 W 121 2 H 76 W 48 H 187 4 W 117 1 H 74 W 46 H 172 3 W 107...

Page 24: ...429 9 5 8 0 200 5080 160 4064 120 3048 41 1048 246 6241 295 7501 19 476 9 5 8 0 210 5334 168 4267 126 3200 43 1100 258 6555 310 7878 20 500 9 5 7 9 240 6096 192 4877 144 3658 50 1257 295 7497 355 900...

Page 25: ...our NEC dealer for more information Do not attempt to install the projector yourself Only use your projector on a solid level surface If the projector falls to the ground you can be injured and the pr...

Page 26: ...ned on unless connected to the projector before being powered up If the screen goes blank while using your remote control it may be the result of the computer s screen saver or power manage ment softw...

Page 27: ...TER 1 IN COMPUTER 1 COMPUTER 1 COMPUTER 2 IN COMPUTER 2 COMPUTER 2 NOTE The projector is not compatible with video decoded outputs of the NEC ISS 6020 switcher NOTE An image may not be displayed corre...

Page 28: ...the DVI cable while the projector is running If the signal cable has been disconnected and then re connected an image may not be correctly displayed Should this happen restart your PC NOTE Use a DVI c...

Page 29: ...sktop type VGA signal cable not supplied DVI to VGA adapter supplied NOTE When the DVI to VGA adapter is not to be used for an extended period of time remove it from the projector Failure to do so may...

Page 30: ...o your projector to simultaneously view on a monitor the computer analog image you re projecting NOTE Daisy chain connection is not possible When audio equipment is connected the projector speaker is...

Page 31: ...on the projector cabinet Button on the remote control COMPUTER 1 IN COMPUTER1 COMPUTER 1 COMPUTER 2 DVI I IN COMPUTER 2 ANALOG COMPUTER 2 NP405 NP305 Input connector SOURCE button on the projector ca...

Page 32: ...IN L and R jacks RCA are shared between the Video and S Video inputs NOTE Refer to your VCR owner s manual for more information about your equipment s video output requirements NOTE An image may not b...

Page 33: ...specify the Network Settings and the Alert Mail Settings for the projector over a LAN To use a LAN connection you are required to assign an IP address to the projector on the PROJECTOR NETWORK SETTIN...

Page 34: ...t the other plug of the supplied power cable in the wall outlet CAUTION Do not try to touch the ventilation outlet on the left front when seen from the front as it can become heated while the projecto...

Page 35: ...hed to the off posi tion Failure to do so may cause damage to the projector 1 Remove the lens cap Do not remove the lens cap by pulling on the string Doing so can cause mechanical damage to the part a...

Page 36: ...d is displayed it means that the SECURITY is turned on page 43 After you turn on your projector ensure that the computer or video source is turned on and that your lens cap is removed NOTE When no sig...

Page 37: ...ilure When the ECO MODE is set to ON the LAMP indicator will light green If one of the following things happens the projector will not turn on If the internal temperature of the projector is too high...

Page 38: ...g the Remote Control Press any one of the COMPUTER 1 2 VIDEO and S VIDEO buttons TIP The COMPUTER 2 button on the remote control toggles the Computer 2 source between COMPUTER2 DIGITAL and COMPUTER2 A...

Page 39: ...hapter drawings and cables are omitted for clarity Adjusting the throw angle the height of an image Tilt foot page 31 Adjusting the left and right tilt of an image Rear foot page 31 Finely adjusting t...

Page 40: ...he front of the projector Rotate the rear foot to the desired height in order to square the image on the projection surface CAUTION Do not use the tilt foot for purposes other than originally intended...

Page 41: ...the screen Zoom Lever NP610S NP510WS The image size can be adjusted electronically from the menu To do so follow the steps below Adjusting from the menu 1 Press the MENU button The menu will be displ...

Page 42: ...completing adjustment press the EXIT button three times The menu will be closed Focus NP610 NP510 NP410 NP405 NP310 NP305 NP510W NP410W Use the FOCUS ring to obtain the best focus NP610S NP510WS Use t...

Page 43: ...r its aspect ratio selection Adjusting with buttons on the cabinet 1 Press the or button with no menus displayed The keystone bar will be displayed MENU E X I T E N T E R STATUS LAMP AUTO ADJ SOURCE 2...

Page 44: ...screen will be displayed 3 Press the button to select KEYSTONE 4 Press the or button Adjust so that the image is rectangular 5 After completing adjustment press the EXIT button three times The menu w...

Page 45: ...TE The maximum range of vertical keystone correction is 30 degrees on the NP610 NP510 NP410 NP405 NP310 NP305 NP510W NP410W and 20 degrees on the NP610S NP510WS The maximum range of keystone correctio...

Page 46: ...volume VOLUME L CLICK MOUSE R CLICK ASPECT HELP FREEZE PICTURE AUTO ADJ S VIDEO VIDEO COMPUTER ECO MODE 1 2 NOTE Some signals may take time to display or may not be displayed correctly The Auto Adjus...

Page 47: ...TUS indicator will light green when NORMAL is selected for STANDBY MODE Immediately after turning on the projector and displaying an image you cannot turn off the projector for 60 seconds 3 Finally tu...

Page 48: ...tor in the soft case with the lens facing upward as shown below This is to prevent the lens from damage NOTE The NP610S the NP510WS the NP405 and the NP305 do not come with a soft case NOTE When placi...

Page 49: ...ge is frozen but the original video is still playing back Enlarging a Picture You can enlarge the picture up to four times NOTE The maximum magnification may be less than four times depending on the s...

Page 50: ...tor is always in ON for 90 seconds after the lamp is turned on and while the POWER indicator is blinking green The lamp condition will not be affected even when ECO MODE is changed After a lapse of 1...

Page 51: ...shows the amount of CO2 emission reduction between the time of changing to ECO MODE immediately after the time of power on and the time of power off The CARBON SAVINGS SESSION message will be display...

Page 52: ...menu To enable the Security function 1 Press the MENU button The menu will be displayed 2 Press the button twice to select SETUP and press the button or the ENTER button to select GEN ERAL 3 Press th...

Page 53: ...n on the projector when SECURITY is enabled 1 Press and hold the POWER button for about 1 second The projector will be turned on and display a message to the effect that the projector is locked 2 Pres...

Page 54: ...tton The KEYWORD CONFIRMATION screen will be displayed 4 Type in your keyword and press the ENTER button When the correct keyword is entered the SECURITY function will be disabled NOTE If you forget y...

Page 55: ...uter via the remote mouse receiver When connecting using the USB terminal For PC the mouse receiver can only be used with a Windows 98 Me XP Windows 2000 Windows Vista or Mac OS X 10 0 0 or later oper...

Page 56: ...ton with the menu displayed both the menu and the mouse pointer will be affected Close the menu and perform the mouse operation The PAGE UP and DOWN buttons do not work with PowerPoint for Macintosh A...

Page 57: ...pen consult your network administrator The projector may not respond if its buttons are repeatedly pressed in rapid intervals Should this happen wait a moment and repeat If you still can t get any res...

Page 58: ...t INFO WIRED LAN SUBNET MASK Set your subnet mask number of the network connected to the projector when DISABLE is selected for DHCP DEFAULT GATEWAY Set your default gateway of the network connected t...

Page 59: ...ng ENABLE will turn on the Alert Mail feature Checking DISABLE will turn off the Alert Mail feature SENDER S ADDRESS Type in the senders address Up to 60 alphanumeric and symbols characters can be use...

Page 60: ...her cables than the supplied VGA signal cable may cause failure in signal communication VGA cable connector Pin Nos 12 and 15 are required for DDC CI Virtual Remote Tool may not work depending on your...

Page 61: ...ayed If the folders are not displayed right click the CD DVD drive icon in Windows Computer or My Computer and select Open 2 Double click software and then Virtual Remote Tool The setup exe icon will...

Page 62: ...hen Control Panel The Control Panel window will be displayed 2 Double click Add Remove Programs The Add Remove Programs window will be displayed On Windows 2000 double click Uninstall a program 3 Clic...

Page 63: ...Easy Setup window will be displayed Follow the instructions on the screens When Easy Setup is completed the Virtual Remote Tool screen will be displayed TIP The Virtual Remote Tool screen or Toolbar...

Page 64: ...ool Displaying the help file using the taskbar 1 Click the Virtual Remote Tool icon on the taskbar when Virtual Remote Tool is running The pop up menu will be displayed 2 Click Help The Help screen wi...

Page 65: ...rojector cabinet to select the item you want to adjust or set You can use the buttons on the remote control or the projector cabinet to select the tab you want 5 Press the ENTER button on the remote c...

Page 66: ...front Radio button Use this round button to select an option in a dialog box Source Indicates the currently selected source Off Timer remaining time Indicates the remaining countdown time when the OFF...

Page 67: ...RAL DIGITAL ZOOM 3 100 80 100 AUTO KEYSTONE OFF OFF ON KEYSTONE 0 KEYSTONE SAVE OFF OFF ON WALL COLOR OFF OFF WHITEBOARD BLACKBOARD BLACKBOARD GRAY LIGHT YELLOW LIGHT GREEN LIGHT BLUE SKY BLUE LIGHT R...

Page 68: ...R SAVING AUTO POWER ON AC OFF OFF ON AUTO POWER ON COMP1 OFF OFF ON AUTO POWER OFF OFF OFF 0 05 0 10 0 20 0 30 DEFAULT SOURCE SELECT LAST LAST AUTO COMPUTER1 COMPUTER2 DIGITAL 1 COMPUTER2 ANALOG VIDEO...

Page 69: ...if the input signal is RGB or component signal COMPUTER2 DIGITAL ANALOG Selects the computer connected to your COMPUTER 2 IN DVI I connector COMPUTER2 NP405 and NP305 only Selects the computer connect...

Page 70: ...lso use DETAIL SETTINGS to set user adjustable settings to customize each gamma or color Your settings can be stored in PRESET 1 to PRESET 6 HIGH BRIGHT Recommended for use in a brightly lit room PRES...

Page 71: ...your choice NOTE When PRESENTATION or HIGH BRIGHT is selected in REFERENCE this function is not available Adjusting Brightness and Contrast DYNAMIC CONTRAST NP410 and NP310 This function allows you t...

Page 72: ...es Yes Yes Yes Video S Video Yes Yes Yes Yes Yes Yes Adjustable No Not adjustable Yes depending on the signal NOTE The NP405 and NP305 do not support Computer RGB DIGITAL signal RESET The settings and...

Page 73: ...ding that might appear This function adjusts the clock frequencies that eliminate the horizontal banding in the image This adjustment may be necessary when you connect your computer for the first time...

Page 74: ...ignal The next time you project the signal with the same resolution horizontal and vertical frequency its adjustments will be called up and applied To delete adjustments stored in memory from the menu...

Page 75: ...9 The image is displayed in 15 9 aspect ratio 16 10 The image is displayed in 16 10 aspect ratio WIDE ZOOM NP610 NP510 NP410 NP405 NP310 NP305 NP610S The image is stretched left and right Parts of th...

Page 76: ...tio is automatically de termined NOTE To display a letterbox signal prop erly select LETTERBOX NOTE To display a squeezed signal prop erly select 16 9 TIP Image position can be adjusted vertically usi...

Page 77: ...ture select ON To adjust the KEYSTONE feature manually select OFF Correcting Vertical Keystone Distortion Manually KEYSTONE You can correct vertical distortion manually page 34 TIP When this option is...

Page 78: ...SAGE TIME page 78 The projector is always in ON for 90 seconds after the lamp is turned on and while the POWER indicator is blinking green The lamp condition will not be affected even when ECO MODE is...

Page 79: ...ssively Selecting 16 10 or 16 9 from ASPECT RATIO Using the POSITION not available on NP510W NP410W NP510WS Selecting Menu Language LANGUAGE You can choose one of 21 languages for on screen instructio...

Page 80: ...ws you to select how long the projector waits after the last touch of a button to turn off the menu The preset choices are MANUAL AUTO 5 SEC AUTO 15 SEC and AUTO 45 SEC The AUTO 45 SEC is the fac tory...

Page 81: ...ROL PANEL LOCK function NOTE This CONTROL PANEL LOCK does not affect the remote control functions When the control panel is locked pressing and holding the EXIT button on the projector cabinet for abo...

Page 82: ...ing and holding the ENTER button on the projector cabinet for 10 seconds will display the menu for canceling the Control ID Assigning or Changing the Control ID 1 Turn on the projector 2 Press the ID...

Page 83: ...built in fans run at a high speed Select this option when using the projector at altitudes approximately 5500 feet 1600 meters or higher When you wish to cool down the temperature inside the projector...

Page 84: ...cting the video standard select the appropriate video standard from the menu This must be done for VIDEO and S VIDEO respectively Enabling or Disabling WXGA Mode WXGA MODE Selecting ON will give prior...

Page 85: ...g condition which consumes less power than the NORMAL mode The projector is preset for NORMAL mode at the factory NORMAL Power indicator Orange light STATUS indicator Green light POWER SAVING Power in...

Page 86: ...P1 will not work and the projector remains in standby mode Enabling Power Management AUTO POWER OFF When this option is selected you can enable the projector to automatically turn off at the selected...

Page 87: ...ges from 0 to 100 Hours and starts counting down If the remaining lamp time reaches 0 hours the projector will not turn on regardless of whether the ECO MODE is set to OFF or ON The message to the eff...

Page 88: ...UENCY VERTICAL FREQUENCY SIGNAL TYPE VIDEO TYPE SYNC TYPE SYNC POLARITY SCAN TYPE WIRED LAN not available on NP405 NP305 PROJECTOR NAME IP ADDRESS SUBNET MASK GATEWAY MAC ADDRESS VERSION PRODUCT SERIA...

Page 89: ...LAMP HOURS below Clearing Networking Settings NETWORK SETTINGS Not available on NP405 NP305 Returns DHCP IP ADDRESS SUBNET MASK and GATEWAY to the default settings Clearing Lamp Hour Meter CLEAR LAMP...

Page 90: ...ncel the message press any button on the projector cabinet or the remote control CAUTION Turn off the projector turn off the main power switch and unplug the projector before replacing the filters Onl...

Page 91: ...ER HOURS page 80 for resetting the filter usage time NOTE Do not wash the filter with soap and water Soap and water will damage the filter membrane Before replacing the filter remove dust and dirt fro...

Page 92: ...he cabinet Note on Cleaning the Lens NP610 NP510 NP410 NP405 NP310 NP305 NP510W NP410W Use a blower or lens paper to clean the lens and be careful not to scratch or mar the lens Note on Cleaning the L...

Page 93: ...ght cause an unwanted shadow and poor picture quality The projector will turn off and go into standby mode when you continue to use the projector for another 100 hours after the lamp has reached the e...

Page 94: ...isk of electrical shock Do not attempt to circumvent this interlock 2 Remove the lamp housing by holding it F O C U S F O C U S Interlock 1 Remove the lamp cover 1 Loosen the lamp cover screw The lamp...

Page 95: ...US LA MP AU TO AD J SO UR CE F O C U S MEN U ST AT US LA MP AU TO AD J SO UR CE F O C U S MEN U ST AT US LA MP AU TO AD J SO UR CE F O C U S MEN U ST AT US LA MP AU TO AD J SO UR CE F O C U S 4 Reatt...

Page 96: ...then turn on again 9 cycle 0 5 sec On 0 5 sec Off DYNAMIC CONTRAST error Dynamic Contrast function is not working properly on NP410 NP310 Contact your dealer Green Re firing the lamp The projector is...

Page 97: ...eset levels using the RESET in the Menu page 80 Enter your registered keyword if the Security function is enabled page 43 Be sure to connect the projector and notebook PC while the projector is in sta...

Page 98: ...yed correctly Should this happen deactivate the notebook PC s LCD screen when the projector display is in use Each notebook PC has a different way of deactivate reactivate the local LCD screens as des...

Page 99: ...ide 9 5 10 0 Tele 7 9 8 3 Wide 9 5 10 0 1 Effective pixels are more than 99 99 2 This is the light output value lumens when the PRESET mode is set to HIGH BRIGHT If any other mode is selected as the P...

Page 100: ...Interface DVI If you are unable to view material via the DVI input this does not necessarily mean the projector is not functioning properly With the implementation of HDCP there may be cases in which...

Page 101: ...Digital VGA SVGA XGA WXGA SXGA Video Bandwidth RGB 80 MHz Max Horizontal Resolution 540 TV lines NTSC NTSC4 43 PAL PAL M PAL N PAL60 300 TV lines SECAM Scan Rate Horizontal 15 kHz to 100 kHz RGB 24 kH...

Page 102: ...o 122 F 10 to 50 C 20 to 80 humidity non condensing Regulations UL C UL Approved UL 60950 1 CSA 60950 1 Meets DOC Canada Class B requirements Meets FCC Class B requirements Meets AS NZS CISPR 22 Class...

Page 103: ...E X IT E N T E R STATUS LAMP AUTO ADJ SOURCE FOCUS 263 10 4 78 3 1 108 5 4 3 55 3 2 2 76 3 0 308 12 1 Cabinet Dimensions NP610 NP510 NP410 NP405 NP310 NP305 NP510W NP410W Lens center Lens center Unit...

Page 104: ...95 7 Appendix NP610S NP510WS MENU E X IT E N T E R STATUS LAMP AUTO ADJ SOURCE FOCUS 78 3 1 308 12 1 76 3 143 2 5 6 301 5 11 9 75 5 3 Lens center Lens center Unit mm inch...

Page 105: ...15 6 9 7 8 NOTE Pin Nos 12 and 15 are required for DDC CI Pin No RGB Signal Analog YCbCr Signal 1 Red Cr 2 Green or Sync on Green Y 3 Blue Cb 4 Ground 5 Ground 6 Red Ground Cr Ground 7 Green Ground Y...

Page 106: ...59 9 1600 1200 75 0 60 0 1600 1200 81 3 65 0 1600 1200 87 5 70 0 1600 1200 93 8 75 0 Apple Macintosh 640 480 35 0 66 7 832 624 49 7 74 6 1024 768 60 2 74 9 1152 870 68 7 75 1 1280 1024 64 3 60 4 1280...

Page 107: ...00H 00H 02H 01H 01H 09H INPUT SELECT COMPUTER 2 Digital 02H 03H 00H 00H 02H 01H 1AH 22H INPUT SELECT COMPUTER 2 Analog 02H 03H 00H 00H 02H 01H 02H 0AH INPUT SELECT VIDEO 02H 03H 00H 00H 02H 01H 06H 0E...

Page 108: ...outlet Lamp cover is installed correctly AUTO POWER OFF is turned off only models with the AUTO POWER OFF function OFF TIMER is turned off only models with the OFF TIMER function Video and Audio Image...

Page 109: ...e Model number Length inch m Distribution amplifier Model number Switcher Model number Adapter Model number Projector PC DVD player Installation environment Screen size inch Screen type White matte Be...

Page 110: ...aused by dropping or shocks during ship ment or movement by the customer or by improper handling by the customers 3 Problems or damage caused by improper usage or unwarrantable alterations or repairs...

Page 111: ...utions Ltd Address 686 1 Nishioi Oi Machi Ashigarakami Gun Kanagawa 258 0017 Japan Telephone 81 465 85 2369 Fax Line 81 465 85 2393 Email Address support_pjweb gw necds nec co jp WEB Address http www...

Page 112: ...riod I also confirm following information is correct Regards Application Sheet for TravelCare Service Program P 1 Date Country product purchased User s Company Name User s Company Address Phone No Fax...

Page 113: ...problem Enduser is required to fill in Application Sheet Enduser needs to confirm the availability of the Service to NEC Authorized Service Stations 3 Loan Only For this service NEC Authorized Servic...

Page 114: ...NEC Display Solutions Ltd 2009 7N951361...

Reviews: