background image

USER’S MANUAL

l      

1       

User’s Manual

Summary of Contents for Primus NX301

Page 1: ...USER S MANUAL l 1 User s Manual ...

Page 2: ...go Software 17 Overview of Nexstgo Software 17 2 Using the Computer and Basic Settings 30 Operating System Information 30 Registering Your Computer 30 Keyboard Overview 31 Keyboard Basics 31 Windows Keys 31 Multimedia Keys 32 Touchpad Overview 34 Touchpad Basics 34 Using the Touchpad Gestures 34 Power Management 36 Using AC Power 36 Using the Internal Battery 36 Power Saving Modes 38 Using Network...

Page 3: ...es 55 Cleaning Your Computer 55 Preparation for Cleaning 56 Cleaning the Sides Covers Keyboard and Touchpad 56 Cleaning the Display 56 Using Audio Features 42 Configuring Audio Settings 42 Using the Camera 43 Using a Media Card 44 Inserting a Media Card 44 Removing a Media Card 44 Configuring the Display Settings 46 Configuring the Advanced Settings 46 Using an External Display 48 Connecting an Ex...

Page 4: ...1 Problems with Audio 92 Problems with the Fingerprint Reader 92 Problems with the Battery 92 Problems with the Internal Storage Drive 93 Problems with the Software 93 Problems with USB Devices 93 Table of Contents Using Windows BitLocker Drive Encryption 61 Trusted Platform Module TPM 62 Deleting Data on the Storage Drive 63 Using Antivirus Software 64 Using Firewall Software 64 Using the Nexstgo...

Page 5: ...erty of their respective companies ABOUT THE USER S MANUAL This manual contains information that will help you to operate the Nexstgo PRIMUS NX301 computer It is divided into seven chapters and one appendix Product Overview Using the Computer and Basic Settings Accessibility Features Taking Care of Your Computer Protecting Your Computer Advanced Configuration Troubleshooting Index Table of Content...

Page 6: ...tel s integrated HD graphics Your computer comes with preinstalled Windows 10 Pro or Windows Home operating system For enhanced security selected models support fingerprint reading and face recognition Before using the computer make sure the following items are included in the package If any items are damaged please contact Nexstgo service center Please refer to Troubleshooting on page 88 Product ...

Page 7: ...e refer to Status Indicators and Lights on page 11 3 Camera and Camera shutter Use camera to capture images record videos or hold a video conference Please refer to Using the Camera on page 43 To turn camera on off by sliding the shutter rightward or leftward 4 Infrared sensors x2 Infrared sensors help the camera to overcome illumination changes during face recognition setup process 5 Power LED Fo...

Page 8: ...nel 14 FHD IPS display panel with back lighting for displaying text and graphics NOTE To turn off the computer open the Start menu click Power and then click Shut down If your computer becomes unresponsive you can shut down the computer by pressing and holding the Power button for at least three seconds You can customize the Power button behavior For example by pressing the Power button the comput...

Page 9: ...ur computer to an immovable object with an optional security cable 4 USB type A 3 1 port Use this port to charge a USB compatible device in the following scenarios Your computer is turned on or in sleep mode Your computer is turned off or in hibernation mode but connected to the AC power source 5 SD SD card reader Insert a supported memory card into the card reader for data access or storage Pleas...

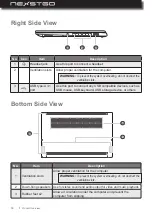
Page 10: ...ard USB storage device or others No Item Description 1 Ventilation slots Allow proper ventilation for the computer 2 Down firing speakers Use for stereo sound and audio output for video and music playback 3 Rubber feet x2 Allow air circulation under the computer and prevent the computer from slipping WARNING To prevent the system overheating do not obstruct the ventilation slots 1 2 3 WARNING To p...

Page 11: ... is unmuted 3 Microphone mute toggle key Orange On Microphones are muted Off Microphones are unmuted Status Indicators and Lights 1 4 2 3 6 5 7 In this section you will find information on the location and identification of the status indicators on your computer NOTE Audio is automatically unmuted also if the Fn lock key is off and you press the volume control keys F2 or F3 Product Overview ...

Page 12: ...onnected to the AC power and charging the battery Off The computer is disconnected from the AC power The computer has turned off due to the low battery power Blinking The computer is turned on and the battery power is less than 10 White On The computer is connected to the AC power and the battery is fully charged Off The computer is disconnected from the AC power White On The computer is using the...

Page 13: ...rate your computer safely Identifying Labels No Description 1 Input current information 2 Model number 3 Company logo 4 Regulatory and safety information Serial number 5 Country of manufacture and company name 1 2 3 5 4 NOTE If you need to contact Nexstgo for assistance the model number and serial number help the technician to identify your computer and provide more rapid service Product Overview ...

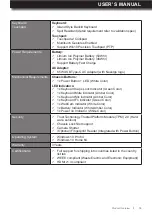
Page 14: ... SSD 256GB Solid State Drive 512GB Solid State Drive co layout M 2 SATA M 2 PCIe Webcam Web camera FHD 1080p resolution fixed focus Windows Hello IR RGB Digital Mic x2 Enable Noise Cancellation Audio Four Speakers two top firing two down firing Dolby Audio Atmos DAX3 Wireless Networking Integrated Wireless 11ac BT Dual Band Wireless AC 2x2 M 2 card 11ac BT Dual Band Wireless AC 2x2 M 2 card Extern...

Page 15: ...tors 1x Keyboard Caps Lock Indicator Green Color 1x Keyboard Mute indicator Amber Color 1x Keyboard Mic indicator Amber Color 1x Keyboard Fn indicator Green Color 1x WebCam Indicator White Color 1x Battery Indicator White Amber Color 1x Power on Indicator White Color Security Trust Technology Trusted Platform Module TPM 2 0 Hard ware solution Chassis Lock Slot support Camera Shutter Optional Finge...

Page 16: ...ations Item Description Size Width W x Depth D x Height H Front dimensions 324 W x 217 9 D x 15 9 H mm 13 2 W x 8 6 D x 0 6 H inches Rear dimensions 324 W x 217 9 D x 17 H mm 13 2 W x 8 6 D x 0 67 H inches Weight 1 25Kg Product Overview ...

Page 17: ...Nexstgo software and tutorials on your computer do the following 1 Open the Start menu and find the Nexstgo group in the apps list 2 Do any of the following Click on the Nexstgo folder to access Nexstgo Backup and Recovery app Nexstgo POWER MANAGER app Nexstgo SESSION REVIVER app or Nexstgo SOFTWARE UpDATER app Read tutorials on Nexstgo software located below the Nexstgo folder Accessing Nexstgo S...

Page 18: ...failure File Backup Enables you to backup personal files manually or automatically Nexstgo Backup and Recovery With the Backup and Recovery app you can backup and restore system and personal files when using Nexstgo computer The Backup and Recovery app interface is divided into 4 tabs such as System Backup File Backup System Recovery and File Recovery Product Overview ...

Page 19: ...PC Reinstalls the operating system but keeps your personal files and settings or reinstalls the operating system by removing everything from the computer System Restore Troubleshoots the system by fixing problems that might make your system running slowly or stop responding This procedure does not affect your personal data stored in the computer System Image Recovery Recovers the system from an im...

Page 20: ...ntrol bar Battery Maintenance Provides customized battery charging threshold to protect and prolong battery life To set up the battery maintenance plan do the following a Click the battery maintenance ON OFF toggle button to ON to enable the function b Set the battery level on the slider bar below Start charging when battery capacity below to set the beginning of charging c Set the battery level o...

Page 21: ...evive to the saving point on demand 1 How to create rename remove a session 1 When this is your first time using this app you have to click to create and edit for the first session 2 Session Reviver will create a new session and popup window on the top for you to input session name then click on SAVE Product Overview ...

Page 22: ...22 l 3 Click on EDIT to enter edit mode Product Overview ...

Page 23: ...move added apps from your session click will do the trick 5 Click on SAVE to keep the setup 6 If you wish to rename existed session simply click pencil image on the bottom right corner of the session 7 If you wish to delete existed session simply click recycle bin image on the bottom right corner of the session Product Overview ...

Page 24: ...og as below We recommend you save data before reviving a session Click on OK will revive your session 2 How to revive a session 1 Select an existed session 2 There is a checkbox for each program Session Reviver will only revive checked programs Product Overview ...

Page 25: ...ession Reviver on system startup 1 Launch Session Reviver app and click Settings icon 2 Setting window will pop out When the checkbox is checked Session Reviver will be launched and minimized to the system tray at Startup Product Overview ...

Page 26: ...pdated version Select the updates you want to apply and then click INSTALL Nexstgo Software Updater With the Software Updater app you can scan and update the system and review outdated missing incorrect drivers and apps of the system NOTE To download the updated drivers and apps make sure your computer is connected to the Internet Product Overview ...

Page 27: ...AL l 27 SETTINGS Click on SETTINGS icon on the top right corner of the Software Updater to set the download path for updated drivers and apps HISTORY Click on HISTORY to review the update history Product Overview ...

Page 28: ...ication Group by using the following two methods 1 When Fn is disabled trigger the application by a single hotkey F12 2 When Fn is enabled trigger the application by a combination of two hotkeys Fn F12 2 Add the application that you usually use 1 Click on Edit to enter the Edit mode select Win32 UWP you would like to add to the group and simply click Product Overview ...

Page 29: ... Remove the application 1 Click on Edit to enter the Edit mode select Win32 UWP you would like to remove from the group and simply click 2 Click on SAVE to keep the setup 2 Click on SAVE to keep the setup Product Overview ...

Page 30: ...s Tap anywhere on the touchpad with three fingers or click on the icon on the taskbar to open the Search bar Then type your question to search Press the F1 function key to open the Windows 10 online help center In this chapter you can find information on the Windows 10 operating system and on various features of your computer Using the Computer and Basic Settings 2 NOTE Make sure your computer is ...

Page 31: ...Keyboard Basics Windows Keys No Key Icon Description 1 Windows Press to open or close the Start Menu When used with other keys it provides a number of functions Please refer to Windows Keys on page 31 2 Fn Press to toggle the Fn lock key on or off to switch between multimedia keys and default Windows function keys Please refer to Multimedia Keys on page 32 3 Caps Lock Press to toggle the Caps Lock...

Page 32: ...ck key status The table below describes the available multimedia keys Multimedia Keys Function Icon Description Audio mute Toggle key that mutes or unmutes audio For key s indicator status please refer to Status Indicators and Lights on page 11 Volume down Decreases audio volume Volume up Increases audio volume Microphone mute Toggle key that mutes or unmutes microphone For key s indicator status ...

Page 33: ... key that turns the keyboard backlight on brighter on or off in a sequence Nexstgo Software Application Group Opens the Nexstgo Software Application Group app where you can add shortcuts of apps for quick access Please refer to Nexstgo Software Application Group on page 28 NOTE The keyboard backlight function is an optional feature NOTE The Fn lock key function can be modified in the System Config...

Page 34: ... the touchpad settings menu Start menu Settings Devices Touchpad Touchpad Basics Using the Touchpad Gestures No Item Description 1 Touchpad Move your finger across the touchpad to move the cursor on the screen Tapping on the touchpad is the same as clicking on the left mouse button For more advanced gestures please refer to Using the Touchpad Gestures on page 34 2 Left touchpad button Press this a...

Page 35: ...he touchpad and move them up and down or left and right to scroll while using apps that support vertical and or horizontal scrollbars For example a web browser Zooms in Put two fingers on the touchpad and move them farther apart to zoom in Zooms out Put two fingers on the touchpad and pinch them together to zoom out 3 finger actions Activates Search bar Tap once anywhere on the touchpad with three...

Page 36: ...wer adapter to the USB Type C port on the computer 3 Connect the power cord to an electrical outlet Connecting the AC Power Adapter Using AC Power When you are working with your computer away from the reach of the electrical outlets your computer depends on battery power to keep the system up and running Different hardware components inside your computer consume power at different rates The more y...

Page 37: ...ities do the following With a full battery the approximate working time of the computer can be up to 12 hours but the actual battery life depends on many different factors Some of them are listed as follows To start charging the battery do the following 1 Type control panel without quotation marks in search bar 2 Click on the Control Panel in the Best match list 3 Switch the view to Large icons or...

Page 38: ...rnation mode set When I press the power button to Hibernate in Power Options menu Please refer to the note in Power button on page 8 If you put your computer into hibernation mode with the feature wake up function disabled default then the computer does not consume any power If you have enabled the wake up function then the computer consumes some amount of power Wireless function off If you are no...

Page 39: ... wireless network card that helps you to establish wireless connections and monitor connection status To establish WLAN connection do the following Using the Wireless LAN Connection 1 Click on the Internet access icon in the Windows notification area to open the wireless network connection page 2 Click on the Wi Fi tab to turn on the WLAN function When turned on the tab becomes blue color 3 Select...

Page 40: ...h capable devices such as cellphones To set up Bluetooth connection between your computer and another Bluetooth device do the following 1 Click on Show hidden icons in the Windows notification area and then click on Bluetooth Devices Add a Bluetooth Device Bluetooth other devices page opens 2 Make sure the Bluetooth function is set to On and the device you want to connect to is located nearby your...

Page 41: ... wireless connections are disabled automatically While in airplane mode you can use other features of your computer such as playing music watching downloaded videos or other apps Using the Airplane Mode WARNING To avoid health hazards turn off all wireless connections on your device in health care facilities when any regulations posted in these areas instruct you to do so Hospitals or health care ...

Page 42: ...ith the following multimedia audio features High Definition HD Audio Playback of MIDI and MP3 audio files Recording and playback of PCM and WAV files Recording from different sound sources 1 Type control panel without quotation marks in search bar 2 Click on the Control Panel in the Best match list 3 Switch the view to Large icons or Small icons 4 Click on the Sound icon The Sound app opens 5 Clic...

Page 43: ... 10 seconds time period or to off when capturing images Exposure compensation Adjusts the exposure manually by making the images brighter or darker Settings Configures the camera button behavior selects the aspect ratio framing grid and time lapse when capturing images or configures the video recording parameters flicker reduction and more 1 Open the Start menu and click on the Camera app The imag...

Page 44: ...e card reader slot on the left side of your computer 2 Insert the media card into the slot with the gold contacts facing down as shown below 1 Click on Safely Remove Hardware and Eject Media in the Windows notification area 3 Then gently push the media card into the slot NOTE The media card is sold separately IMPORTANT To avoid the data on the media card becoming corrupted or lost stop the media c...

Page 45: ...UAL l 45 2 Click on the media card to remove it safely You will shortly see a Safe to Remove Hardware message on the screen 3 Remove the media card from the card reader slot Using the Computer and Basic Settings ...

Page 46: ...esolution and display orientation To personalize your computer do the following If you wish to configure more advanced display settings you can do it using the Intel HD Graphics Control Panel app To access the Intel HD Graphics Control Panel app do the following 1 Right click on an empty space on the desktop and then click on Personalize The settings page opens 2 Set a desktop background personali...

Page 47: ...aturation for red green and blue individually or by all colors together Multiple Displays To modify the external display settings connect the external display first Please refer to Connecting an External Display on page 48 Custom Resolutions Width height refresh rate or underscan percentage IMPORTANT Altering resolution may Reduce system stability and useful life of the system and chipset Cause th...

Page 48: ...play can be connected to the HDMI connector or to the USB type C connector by an appropriate cable The wireless display can be connected using Miracast function To connect a wired display do the following Connecting an External Display NOTE To configure the advanced display settings of the external display please refer to Configuring the Advanced Settings on page 46 NOTE Before connecting a wirele...

Page 49: ...the four display modes Connecting an External Display PC screen only Only your computer s display is used the external display is disabled Duplicate The external display mirrors your computer s video output Extend The desktop of your computer is extended across the external display allowing you to have a desktop that spans across both displays You can drag and move items between the two displays S...

Page 50: ...res please refer to https www microsoft com en us accessibility windows Key Combination Description u Opens Ease of Access Center Right Shift for 8 seconds Enables or disables the Filter Keys Shift for 5 times Enables or disables the Sticky Keys Left Alt left Shift PrtSc Enables or disables High Contrast Using the Ease of Access Center With the Ease of Access Center you can make your computer more...

Page 51: ...r so you can see things better You can configure the following settings Magnifier Enable or disable the magnifier feature and set the magnification zoom level Magnifier options Set the zoom level increments decide when to start magnifier feature invert colors enable or disable bitmap smoothing and collapse to magnifying glass icon Magnifier mode Set the magnifier mode and tracking options Keyboard...

Page 52: ... Keys Enable or disable ignoring or slowing down brief or repeated keystrokes and adjusting keyboard repeat rates Other Settings Enable or disable shortcut underlines displaying a warning message when turning a setting on with a shortcut making a sound when turning a setting on or off with a shortcut Mouse This feature helps you to configure the mouse settings Pointer size Select the pointer size ...

Page 53: ... the length when the notifications are displayed on the screen adjust the cursor thickness and customize visual notifications for sound Audio options Enable or disable mono audio NOTE You can find some additional Ease ofAccess features in Control Panel To open the Control Panel do the following a Type control panel without quotation marks in search bar The Control Panel page opens b Click on the E...

Page 54: ...oid strain to the tendons and muscles Posture Viewing angle of the display Room lighting A poor posture can easily cause or increase the risk of back pain and over time damage spinal structures Therefore sit in a chair that has a good back support If needed adjust the level of the chair so that your feet are flat on the floor Try to sit in a relaxed upright posture and avoid leaning far backwards ...

Reviews: