background image

User’s Manual

1

EN

User’s Manual

English · Français · Español · Deutsch · Italiano · Português · Polski

Screen Mouse

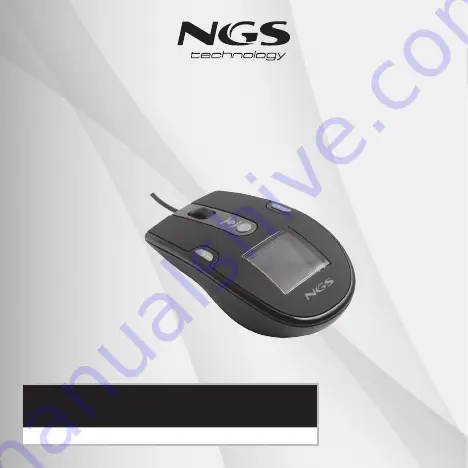
NGS PHOTO FRAME MOUSE

Summary of Contents for Screen Mouse

Page 1: ...User s Manual 1 EN User s Manual English Français Español Deutsch Italiano Português Polski Screen Mouse NGS PHOTO FRAME MOUSE ...

Page 2: ......

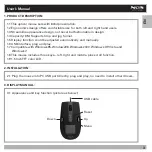
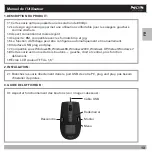
Page 3: ... 8M Supports bmp and jpg format 1 5 Display function could be adjusted automatically and manually 1 6 USB interface plug and play 1 7 Compatible with Windows95 Windows98 Windows2000 Windows XP Vista and Windows 7 1 8This mouse includes three keys left right and middle plus scroll function 1 9 1 5 InchTFT color LCD 2 1 Plug the mouse into PC USB port directly plug and play no need to install other ...

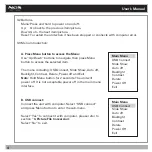
Page 4: ...luding USB connect Slide Show Auto off Backlight Contrast Delete Power off and Exit Note Hold Menu button for 2 seconds The unit will power off It is not acceptable power off in the main menu interface B USB connect Connect the unit with computer Select USB connect and press Menu button to enter the sub menu Select Yes to connect it with computer please refer to section 4 Picture File Conversion S...

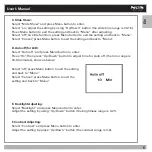
Page 5: ... E Backlight Adjusting Select Backlight and press Menu button to enter Adjust the setting by using Up Down button the brightness range is 0 21 F Contrast Adjusting Select Contrast and press Menu button to enter Adjust the setting by press Up Down button the contrast range is 0 6 D Auto off for LCD Select Auto off and press Menu button to enter Press On then press Up Down button to adjust time for ...

Page 6: ...elete and press Menu to enter Select sub menu Delete All press Menu button to enter Select Yes and press Menu to delete all pictures Select No and press Menu to exit H Power Off for LCD Select Power off and press Menu button to shut LCD display Press Menu button again several seconds the screen will display just as before I Exit Select Exit and press Menu button to exit the menu J If there are not...

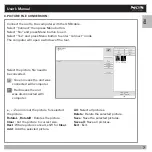
Page 7: ...tool Select the picture file need to be converted Green means the unit was connected with computer Red means the unit was disconnected with computer Zoom in out the picture for selected the picture RotateL RotateR Rotates the picture Clear Cut the picture to correct size Rect Whole picture convert shift for Clear Add Add the selected picture All Select all pictures Delete Delete the selected pictu...

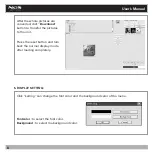
Page 8: ...ading completely After the whole pictures are converted click Download button to transfer the pictures to the unit 5 Display setting Click setting can change the font color and the background color of the menu Fontcolor to select the font color Background to select the background color ...

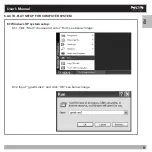
Page 9: ...User s Manual 9 EN 6 Auto play setup for computer system 6 1 Windows XP system setup 6 1 1 Click Start choose and enter Run see below image 6 1 2 Input gpedit msc and click OK see below image ...

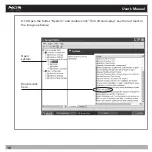
Page 10: ...User s Manual 10 6 1 3 Open the folder System and double click Turn off Auto play see the red mark in the image as below Open system Double click here ...

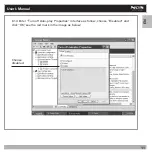
Page 11: ...User s Manual 11 EN 6 1 4 Enter Turn off Auto play Properties interface as follow choose Disabled and click OK see the red mark in the image as below Choose disabled ...

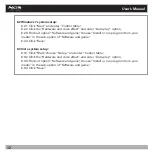
Page 12: ...me choose Install or run program from your media in the sub option of Software and game 6 2 4 Click Save 6 3 Vista system setup 6 3 1 Click Start choose Set up and enter Control table 6 3 2 Click the Hardware and voice effect and enter Auto play option 6 3 3 Find out option Software and game choose Install or run program from your media in the sub option of Software and game 6 3 4 Click Save ...

Page 13: ...t jpg 1 5 La fonction d affichage peut être configurée automatiquement et manuellement 1 6 Interface USB plug and play 1 7 Compatible sous Windows95 Windows98 Windows2000 Windows XP Vista et Windows 7 1 8 Cette souris est munie de trois boutons gauche droit et central plus fonction défilement 1 9 Écran LCD couleurTFT de 1 5 2 1 Branchez la souris directement dans le port USB de votre PC plug and p...

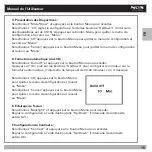
Page 14: ...ion USB Présentation de diapositives Fermeture automatique Éclairage de l écran Contraste Effacer Éteindre et Quitter Note Appuyez le bouton Menu pendant 2 secondes L unité se met hors service Le menu principal d interface ne permet pas la mise hors service B Connecteur USB Raccordez l unité sur votre ordinateur Sélectionnez USB connect et appuyez sur le bouton Menu pour accéder au sous menu Cliqu...

Page 15: ...t appuyez sur le bouton Menu pour accéder Réglez la configuration à l aide des boutons Up Down l intervalle de luminosité est de 0 21 F Configuration du Contraste Sélectionnez Contrast et appuyez sur le bouton Menu pour accéder Réglez la configuration à l aide des boutons Up Down l intervalle de contraste est de 0 6 D Fermeture automatique du LCD Sélectionnez Auto off et appuyez sur le bouton Menu...

Page 16: ...z sur Menu pour accéder Sélectionnez le sous menu Delete all et appuyez sur le bouton Menu pour accéder Sélectionnez Yes puis appuyez sur Menu pour effacer toutes les images Sélectionnez No puis appuyez sur Menu pour quitter H Fermeture du LCD Sélectionnez Power off et appuyez sur le bouton Menu pour fermer l écran LCD Appuyez encore sur le bouton Menu pendant plusieurs secondes l écran reviendra ...

Page 17: ...pour l outil Sélectionnez le fichier d image que vous souhaitez convertir Le vert signifie que l unité est reliée à l ordinateur Le rouge signifie que l unité n est pas reliée à l ordinateur Zoom de l image choisie RotateL RotateR Rotation de l image Clear Découpe de l image à la dimension correcte Rect Conversion complète de l image en Clear Add Ajout de l image choisie All Sélection de toutes le...

Page 18: ...ue toutes les images ont été converties cliquez sur les boutons Download pour transferer les images vers l unité 5 Configuration de l affichage Cliquez sur setting pour changer la couleur des caractères et de l arrière plan du menu Fontcolor pour choisir la couleur des caractères Background pour choisir la couleur de l arrière plan ...

Page 19: ...guration de la lecture automatique du système de l ordinateur 6 1 Configuration sous Windows XP 6 1 1 Cliquez sur Start choisissez et accédez à Run voir l image ci dessous 6 1 2 Saisir gpedit msc puis cliques sur OK voir l image ci dessous ...

Page 20: ...Manuel de l Utilisateur 20 6 1 3 Ouvrez le répertoire System et double cliquez sur Turn off Autoplay voir la marque rouge sur l image suivante Ouvrir Double cliquez ici ...

Page 21: ...Manuel de l Utilisateur 21 FR 6 1 4 Accédez à l interface Turn off Autoplay Properties ci dessous choisissez Disabled et cliquez sur OK voir la marque rouge sur l image suivante Choisissez ...

Page 22: ... Install or run program from your media dans la sous option de Software and game 6 2 4 Cliquez sur Save 6 3 Configuration sous Windows Vista 6 3 1 Cliquez sur Start choisissez Setup et accédez à Control table 6 3 2 Cliquez sur Hardware and voice effect et accédez à l option Auto play 6 3 3 Retrouvez l option Software and game choisissez Install or run program from your media dans la sous option de...

Page 23: ...a función de la pantalla puede ajustarse de forma automática y manual 1 6 Interfaz USB plug and play 1 7 Compatible con Windows95 Windows98 Windows2000 Windows XP Vista y Windows 7 1 8 Este ratón dispone de tres botones izquierdo derecho y central además de la función desplazamiento 1 9 PantallaTFT de 1 5 pulgadas 2 1 Conecte el ratón directamente en el puerto USB de su PC es un dispositivo plug a...

Page 24: ...onado El menú incluye Conexión USB Presentación de Diapositivas Apagado Automático Luz de fondo Contraste Borrar Apagado y Salir Nota Mantener apretado durante 2 segundos el botón de Menú La unidad se apagará No se acepta el apagado en la interfaz del menú principal B Conexión USB Conecte la unidad en el ordenado Seleccione USB connect y pulse el botón de Menú para acceder al submenú Seleccione Ye...

Page 25: ...ación de la luz de fondo Seleccione Backlight y pulse el botón de Menú para acceder Realice la configuración por medio de los botones Up Down el intervalo del brillo es de 0 21 F Configuración del Contraste Seleccione Contrast y pulse el botón de Menú para acceder Realice la configuración por medio de los botones Up Down el intervalo del contraste es de 0 6 D Apagado automático LCD Seleccione Auto...

Page 26: ...enu para acceder Seleccione el submenú Delete All y pulse el botón de Menú para acceder Seleccione Yes y pulse Menu para borrar todas las imágenes Seleccione No y pulse Menu para salir H Apagado LCD Seleccione Power Off y pulse el botón de Menú para apagar la pantalla LCD Pulse de nuevo el botón de Menú durante varios segundos la pantalla se mostrará como antes I Salir Seleccione Exit y pulse el b...

Page 27: ...ione el archivo de imagen que desea convertir El color verde indica que la unidad está conectada al ordenador El color rojo indica que la unidad está desconectada del ordenador Acercar alejar la imagen RotateL RotateR Girar la imagen Clear Cortar la imagen al tamaño adecuado Rect Convertir la imagen completa cambiar por Clear Add Agregar la imagen seleccionada All Seleccionar todas las imágenes de...

Page 28: ...etamente Después de convertir todas las imágenes pulse el botón Download para transferir las imágenes hacia la unidad 5 Configuración de la pantalla Pulse setting para cambiar el color delantero y el color de fondo del menú Fontcolor para seleccionar el color delantero Background para seleccionar el color de fondo ...

Page 29: ...producción automática para el sistema del ordenador 6 1 Configuración del sistema Windows XP 6 1 1 Haga clic en Start seleccione y acceda a Run ver la imagen a continuación 6 1 2 Introduzca gpedit msc y haga clic en OK ver la imagen a continuación ...

Page 30: ...Manual de Usuario 30 6 1 3 Abra la carpeta System y haga doble clic en Turn off Autoplay ver la marca roja según se indica a continuación Abrir sistema Hacer doble clic ...

Page 31: ...Usuario 31 ES 6 1 4 Acceda a la interfaz Turn off Autoplay Properties según se indica a continuación seleccione Disabled y haga clic en OK ver la marca roja en la imagen según se indica a continuación Seleccione ...

Page 32: ...ione Install or run program from your media en la sub opción de Software and game 6 2 4 Haga clic en Save 6 3 Configuración del sistema Vista 6 3 1 Haga clic en Start seleccione Setup y acceda a Control table 6 3 2 Haga clic en Hardware and voice effect y acceda a la opción Auto play 6 3 3 Localice la opción Software and game seleccione Install or run program from your media en la subopción de Sof...

Page 33: ...en 1 5 Die Bildschirmfunktion kann automatisch und manual eingestellt werden 1 6 USB Interface Plug and Play 1 7 Kompatibel mit Windows95 Windows98 Windows2000 Windows XP Vista und Windows 7 1 8 Diese Maus hat dreiTasten linke rechte und zentraleTaste und die Bildlauf Funktionen 1 9TFT Bildschirm 1 5 Zoll 2 1 Schliessen Sie die Maus direkt an den USB Anschluss Ihres PCs an es ist ein Plug and Play...

Page 34: ...t aus USB Anschluss Bildpräsentation Automatisches Abschalten Hinterlicht Kontrast löschen Abgeschaltet und beenden Bemerkung Menütaste drücken und 2 Sekunden halten Das Gerät wird abgeschaltet Das Abschalten mit dem Interface des Hauptmenüs wird nicht akzeptiert B USB Anschluss Schliessen Sie das Gerät an den Computer an Wählen Sie USB connect und drücken Sie die MenüTaste für den Zugriff zu das ...

Page 35: ...interlichts Backlight wählen und MenüTaste um die Anwendung zu öffnen drücken Die Einstellung mit den Up Down Tasten durchzuführen Glanzintervall ist von 0 21 F Kontrasteinstellung Kontrast wählen und MenüTaste um die Anwendung zu öffnen drücken Einstellung mit den Up Down Tasten durchzuführen das Kontrast Intervall ist von 0 6 D Automatisches Abschalten LCD Auto off wählen und MenüTaste um die An...

Page 36: ... Anwendung zu öffnen Submenü Delete All wählen und MenüTaste drücken um die Anwendung zu öffnen Yes wählen und Menu drücken um alle die Bilder zu löschen No wählen und Menu drücken zu beeden H Abgeschaltet LCD Power Off wählen und MenüTaste um das LCD Bildschirm abzuschalten drücken Drücken und halten Sie einige Sekunde die Menütaste das Bildschirm wird wie vorher aussehen I Beenden Exit wählen un...

Page 37: ...ung öffnen Wählen Sie welches Bild Sie konvertieren wollen Die grüne Farbe zeigt dass das Gerät an den Computer angeschlossen ist Die rote Farbe zeigt dass das Gerät abgeschaltet wurde Bild vergrössern verkleinern RotateL RotateR Bild drehen Clear Bild auf die richtige Grösse schneiden Rect Das komplette Bild konvertieren wechseln Clear Add das gewählte Bild addieren a All Alle Bilder des Geräts w...

Page 38: ...etten aufladen zu öffnen Nach der Konversion von allen den Bildern auf Download Taste klicken um alle Bilder auf das Gerät überzutragen 5 Bildschirmeinstellung Auf Setting für den Wechsel der vorderen und der hinteren Farbe des Menüs klicken Fontcolor vordere Farbe wählen Background hintere Farbe wählen ...

Page 39: ...ellung der automatischen Wiedergabe für das System des Computers 6 1 Einstellung in Windows XP 6 1 1 Klick auf Start machen Run wählen und öffnen siehe folgendes Bild 6 3 2 gpedit msc eingeben und Klick auf OK machen siehe folgendes Bild ...

Page 40: ...Gebruikershandleiding 40 6 1 3 System Ordner öffnen und Doppelklick auf Turn off Autoplay machen siehe rote Markierung auf dem folgenden Bild System öffnen Doppelklick machen ...

Page 41: ...ikershandleiding 41 DE 6 1 4 Interface Turn off Autoplay Properties wie unten beschrieben wird öffnen Disabled wählen und Klick auf OK machen siehe die rote Markierung auf dem folgenden Bild Disabled wählen ...

Page 42: ...ll or run program from your media in der Sub Option von Software and game wählen 6 2 4 Klick auf Save machen 6 3 Einstellung in Vista 6 3 1 Klick auf Start machen Setup wählen und Control table öffnen 6 3 2 Klick auf Hardware and voice effect machen und die Option Auto play öffnen 6 3 3 Die Option Software and game öffnen Install or run program from your media in der Sub Option Software and game w...

Page 43: ...JPG 1 5 la funzione dello schermo può essere regolata in modo automatico e manuale 1 6 interfaccia USB Plug and Play 1 7 compatibile con Windows95 Windows98 Windows2000 Windows XP Vista e Windows 7 1 8 questo mouse ha tre tasti sinistro destro e centrale oltre alla funzione di scroll 1 9 schermoTFT da 1 5 pollici 2 1 collegare il mouse direttamente nella porta USB del PC essendo un dispositivo Plu...

Page 44: ...include Collegamento USB Presentazione Diapositive Spegnimento Automatico Luce di fondo Contrasto Cancellare Spegnimento e Uscita Nota Mantenere premuto per due secondi il tasto Menu L unità si spegnerà Non è possibile lo spegnimento dall interfaccia dal menu principale B Connessione USB Collegare l unità al computer Selezionare USB connect e premere il tasto Menu per accedere al sub menu Selezion...

Page 45: ...ce di fondo Selezionare Back light e premere il tasto di Menu per accedere Realizzare la configurazione per mezzo dei tasti Up Down l intervallo della luminosità è di 0 21 F Configurazione del Contrasto Selezionare Contrast e premere il tasto di Menu per accedere Realizzare la configurazione per mezzo dei tasti Up Down l intervallo del contrasto è di 0 6 D Spegnimento automatico LCD Selezionare Au...

Page 46: ... e premere il Menu per accedere Selezionare il sub menu Delete All e premere il tasto Menu per accedere Selezionare Yes e premere Menu per cancellare tutte le immagini Selezionare No e premere Menu per uscire H Spegnimento LCD Selezionare Power Off e premere il tasto Menu per spegnere lo schermo LCD Premere di nuovo il tasto Menu durante vari secondi lo schermo apparirà come prima I Uscire Selezio...

Page 47: ...l file d immagine che desidera convertire Il colore verde indica che l unità è connessa al computer Il colore rosso indica che l unità è scollegata dal computer Avvicinare allontanare l immagine RotateL RotateR Girare l immagine Clear Ritagliare l immagine con le dimensioni Rect Convertire l immagine completa cambiare per Clear Add Unire l immagine selezionata All Selezionare tutte le immagini del...

Page 48: ...o completamente Dopo avere convertito tutte le immagini premere il tasto Download per trasferire le immagini all unità 5 Configurazione dello schermo Premere Setting per cambiare il colore anteriore e il colore fondo del menu Fontcolor Per selezionare il colore anteriore Background Per selezionare il colore di fondo ...

Page 49: ...produzione automatica in base al sistema operativo 6 1 Configurazione del sistema con Windows XP 6 1 1 Fare clic su Start selezionare ed eseguire Run come si mostra nell immagine 6 1 2 Digitare gpedit msc e fare clic in OK come si mostra nell immagine ...

Page 50: ...Instruzioni d Uso 50 6 1 3 Aprire la directory System e fare doppio clic su Turn off Autoplay osservare il globo rosso come si mostra nell immagine Accedere a sistema Fare doppio clic aquí ...

Page 51: ...d Uso 51 IT 6 1 4 Accedere all interfaccia Turn off Autoplay Properties come si mostra nell immagine selezionare Disabled e fare clic su OK osservare il globo rosso come si mostra nell immagine Selezionare Disabled ...

Page 52: ...nare Install or run program from your media nella sub opzione Software and game 6 2 4 fare clic su Save 6 3 Configurazione del sistema con Vista 6 3 1 fare clic in Start selezionare Setup e accedere a Controllo table 6 3 2 fare clic in Hardware and voice effect e accedere all opzione Auto play 6 3 3 localizzare l opzione Software and game selezionare Install or run program from your media nella su...

Page 53: ...rmatos bmp e jpg 1 5 A função do ecrã pode ajustar se de forma automática e manual 1 6 Interface USB plug and play 1 7 Compatível com Windows95 Windows98 Windows2000 Windows XP Vista e Windows 7 1 8 Este rato dispõe de três botões esquerdo direito e central além da função scroll 1 9 EcrãTFT de 1 5 polegadas 2 1 Ligue o rato directamente na porta USB do seu PC é um dispositivo plug and play não req...

Page 54: ... elemento seleccionado O menu inclui Ligação USB Apresentação de Diapositivos Apagar Automaticamente Luz de fundo Contraste Apagar Apagar e Sair Nota Carregar durante 2 segundos no botão de Menu A unidade vai apagar se Não é possível apagá la no interface do menu principal B Ligação USB Ligue a unidade ao computador Seleccione USB connect e carregue em Menu para aceder ao submenu Escolha Yes para ...

Page 55: ...ar a luz de fundo Seleccione Backlight e carregue em Menu para entrar Realize a configuração através dos botões Up Down o intervalo de brilho varia entre 0 21 F Configuração do Contraste Seleccione Contrast e carregue em Menu para entrar Realize a configuração através dos botões Up Down o intervalo de contraste varia entre 0 6 D Apagar automaticamente LCD Seleccione Auto off e carregue em menu par...

Page 56: ...e e carregue em Menu para entrar Seleccione o submenu Delete All e carregue em Menu para entrar Seleccione Yes e carregue Menu para apagar todas as imagens Seleccione No e carregue em Menu para sair H Apagado LCD Seleccione Power Off e carregue em Menu para apagar o ecrã LCD Carregue de novo em Menu durante vários segundos o ecrã volta a ficar com antes I Sair Seleccione Exit e carregue em Menu pa...

Page 57: ...ficheiro de imagem que deseja converter A cor verde indica que a unidade está ligada ao computador A cor vermelha indica que a unidade está desligada do computador Aproximar afasar a imagem RotateL RotateR Rodar a imagem Clear Cortar a imagem no tamanho adequado Rect Converter a imagem completa alterar por Clear Add Adicionar a imagem seleccionada All Seleccionar todas as imagens da unidade Delete...

Page 58: ...egar completamente Depois de converter todas as imagens carregue no botão Download para transferir as imagens para a unidade 5 Configuração do ecrã Carregue setting para alterar a cor de frente e a cor de fundo do menu Fontcolor para seleccionar a cor da frente Background para seleccionar a cor de fundo ...

Page 59: ...a reprodução automática para o sistema do computador 6 1 Configuração do sistema Windows XP 6 1 1 Faça click em Start seleccione e aceda a Run observe as figuras seguintes 6 1 2 Introduza gpedit msc e faça clic em OK observe as figuras seguintes ...

Page 60: ...Manual do Utilizador 60 6 1 3 Abra a pasta System e faça duplo click em Turn off Autoplay ver o balão vermelho assinalado de seguida Abrir sistema Faça duplo click ...

Page 61: ... do Utilizador 61 PT 6 1 4 Aceda ao interface Turn off Autoplay Properties conforme se indica de seguida seleccione Disabled e faça clic em OK observe o balão vermelho da imagem indicado de seguida Seleccione ...

Page 62: ...leccione Install or run program from your media na sub opção de Software and game 6 2 4 Faça click em Save 6 3 Configuração do sistema Vista 6 3 1 Faça click em Start seleccione Setup e aceda a Control table 6 3 2 Faça click em Hardware and voice effect e aceda à opção Auto play 6 3 3 Localize a opção Software and game seleccione Install or run program from your media na subopção de Software and g...

Page 63: ...tawienia funkcji ekranu mogą być kontrolowane ręcznie i automatycznie 1 6 Złącze USB plug and play 1 7 Kompatybilna z Windows95 Windows98 Windows2000 Windows XP Vista i Windows 7 1 8 Mysz jest wyposażona w trzy przyciski lewy prawy i środkowy oraz kółko do przewijania 1 9 EkranTFT o przekroju 1 5 cala 2 1 Podłącz myszkę do portu USB w komputerze mysz jest urządzeniem plug and play a więc nie wymag...

Page 64: ...awiera następujące opcje Złącze USB Prezentacja slajdów Automatyczny wyłącznik Podświetlenie Kontrast Usuń Wyłącz i Wyjdź Uwaga Aby wyłączyć urządzenie przytrzymaj wciśnięty przycisk menu prze około 2 sekundy Nie ma możliwości wyłączenia urządzenia poprzez interfejs głównego menu B Złącze USB Podłącz urządzenie do komputera Wybierz USB connect i naciśnij przycisk menu żeby uzyskać dostęp do podmen...

Page 65: ...rzycisków Up Down skonfiguruj ustawienia podświetlenia w ramach wartości zawierających się pomiędzy 0 a 21 F Konfiguracja kontrastu Wybierz Contrast a następnie naciśnij przycisk menu aby uruchomić ustawienia tej funkcji Za pomocą przycisków Up Down skonfiguruj ustawienia kontrastu w ramach wartości kontrastu zawierających się pomiędzy 0 a 6 D Automatyczne wyłączanie LCD Wybierz Auto off a następn...

Page 66: ...enu aby uruchomić tę opcję Z podmenu wybierz Delete All a następnie naciśnij przycisk menu aby uruchomić tę opcję Wybierz Yes a następnie zatwierdź wybór za pomocą przycisku menu aby usunąć wszystkie zdjęcia Wybierz No a następnie zatwierdź wybór za pomocą przycisku menu H Wyłączanie LCD Wybierz Power Off a następnie naciśnij przycisk menu aby wyłączyć ekran LCD Aby włączyć ekran naciśnij przycisk...

Page 67: ... okno z narzędziami Wybierz plik obrazu który chcesz modyfikować Kolor zielony oznacza że urządzenie jest podłączone do komputera Kolor czerwony oznacza że urządzenie nie jest podłączone do komputera Zbliż oddal obraz RotateL RotateR Obróć obraz Clear Przytnij obraz do właściwego rozmiaru Rect Modyfikuj obraz w całości zmień na Clear Add Dodaj wybrany obraz All Zaznacz wszystkie obrazy znajdujące ...

Page 68: ...lizacji po całkowitym załadowaniu danych Po zmodyfikowaniu wszystkich obrazów naciśnij przycisk Download aby przenieść obrazy do urządzenia 5 Konfiguracja ekranu Kliknij setting w celu zmiany koloru głównego i koloru tła Fontcolor aby wybrać kolor główny Background aby wybrać kolor tła ...

Page 69: ...ja auto play w systemie operacyjnym komputera 6 1 Konfiguracja dla systemu Windows XP 6 1 1 Klikinj menu Start a następnie uruchom pasek polecenia klikając Uruchom patrz obrazek poniżej 6 1 2 Wpisz gpedit msc i kliknij OK patrz obrazek poniżej ...

Page 70: ...Podręcznik Użytkownika 70 6 1 3 Otwórz folder System a następnie dwukrotnie kliknij Turn off Autoplay patrz poniższy obrazek czerwona ramka informacyjna Otwórz folder System Tu kliknij dwukrotnie ...

Page 71: ...ik Użytkownika 71 PL 6 1 4 Wybierz opcję Turn off Autoplay Properties zgodnie z opisem poniżej a następnie wybierz opcję Disabled i kliknij OK patrz poniższy obrazek czerwona ramka informacyjna Wybierz Disabled ...

Page 72: ...ware and game wybierz Install or run program from your media w podopcji Software and game 6 2 4 Kliknij Save 6 3 Konfiguracja dla systemu Vista 6 3 1 Kliknij Start a następnie wybierz opcję Setup a w niej Control table 6 3 2 Kliknij opcję Hardware and voice effect a następnie wybierz Auto play 6 3 3 Znajdź opcję Software and game wybierz Install or run program from your media w podopcji Software a...

Page 73: ......

Page 74: ...www ngs eu Screen Mouse ...

Reviews: