background image

USER GUIDE

PXIe-1083

This document describes the features of the PXIe-1083 chassis and contains information about
configuring the chassis, installing the modules, and operating the chassis.

Contents

Related Documentation ............................................................................................................2
Getting Started.......................................................................................................................... 2

Unpacking......................................................................................................................... 2
What You Need to Get Started..........................................................................................2
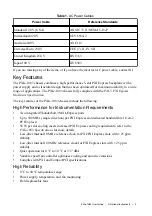
Key Features..................................................................................................................... 3
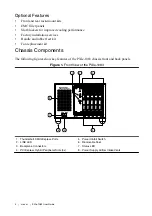
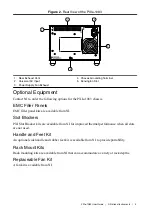
Chassis Components......................................................................................................... 4
Optional Equipment.......................................................................................................... 5

PXIe-1083 Backplane Overview.............................................................................................. 6

Interoperability with CompactPCI.................................................................................... 6
MXI Interface....................................................................................................................6
Basic MXI-Express Thunderbolt Systems........................................................................6
Thunderbolt Bus Extension...............................................................................................7
Backwards Compatibility..................................................................................................7
Hybrid Peripheral Slots.....................................................................................................7
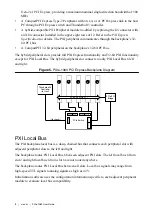
PXI Local Bus...................................................................................................................8
PXI Trigger Bus................................................................................................................ 9
System Reference Clock................................................................................................... 9

Installation and Configuration................................................................................................ 10

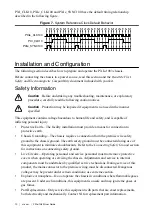
Safety Information.......................................................................................................... 10
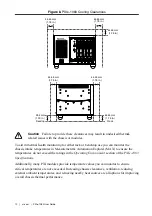
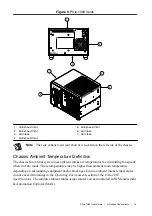
Chassis Cooling Considerations......................................................................................11
Rack Mounting................................................................................................................14
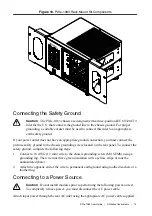
Connecting the Safety Ground........................................................................................15
Connecting to a Power Source........................................................................................ 15
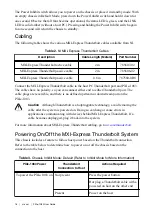
Cabling............................................................................................................................ 16
Powering On/Off the MXI-Express Thunderbolt System...............................................16
Installing Peripheral Modules......................................................................................... 17
LED Indicators................................................................................................................18
DIP Switches...................................................................................................................19
Inhibit Mode....................................................................................................................20
Fan Mode........................................................................................................................ 21
PXI Express System Configuration with MAX..............................................................21
Using System Configuration and Initialization Files......................................................25

Summary of Contents for PXIe-1083

Page 1: ...ce 6 Basic MXI Express Thunderbolt Systems 6 Thunderbolt Bus Extension 7 Backwards Compatibility 7 Hybrid Peripheral Slots 7 PXI Local Bus 8 PXI Trigger Bus 9 System Reference Clock 9 Installation and...

Page 2: ...Started Unpacking Carefully inspect the shipping container and the chassis for damage Check for visible damage to the metal work Check to make sure all handles hardware and switches are undamaged Ins...

Page 3: ...XIe 1083 chassis include the following High Performance for Instrumentation Requirements Two integrated Thunderbolt 3 MXI Express ports Up to 500 MB s single direction per PXI Express slot dedicated b...

Page 4: ...nts The following figures show key features of the PXIe 1083 chassis front and back panels Figure 1 Front View of the PXIe 1083 PXIe 1083 7 8 4 6 5 3 1 LINK H H H H H 2 3 4 5 6 2 1 Thunderbolt 3 MXI E...

Page 5: ...ller Panels EMC filler panel kits are available from NI Slot Blockers PXI Slot Blocker kits are available from NI for improved thermal performance when all slots are not used Handle and Feet Kit An op...

Page 6: ...e Thunderbolt 3 ports replace this slot Thunderbolt technology is transparent to device drivers so no additional software is needed for CompactPCI Express level support for PXI Express devices in conn...

Page 7: ...3 cable Because Thunderbolt 3 is backwards compatible with previous Thunderbolt generations it may be possible to use adapters to establish connections with host PCs or devices with previous generatio...

Page 8: ...d peripheral slot connects to only PXI Local Bus 6 left and right Figure 5 PXIe 1083 PCI Express Backplane Diagram Port 5 Port 1 Port 7 Port 9 Port 12 Port 14 Port 0 PCIe Switch 6 H 5 H 4 H 3 H 2 H 32...

Page 9: ...6 PXI Trigger Bridge 1 PXI Trigger Bus 1 H System Reference Clock The PXIe 1083 chassis supplies PXI_CLK10 PXIe_CLK100 and PXIe_SYNC100 to every peripheral slot with an independent driver for each si...

Page 10: ...vide a means for connection to protective earth Chassis Grounding The chassis requires a connection from the premise wire safety ground to the chassis ground The earth safety ground must be connected...

Page 11: ...ing Adequate Clearance The module and power supply intake vents are located on the front left side and bottom of the chassis The module and power supply exhaust vents for the PXIe 1083 are located on...

Page 12: ...enchtop use you can monitor the chassis intake temperatures in Measurement Automation Explorer MAX to ensure the temperatures do not exceed the ratings in the Operating Environment section of the PXIe...

Page 13: ...tion The chassis fan control system uses ambient intake air temperatures for controlling fan speeds when in Auto mode These temperatures may be higher than ambient room temperature depending on surrou...

Page 14: ...Blockers The cooling performance of the chassis can be improved by installing optional slot blockers Refer to the NI website at ni com info and enter the Info Code slotblocker for more information ab...

Page 15: ...screw located on the rear panel To connect the safety ground complete the following steps 1 Connect a 16 AWG 1 3 mm wire to the chassis grounding screw M4 SEMS using a grounding lug The wire must hav...

Page 16: ...t either end to either Thunderbolt port The cable plugs are reversible and there is no defined upstream or downstream port on the PXIe 1083 Caution Although Thunderbolt is a hotpluggable technology av...

Page 17: ...ion instructions for installing a peripheral module in a PXIe 1083 chassis Refer to your peripheral module user manual for specific instructions and warnings To install a module complete the following...

Page 18: ...K LED on the PXIe 1083 front panel gives status information about the power supply and link state as the following table describes Table 5 LINK LED Colors LED Color Meaning LINK Off Power is off Blink...

Page 19: ...l chassis behavior Refer to the following figure for the DIP switches location Figure 13 PXIe 1083 Dip Switch Location PXIe 1083 DIP switch 1 on the left controls the chassis fan mode Set this switch...

Page 20: ...Default mode when you desire normal power inhibit button functionality In Default mode when no host is connected to the chassis Thunderbolt port you can press the power inhibit button to power on the...

Page 21: ...rnatively the fan mode on the PXIe 1083 chassis is selected using a DIP switch on the daughterboard Refer to the DIP Switches section for more information about the DIP switch Note The DIP switch must...

Page 22: ...y vary based on your chassis variant or firmware and platform services version Trigger Configuration in MAX PXI Platform Services provides an interface to route and reserve triggers so dynamic routing...

Page 23: ...of trigger lines can be implemented by the user in MAX through the Triggers tab PXI modules dynamically configured by programs such as NI DAQmx will not use reserved trigger lines This prevents the in...

Page 24: ...ode In this mode you may manually set the fan speeds to achieve the desired performance Note You may not set the fan speeds or power settings lower than the minimum level required to maintain required...

Page 25: ...ad an arbitrary chassis ini file and generate the corresponding pxisys ini file System controllers from NI provide the pxisys ini file for the PXIe 1083 chassis so you should not need to use the chass...

Page 26: ...stened with clear water Do not use abrasive compounds on any part of the chassis Caution Avoid getting moisture inside the chassis during exterior cleaning especially through the top vents Use just en...

Page 27: ...ments EULAs and third party legal notices in the readme file for your NI product Refer to the Export Compliance Information at ni com legal export compliance for the NI global trade compliance policy...

Reviews: