background image

Electronic  Service

Manuals

This electronic document is provided as a service to our custom-
ers.  We do not create the contents of the information contained in
this document.  Should you have detailed questions pertaining to
the information contained in this document, you may contact Michco,
or the manufacturer which provided the original information in this
electronic deliverable.  Michco’s only part in this electronic deliver-
able was the electronic assembly process.

You may contact Michco through the following methods:

Phone (517) 484-9312 or (800) 331-3339 MI, OH, IN only

2011 N. High St.  -- Lansing, Michigan -- 48906

Fax: (517) 484-9836

Email: CustServ@Michco.com

Web site: www.Michco.Com

Parts Web site:  www.FloorMachineParts.Com

Order Parts on Line at:

www.FloorMachineParts.Com

Directly to Parts & Service:

By Email: 

Shop@Michco.com

By Fax: (517) 702-2041

By Voice: Use numbers above.

Serving the Cleaning Industry Since 1922

Notice: All copyrighted material remains property of original owners, all trademarks are property of respective
owners.  Manuals are subject to Manufacturer’s reproduction limitations.  Originals or reproductions were provided
by manufacturers through a request.  We make no warranty as to the correctness of information provided in this
document and you assume all risk.

Summary of Contents for 9082317010

Page 1: ... 9312 or 800 331 3339 MI OH IN only 2011 N High St Lansing Michigan 48906 Fax 517 484 9836 Email CustServ Michco com Web site www Michco Com Parts Web site www FloorMachineParts Com Order Parts on Line at www FloorMachineParts Com Directly to Parts Service By Email Shop Michco com By Fax 517 702 2041 By Voice Use numbers above Serving the Cleaning Industry Since 1922 Notice All copyrighted materia...

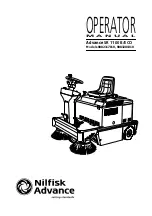
Page 2: ...OPERATOR M A N U A L Advance SR 1100 B ECO Models 9082317010 9083201010 ...

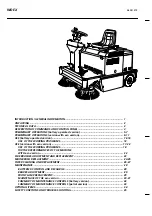
Page 3: ...th eco version 17 22 USE OF THE WORKING PROGRAMS 18 FURTHER PERFORMANCES OF THE MACHINE WITH eco version 22 SIDE BRUSHES ADJUSTMENT AND REPLACEMENT 23 MAIN BRUSH REPLACEMENT 24 25 FILTER CLEANING AND REPLACEMENT 26 27 MAINTENANCE 28 BATTERIES CONTROL AND RECHARGE 28 BRAKES ADJUSTMENT 29 FRONT LAMP REPLACEMENT 29 MAINTENACE OF THE eco version 30 31 SUMMARY OF MAINTENANCE CONTROLS battery version 32...

Page 4: ... into shelves or scaffolding where there is a risk of falling objects Adjust the operating speed to the floor adhesion Do not exceed the declared slope limits to avoid unstable conditions When the machine is parked remove the key and engage the parking brake When machine operating malfunctions occur make sure that they are not caused by a lack of routine maintenance If not request assistance from ...

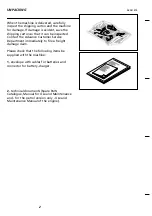
Page 5: ...ected Contact the Advance Customer Service Department immediately to file a freight damage claim Please check that the following items be supplied with the machine 1 envelope with cables for batteries and connector for battery charger 2 technical documents Spare Parts Catalogue Manual for Use and Maintenance and for the petrol version only Use and Maintenance Manual of the engine 2 ...

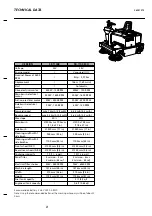
Page 6: ... mi h Reverse speed max 3 5 km h 2 4 mi h 3 6 km h 2 4 mi h Max slope 20 20 Main brush Ø 300 mm x 700 mm 11 8 x 27 in Ø 300 x 700 mm 11 8 x 27 in Side brush Ø 430 mm 17 in Ø 430 mm 17 in Cleaning width with 1 side brush 900 mm 35 in 900 mm 35 in Cleaning width with 2 side brushes 1100 mm 43 in 1100 mm 43 in Front wheel NR 1 Ø 250 mm 9 8 in Ø 250 mm 9 8 in Rear drive wheels NR 2 Ø 250 mm 9 8 in Ø 2...

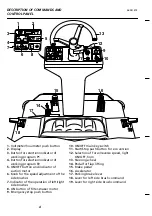
Page 7: ... of suction motor 6 Knob for the speed adjustment of the side brushes 7 Indicator of the operation of left right side brushes 8 ON button of filter shaker motor 9 Emergency stop push button 4 10 ON OFF main key switch 11 Start Stop push button for eco version 12 Selection of forw reverse speed light ON OFF horn 13 Steering wheel 14 Pedal for flap lifting 15 Brake pedal 16 Accelerator 17 Parking br...

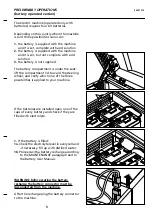
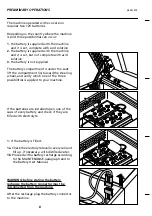
Page 8: ...d the steering wheel and verify which one of the three possibilities is applied to your machine If the batteries are installed open one of the caps of every battery and check if they are filled with electrolyte 1 If the battery is filled 1a Check the electrolyte level in every cell and if necessary fill up with distilled water 1b Proceed with a battery recharge according to the MAINTENANCE paragra...

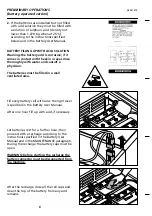
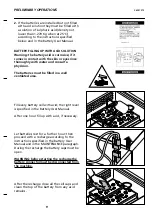
Page 9: ...with water and consult a physician The batteries must be filled in a well ventilated area Fill every battery cell with acid the right level is specified in the Battery User Manual After one hour fill up with acid if necessary Let batteries rest for a further hour then proceed with a recharge according to the instructions specified in the Battery User Manual and in the MAINTENANCE paragraph During ...

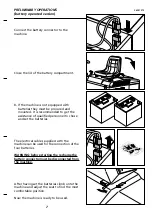
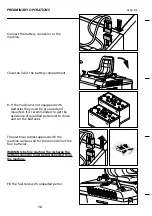
Page 10: ...rsonnel to chose and set the batteries The electrical cables supplied with the machine can be used for the connection of the four batteries WARNING before starting the recharge the battery connector must be disconnected from the machine After having set the batteries climb onto the machine and adjust the seat to find the most comfortable position Now the machine is ready to be used PRELIMINARY OPE...

Page 11: ...lift the compartment lid toward the steering wheel and verify which one of the three possibilities is applied to your machine If the batteries are installed open one of the caps of every battery and check if they are filled with electrolyte 1 If the battery is filled 1a Check the electrolyte level in every cell and fill up if necessary with distilled water 1b Proceed with a battery recharge accord...

Page 12: ...The batteries must be filled in a well ventilated area Fill every battery cell with acid the right level is specified in the Battery User Manual After one hour fill up with acid if necessary Let batteries rest for a further hour then proceed with a recharge according to the instructions specified in the Battery User Manual and in the MAINTENANCE paragraph During the recharge the battery caps must ...

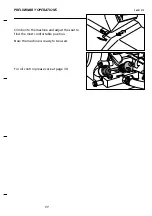
Page 13: ...they must be procured and mounted It is recommended to get the assistance of qualified personnel to chose and set the batteries The electrical cables supplied with the machine can be used for the connection of the four batteries WARNING before starting the recharge the battery connector must be disconnected from the machine Fill the fuel tank with unleaded petrol 10 ...

Page 14: ...56041475 Climb onto the machine and adjust the seat to find the most comfortable position Now the machine is ready to be used For oil control please ceck at page 30 PRELIMINARY OPERATIONS 11 ...

Page 15: ...sable all the machine activities except for the drive when the battery voltage drops below 20 Volt the display flashes recharge the battery as specified in the Maintenance paragraph To access the hour meter function press the button shown in the figure the display will show the number of machine service hours Press the button again to display the number of machine service minutes Pressing the butt...

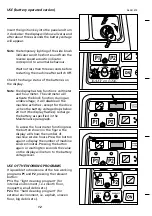
Page 16: ...t to change the pre set values call the customer service personnel of your supplier Lower the side brush es pressing the top of the relevant lever and moving it forward Note on the control panel the corresponding light indicators will turn on To lift the side brush es press the top of the levers and move them backward Note the side brush es the main brush and the suction fan will start automatical...

Page 17: ...rder to prevent the damage of the paper panel filter with water In order to get an efficient cleaning function the panel filter must always be clean Press the filter shaker button even if the machine is working This operation must be repeated every 10 to 15 minutes depending on the kind of rubbish to be swept before emptying the dirt container and in any case at the end of the work During the oper...

Page 18: ... the figure the functions of the command lever are shown 1 forward speed 2 reverse speed 3 horn 4 front light On Off The machine is equipped with an emergency stop button by pressing this button red light On a sudden stop of the machine will occur and all functions will turn Off To restart the machine turn the red button clockwise according to the arrow shown on the button itself To restart the no...

Page 19: ...tion counter clockwise At the end of the job or whenever it is necessary empty the rear dirt container In the event that the machine must be pushed in Off condition or without batteries turn the proper red key counter clockwise see the figure in order to disengage the electrical drive motor and disable the self breaking function Turn and eventually remove the red key that can be seen after lifting...

Page 20: ...unction during an undervoltage it will disable all the machine activities except for the drive when the battery voltage drops below 20 Volt the display is flashing when this condition is achieved you have two options either recharge the battery according the Maintenance paragraph or start the eco version To start the eco version press the red button shown in the figure to stop the engine press the...

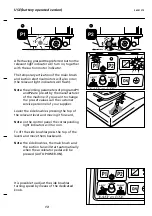
Page 21: ...otor indicator The temporary activation of the main brush and suction electrical motors will also occur the relevant light indicators will flash Note the working parameters of programs P1 and P2 are pre set by the manufacturer of the machine if you want to change the pre set values call the customer service personnel of your supplier Lower the side brush es pressing the top of the relevant lever a...

Page 22: ...to Power Off except the eco version the light indicators of the selected working program and of the suction fan will start flashing The automatic restart of all functions will automatically occur as soon as the accelerator pedal will be pushed again Auto Power ON In order to enable the selection of a different working program first disable the previously selected one When it is necessary to sweep ...

Page 23: ...matic breaking function when the accelerator pedal is released when necessary the service brake can also be used see the figure When driving reverse an intermittent acoustic signal will be heared and all the functions will remain enabled In the figure the functions of the command lever are shown 1 forward speed 2 reverse speed 3 horn 4 front light On Off The machine is equipped with an emergency s...

Page 24: ...b turn off the selected working program P1 or P2 and switch the eco versioneco version Off pressing the button shown in the figure Before leaving the machine make sure that the side brush es be lifted the parking brake engaged and the master key in the Off position counter clockwise At the end of the job or whenever it is necessary empty the rear dirt container USE version with eco version 21 ...

Page 25: ... time will depend on the capacity amper hours of the batteries installed on the machine on the intensity of the selected working program on the charge status of the batteries On this machine in order to guarantee the reliability of the batteries two safety features are envisaged 1 protection against the deep discharge of the battery when the battery voltage drops down to about 20 Volt the automati...

Page 26: ...y repeat the adjustment sequence When the brush is very worn the replacement is necessary remove the screw used to fix the brush to the shaft of the motor with gear box pay attention not to lose the screw and the reference key Remove the metal hub from the worn brush and mount it on the new one Put some grease on the shaft Use the metal key the screw and the washer to fix the new brush to the shaf...

Page 27: ...ain brush is automatically adjusted no need of manual adjustment The complete wear of the main brush and then the need to replace it is notified with code 800 on the display Please meet the following procedure for the main brush replacement Open the side door on the left side of the machine unscrewing the knob shown in the figure Remove the three knobs used to fix the lid of the main brush compart...

Page 28: ...h pay attention to the correct angle of the brush bristles look at the next figure Fit the new brush in its compartment paying attention to the engagement of the plastic adapter with the hub on the opposite side of the compartment Fit the lid of the main brush compartment using the three knobs previously removed MAIN BRUSH REPLACEMENT 25 ...

Page 29: ...achine must first be switched off and the key out Loosen the two screws with butterfly head on the two sides of the metal frame fixing the panel filter it is not necessary to remove the screws completely Remove the metal frame and take the panel filter out Clean the filter shaking it and blowing with compressed air pressure not higher than 6 bar from the side where the metal protection net is moun...

Page 30: ... two screws with butterfly head and reconnect the filter shaker electric cable If the filter is damaged or can not be properly cleaned replace it with a new one Ask to your supplier for the new spare part Polyester panel filters are also available FILTER CLEANING AND REPLACEMENT 27 ...

Page 31: ...yes rinse thoroughly with water and consult a physician When necessary proceed with a recharge of the battery according to the following instructions and taking also into account what is specified in the Battery User Manual switch the machine Off and remove the master key Warning before starting the recharge the battery connector must be disconnected from the machine the recharge must be done in a...

Page 32: ...nt wheel models SR 1100 SR 5110 loosen the locking nut A turn adjuster B tighten locking nut A FRONT LAMP REPLACEMENT In order to replace the front lamp remove the transparent cover push the lamp and turn it counter clockwise to remove it replace the lamp paying attention to the volt and watt ratings fit the transparent cover MAINTENANCE 29 B A ...

Page 33: ...engine oil must be replaced the first time after 50 working hours or in any case not later that one month since the receipt of the machine The succeeding times it must be replaced every 100 hours or not later than 8 months since the last replacement It is an automatic safety device which does not permit to start or stops the motor if the oil quantity is not enough FOR THIS SAFETY DEVICE THERE IS N...

Page 34: ... wash the engine air filter with water and soap or any other detergent for domestic use Squeeze it and dry it well Wet it with engine oil and squeeze it again to remove the exceeding oil Fit the engine air filter in its compartment and the relevant cover MAINTENANCE 31 ...

Page 35: ... is submitted to a self discharge phenomenon In the event that the machine is not used for a long time e g 3 or 4 weeks it is necessary TO RECHARGE THE BATTERY infact the battery voltage MUST NEVER drop down below 20 Volt 32 CONTROL UPON DELIVERY EVERY 30 HOURS EVERY 50 HOURS EVERY 100 HOURS EVERY 400 HOURS Battery liquid level and voltage check OR EVERY TWO WEEKS Check the carbon brushes of all e...

Page 36: ...enon In the event that the machine is not used for a long time e g 3 or 4 weeks it is necessary TO RECHARGE THE BATTERY infact the battery voltage MUST NEVER drop down below 20 Volt SUMMARY OF MAINTENANCE CONTROLS petrol version 33 CONTROL UPON DELIVERY TWO TIMES PER WEEK ONE TIME PER WEEK EVERY 50 HOURS EVERY 100 HOURS EVERY 400 HOURS Battery liquid level and voltage check Engine air filter clean...

Page 37: ...High capacity batteries for machine without eco version Battery charger Different types of main bushes and side brushes Polyester panel filter it can be washed In order to have more detailed information for all the optional items get in touch with your supplier of the machine 34 ...

Page 38: ... working will stop Possible problem with traction control electronic circuit Check carbon brushes of traction motor Check connection cables of traction motor If the above is OK replace the power electronic board 305 The machine functions will stop High temperature on the electronic control circuits 95 C If the ambient temperature is high let the machine cool down 20 minutes If the problem will rem...

Page 39: ...Graphic project VISUAL DIVISION Milan Italy Nilfisk Advance Italia S p A Località Novella Terza 26862 Guardamiglio Lodi Italia Tel 39 0377 451124 Fax 39 0377 51443 COD 56041475 1 99 09 ...

Reviews: