INSTRUCTION MANUAL
Thank you for purchasing this lighted tree. This tree assembles in minutes and is decorated with
energy-saving LED light sets.
• 2 pre-lighted tree sections (A - Top Section, B - Bottom Section)
Note: Before you start to assemble your tree, please choose a location near an electrical wall outlet. Place
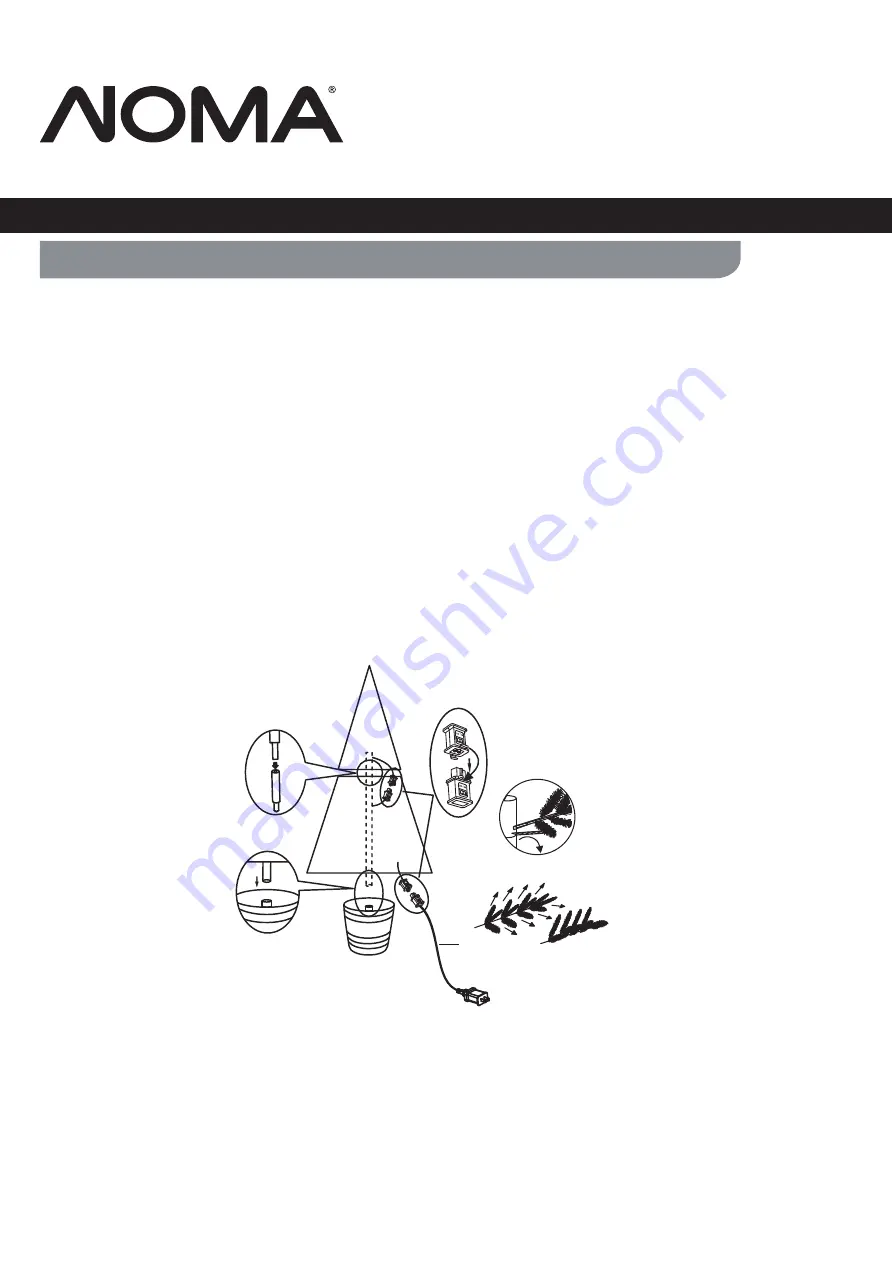
1. Carefully insert bottom section (B) of tree into tree base (see Fig. 1).
This tree is pre-strung with 200 lights.
• 1 sturdy pot
ASSEMBLY:
the tree base on a level surface.
Please remove protective covers from the base of the pole from each section.
2. Insert the top section (A) of the tree into the bottom section (B) (see Fig. 2).
4. Allow the branches to fall into place or gently pull branches up and out. When adjusting branches be
sure that all wires are free of branch hinges (See Fig. 4).
5. Shape the branches. Starting with tips closest to the pole, shape one tip to the right, one to the left and
one along the centre of the main stem. Repeat pattern for each branch (see Fig. 5).
6. Plug cord into electric outlet.
CARTON INCLUDES:
IMPORTANT:
Please read this manual carefully before assembly and save it for reference.
For indoor use only
Retain carton for storage purposes
Instruction Manual
5‘ INDOOR ARCTIC SPRUCE POTTED TREE
model no
.
|
www.noma.com
CTI1517110
CAUTION!
ALWAYS UNPLUG YOUR TREE FROM ITS POWER SOURCE
BEFORE ASSEMBLING OR DISASSEMBLING.
• 1 power cord with adaptor
Please locate the plug and socket first before assembled each sections of the tree
.
3. Insert the plug from the base of section (A) into the connected from the top of section (B). From section (B)’s
base connect to the power cord, then clip the connectors tightly as shown in the magnified drawing in Fig. 3.
A
B
Fig. 2
Fig. 1
Fig. 3
Fig. 4
Fig. 5
Tree base
side
view
side
view
Fig. 6
C


