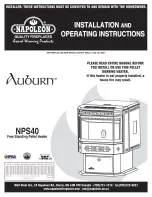
background image


1

P r o v e n   P e r f o r m a n c e

MSTOVEF


NorthStar Corn Stove Model # CS550 (Item #173780):


A freestanding room heater that burns shelled feed corn.


Manufactured by the skilled workforce at: 

Northern Tool & Equipment Mfg. 

2050 Airtech Rd. 

Faribault, MN 55021 


NorthStar Parts and Service 1-800-270-0810 

Quick Facts: 


Installation:  

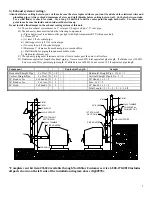
Before installing your NorthStar Corn Stove, please read and follow all instructions contained in this manual.  

A fire hazard may result if installed incorrectly. Consult local building and fire codes for additional 
requirements. Removal or reinstallation costs are not covered by this product’s warranty. 


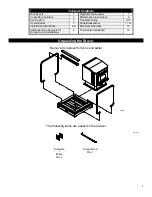
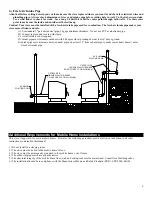
Before cutting holes in your wall, make sure the stove is placed where you want it and check for electrical 
wires and plumbing pipes.  Cut holes between studs.  Use a stud finder to check for studs.  Use a long 
1/4 drill bit to drill a center point through both walls.  Use this center point to make sure the inside and 
outside wall holes line up.  
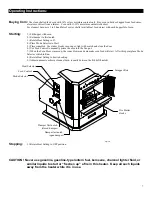
 

Buying Corn: 

Use cleaned shelled feed corn with 14% or less moisture content only.  Buy corn in bulk or bagged from 

feed stores, elevators or direct from a farmer.  Corn with 11-12% moisture content works best. 


Mix 1 to 2 handfuls of oyster shells (North Star #PD366991 or available at feed stores) with each 
hopperful of corn. 


Starting:


1.) Fill hopper with corn. 


2.) Set damper to first notch (see page 7).  


3.) Rotate Heat Setting to #1. 


4.) Place Mode Selector to Start. 


5.) Place crumbled fire starter blocks in corn pot, light with match


and close the door. 


6.) Use Feed Control to manually prime the corn into the fire pot. 


7.) When the Corn Stove warms up, the room blower and automatic corn feed will start.  After this point 
place Mode Selector switch to Run. 


8.) Rotate Heat Setting to desired setting. 


9.) Adjust damper to achieve cleanest burn. 


10.) The first time the stove is operated, oils will burn out of the fire chamber and create an odor and 
possibly some smoke.  This will stop after the first 15 minutes of operation.   


Stopping:


1.) Rotate Heat Setting to OFF position. 
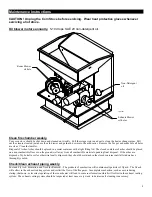
 

Maintenance: 

Unplug the Corn Stove before servicing.  


Oil blower motors annually.  5-10 drops SAE 20 non-detergent oil. 

  Check/Clean 

exhaust 

piping 

weekly. 


Clean combustion chamber weekly. 


SAVE THESE INSTRUCTIONS


Summary of Contents for MSTOVEF CS550

Page 1: ...14 or less moisture content only Buy corn in bulk or bagged from feed stores elevators or direct from a farmer Corn with 11 12 moisture content works best Mix 1 to 2 handfuls of oyster shells North Star PD366991 or available at feed stores with each hopperful of corn Starting 1 Fill hopper with corn 2 Set damper to first notch see page 7 3 Rotate Heat Setting to 1 4 Place Mode Selector to Start 5 ...

Page 2: ...10 Oyster Shells 3 Parts Breakdowns 11 14 Installation Instructions 4 6 Electrical schematic 15 Additional Requirements for Mobile Home Installations 6 Thermostat Installation 16 Unpacking the Stove Remove Cornstove from box and pallet The following items are packed in the drawer Firestarte r Bricks Qty 2 Scraper Rod Qty 1 fig01037 fig01038 ...

Page 3: ...different draft settings DO NOT USE CORN WITH A HIGH WAX CONTENT DO NOT BURN SEED CORN Seed corn is treated with pesticides that can be fatal if swallowed Therefore seed corn is dangerous to have around the house especially when children are present Oyster Shells Unburned corn kernel starches cling to the fire pot and form solid masses called clinkers Clinkers will plug the air inlet holes in the ...

Page 4: ... floor must be protected directly under the stove B The floor must be protected 6 beyond the viewing and ash door and 6 beyond each side of the stove C Use non combustible materials such as ceramic tile or concrete for floor protection 6 6 6 NON COMBUSTIBLE FLOOR PROTECTION 2 Minimum Installation Clearances to Combustible Materials A 1 minimum clearance to back wall from heater and chimney connect...

Page 5: ...es g Wall thimble for piping through combustible walls h Horizontal chimney cap C The exhaust piping must terminate outside at least 6 inches past the outer wall surface D Determine equivalent length of exhaust piping Never exceed 20ft total equivalent pipe length If altitude is over 2000ft do not exceed 15ft equivalent pipe length If altitude is over 4000ft do not exceed 12 5ft equivalent pipe le...

Page 6: ...ree elbow pointing down at least 6 above ground E Intake pipe must terminate below exhaust pipe and at least 12 from exhaust pipe to make sure exhaust doesn t enter freash air intake pipe FIG00979 3 STEEL PIPE 30GAGE WALL THICKNESS DO NOT USE PVC OR ALUMINUM 3 STEEL PIPE 30GAGE WALL THICKNESS DO NOT USE PVC OR ALUMINUM 90 ELBOW POINTING DOWN 90 EBLOW POINTING DOWN Additional Requirements for Mobil...

Page 7: ...e the door 6 Use Feed Control to manually prime the corn into the fire pot 7 When the Corn Stove warms up the room blower and automatic corn feed will start After this point place Mode Selector switch to Run 8 Rotate Heat Setting to desired setting 9 Adjust damper to achieve cleanest burn usually between the 4th 5th notch Stopping 1 Rotate Heat Setting to OFF position CAUTION Never use gasoline ga...

Page 8: ...e floor or on the ground well away from all combustible materials pending final disposal If the ashes are disposed of by burial in soil or otherwise locally dispersed they should be retained in the closed container until all cinders have thoroughly cooled Check Clean exhaust piping weekly Soot and Fly Ash Formation and Need for Removal The products of combustion will contain small particles of fly...

Page 9: ...ull of ash Remove and clean fire pot Clean out fire pot holes and tumbler Try adding 1 2 handfuls of oyster shells to each hopperful of corn This will reduce the buildup of unburned starch that collects on the tumbler and in the fire pot Pull scraper rod to clean heat exchanger tubes Clean side walls of fire chamber Pull out ash closures and push ash through holes down into drawer Empty ash drawer...

Page 10: ...nge mode selector switch to RUN mode This will engage the temp switch that turns the exhaust blower and the tumbler motor off Room too warm If the room in which the stove is installed reaches 95F or higher the low temperature switches will close and the motors will start Also the room needs to be cooled down to 80F before the low temperature switches will reset to the open position If your room ne...

Page 11: ...trol Box 1 10 37899 50 Sash Chain 14 11 36607 Lid 1 12 36309 Back Panel 1 13 36310 Hinge 3 REF PART DESCRIPTION QTY 14 36248 Right Side Panel 1 15 36359 Hopper 1 16 36446 Fire Chamber Insulation 1 17 36353 Combustion Chamber 1 18 36256 Scraper 1 19 36323 Pedestal 1 20 36212 Drawer 1 21 35227 Sticker Tight Gasket 44 22 36445 Long Closure 2 23 36424 Door Latch 1 24 36368 Front Panel 1 25 36337 Rod 1...

Page 12: ...0T 1 2 bore 1 all 51 36423 Tumbler Drive Shaft 1 all 52 36425 Tumbler Coupler 1 all REF PART DESCRIPTION QTY MODEL 53 36454 Tumbler Collar 1 all 54 36198 Tumbler 1 all 55 36202 Fire Pot 1 all 56 36660 Room Blower 1 all 57 36435 Room Blower Gasket 1 all 58 36090 Exhaust Tube 1 all 59 36659 Exhaust Blower 1 all 60 36434 Exhaust Blower Gasket 1 all 61 37049 Exhaust Manifold 1 all 62 36593 Exhaust Man...

Page 13: ...OM BLOWER MOTOR ORANGE AND WHITE WIRES TO AUGER MOTOR RED AND WHITE WIRES TO TUMBLER MOTOR B RING BETWEEN TWO 1 4 20 FLANGE NUTS AFFIX WIRES TO DOOR WITH ONE CABLE TIE BASE AND ZIP TIE 71 72 74 75 REF PART DESCRIPTION QTY MODEL 71 36306 Strain Relief 1 all 72 777252 Power Cord 1 all 73 35790 Wire Harness 1 all 74 35408 Red Yellow Wire Nut 1 all 75 36272 High Temp Limit Switch 1 all ...

Page 14: ...e Auto 5 10 6 Off 1 4 3 2 9 7 8 REF PART DESCRIPTION QTY MODEL 90 36273 Low Temp Switch 3 all 91 31117 Control Knob 1 all 92 35769 Control Panel 1 all 93 36483 Mode Selector Switch 1 all 94 33793 Primer Button 1 all 95 35948 Timer 1 all 96 36486 Standoff 4 all 97 35408 Red Yellow Wire Nut 5 all 98 36658 Fuse 1 all ...

Page 15: ...15 ...

Page 16: ...n be purchased locally from hardware stores and home improvement stores 2 There are two brown wires on the corn stove timer Connect the two wires from the thermostat to these two brown wires with wire nuts as shown in the diagram above 3 Make sure the wires are routed away from hot surfaces 4 When disconnecting a thermostat connect the two brown wires back together with a wire nut If this is not d...

Reviews: