
Instructions for Installing the Octave 8 Setting and Multi Setting Temperature
Switches for the Afinia and UP! 3D Printers
Important! Read this notice before making any alterations to your 3D printer.
Installation of any Octave Temperature Switch for the Afinia and UP! 3D printers, is neither an approved nor non-
approved procedure by the manufacturer. However, if your 3D printer needs to be returned to the manufacturer for
any reason, the switch should be removed before returning so as not to void any existing warranties.
Installation of the Octave Temperature Switches for the Afinia and UP! 3D printers is a non-invasive modification,
a procedure requiring only the unplugging of an existing cable set, and plugging in the Octave Temperature
Switch.
Introduction
The Octave 8 and Multi Setting Temperature Switches allow selection of a range of lower filament melting temperatures so
that other filament brands on the market can also be used with the Afinia and UP! printers. We recommend the Octave
Filament range which produces high quality results with both printers, at a very competitive price.
You can also view these instructions, watch the installation video, and order online, on the Octave website at
http://www.octave.com/temp-switch-multi
and
http://www.octave.com/temp-switch-8
Installation Procedure
Important: When plugging and unplugging connectors, try not to pull on the cables. Instead, firmly grip and pull
on the plastic headers to avoid damage to any connections.
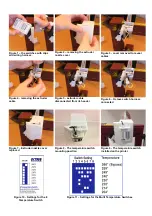
These instructions refer to the Octave 8 and Multi setting temperature switches. Before starting, make sure you have ready
the Octave temperature switch with the mounting clip attached and the wiring harness, as shown in Figure 1.The mounting
clip is screwed on to the bottom side of the temperature switch.
Ensure your printer is turned off and unplugged from mains power and is disconnected from your computer. Begin by
carefully removing the extruder nozzle assembly cover, Figure 2. You should now see the top of the extruder nozzle
assembly. There is a cable running down from the top of the assembly to the extruder nozzle below, see Figure 3.
Gently grip the plastic header of the temperature sense cables carefully as shown in Figure 4. and unplug it. Figure 5. You
will connect the temperature sense cables to the Octave temperature switch in the ensuing steps.
Your Octave Temperature Switch came with a cable harness. Connect this to the extruder cable, and also the header on
the extruder assembly as shown in Figure 6. Now replace the cover ensuring the remaining free cable is passed through
the opening in the cover as show in Figure 7. Take the Octave Temperature Switch and align the clip with the slot in the
extruder cover as shown in Figure 8. Squeeze and press the clip so that it clicks firmly into place in the extruder cover slot.
Take the connector of the cable protruding through the extruder assembly cover and connect it to the header on the
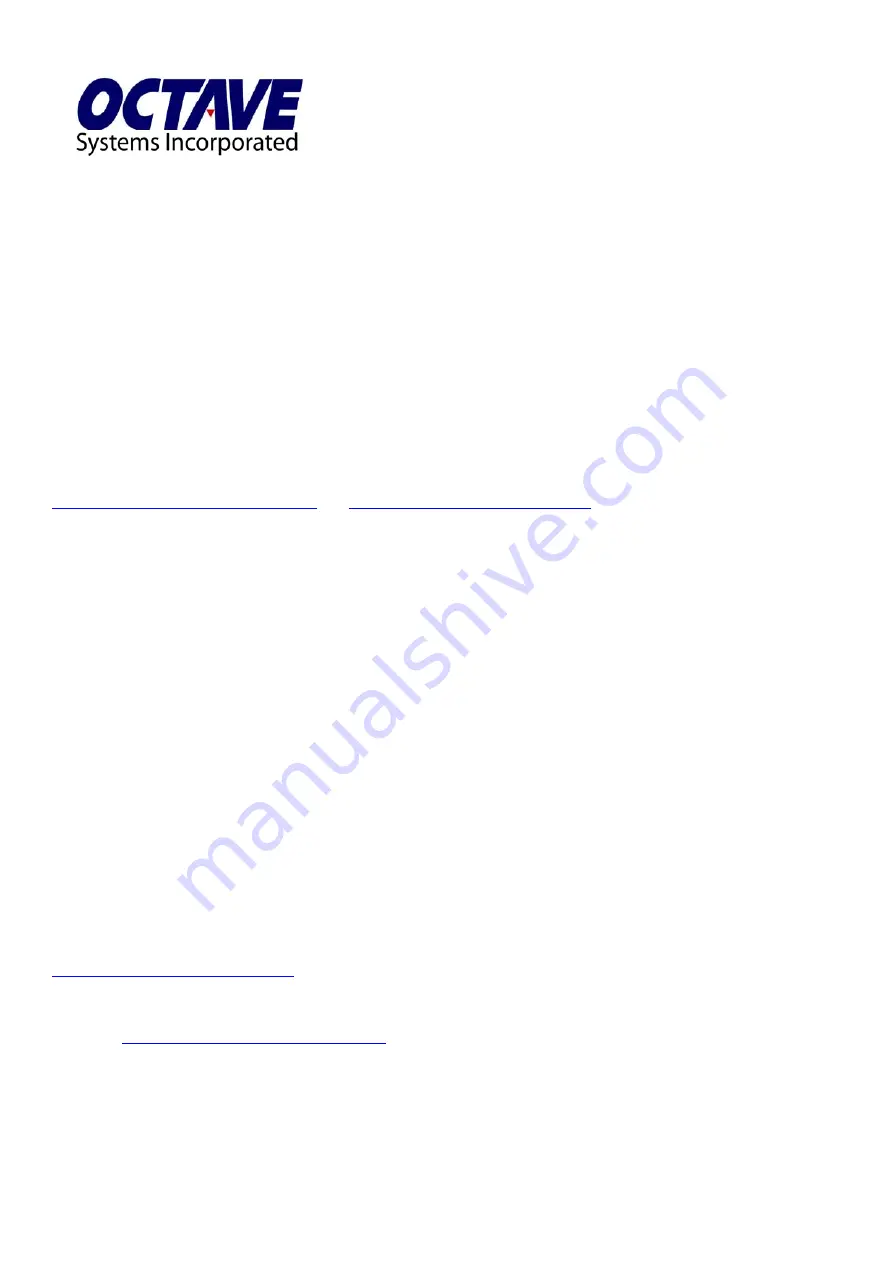
Octave Temperature Switch – Figure 9. You can now select the desired temperature (see tables in Figures 10 & 11) by
selecting the appropriate settings on the Octave Temperature Switch. Always make sure the printer is turned off whenever
changing the temperature switch positions. For the Octave 8 Setting Temperature Switch, temperature values are marked
on the top of the cover and can also be downloaded in PDF format from the Octave website at
http://www.octave.com/temp-switch-8
. Only use the switch settings shown on the switch cover or in the downloaded PDF
file. Placing more than one switch in the on position at a time can produce undesirable results.
For the complete temperature settings on the Multi Setting Switch, you need to download the PDF file from the Octave
website at
http://www.octave.com/temp-switch-multi
. Unlike the 8 Setting Temperature switch, more than one switch can
be set to the On position on the Multi Setting Temperature switch, to select up to 127 distinct temperatures.
Important: When using the 8 Setting Switch, it is important that one switch and only one switch be set to the On
position at all times, otherwise results may not be stable.
You are now ready to start printing.
Customer Service
Octave Systems Inc
1190 Dell Avenue Suite A
Campbell CA 95008
Tel (408) 866 8424
Fax (408) 866 4252
email: info@octave.com
http://www.octave.com


