background image

6000527-REV C     6/10

Assembled in U.S.A. of domestic and imported components

42LS

18 cu. ft. LAWN SWEEPER

READ AND FOLLOW ALL SAFETY RULES AND OPERATING 

INSTRUCTIONS BEFORE USING THIS EQUIPMENT

Summary of Contents for 42LS

Page 1: ...6000527 REV C 6 10 Assembled in U S A of domestic and imported components 42LS 18 cu ft LAWN SWEEPER READ AND FOLLOW ALL SAFETY RULES AND OPERATING INSTRUCTIONS BEFORE USINGTHIS EQUIPMENT ...

Page 2: ...product Check product for worn loose or damaged parts before each use If any damage is present repair the product before using Check product for loose or missing fasteners before each use Tighten or replace fasteners as needed before using Do not fasten rope to any part of your body or clothing Do not hold rope while tractor and Lawn Sweeper are in motion Do not use Lawn Sweeper near fire or smold...

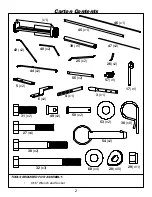
Page 3: ...46 x1 55 x2 47 x2 25 x2 26 x2 5 x2 6 x2 3 x1 4 x1 50 x2 49 x2 53 x2 38 x8 54 x2 57 x1 17 x1 28 x10 29 x11 30 x2 31 x2 32 x3 27 x4 60 x4 x1 40 x2 42 x2 TOOLS REQUIRED FOR ASSEMBLY 9 16 Wrench and Socket 2 Carton Contents ...

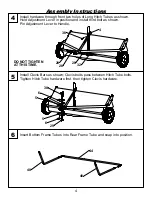
Page 4: ... Short Hitch Tubes to Sweeper Assembly and tighten hardware DO NOT OVERTIGHTEN Attach Handle to Height Adjustment and tighten hardware Insert Long Hitch Tubes into Short Hitch Tubes and snap into position 3 Assembly Instructions 1 3 2 ...

Page 5: ... position and install third bolt as shown Pin Adjustment Lever to Handle DO NOT TIGHTEN AT THIS TIME Install Clevis Bars as shown Clevis bolts pass between Hitch Tube bolts Tighten Hitch Tube hardware first then tighten Clevis hardware Insert Bottom Frame Tubes into Rear Frame Tube and snap into position 4 Assembly Instructions 4 6 5 ...

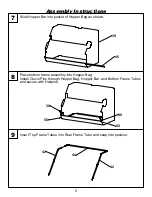
Page 6: ... Hopper Bag as shown Place bottom frame assembly into Hopper Bag Install Clevis Pins through Hopper Bag Hopper Bar and Bottom Frame Tubes and secure with Hairpins Insert Top Frame Tubes into Rear Frame Tube and snap into position 5 Assembly Instructions 7 9 8 ...

Page 7: ...th Hairpins Slide Pivot Rod through Top Frame Tube and Connecting Tube then through pocket of Hopper Bag then through Connecting Tube and Top Frame Tube Secure both ends with Washer and Hairpin Hold Hopper Bag open and carefully insert Tension Rods into holes in Rear Frame Tubes Secure Hopper Bag around Top Frame Tubes with velcro tabs 6 Assembly Instructions 10 12 11 ...

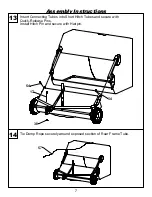
Page 8: ...nsert Connecting Tubes into Short Hitch Tubes and secure with Quick Release Pins Install Hitch Pin and secure with Hairpin Tie Dump Rope securely around exposed section of Rear Frame Tube 7 Assembly Instructions 13 14 ...

Page 9: ... at its slowest speed and begin sweeping Increase 7 tractor speed as required to throw material to the back of the hopper bag Sweep in straight lines whenever possible and avoid sharp turns 8 Periodically check the sweeper while operating to ensure that wheels and 9 brushes are rotating smoothly and that nothing is wrapped around the brushes or brush shaft When filled the hopper bag can be emptied...

Page 10: ...ng of grease Storing Lawn Sweeper Empty hopper bag and thoroughly clean Lawn Sweeper before storing 1 Store Lawn Sweeper away from excessive heat to prevent damage 2 Brushes must not contact ground during storage to prevent damage 3 Remove quick release pins to separate hopper bag from Lawn Sweeper 4 Carefully remove tension rods and collapse hopper bag for compact storage 5 Detach adjustment leve...

Page 11: ...l 1 800 652 2321 or return this product to place of purchase for replacement This warranty gives you specific legal rights and you may also have other rights which may vary from state to state This warranty applies only while this product is in use in the United States In the space below record the purchase date of your Lawn Sweeper Model Number 42LS Purchase Date Keep this Owner s Manual and your...

Page 12: ...20 16 14 59 24 15 22 24 13 19 24 59 11 2 34 34 33 18 24 36 10 23 24 7 8 9 21 12 37 24 29 28 5 6 38 29 29 30 3 31 4 38 29 60 26 25 62 28 27 32 28 17 1 11 Repair Parts ...

Page 13: ...39 44 42 61 53 38 49 47 46 55 54 44 40 61 45 50 38 57 12 Repair Parts ...

Page 14: ...www ohiosteel com 800 652 2321 ...

Reviews: