background image

MICROLINE

®

 520/521

User's Guide

Summary of Contents for Microline 520

Page 1: ...MICROLINE 520 521 User s Guide...

Page 2: ...idata com Year 2000 Compliance All products currently sold by Okidata are Year 2000 Compliant Each product contains information technology that accurately processes date and time data between the year...

Page 3: ...e printer on or near a heat source such as a radiator or heat register If you put the printer in any kind of enclosure make sure it is well ventilated The printhead can get quite hot when it has been...

Page 4: ...those outlined in the manual you might cause damage requiring extensive repair work the Warranty Regulatory and Safety Information booklet supplied with your printer explains how to get your printer...

Page 5: ...Jams 15 Clearing Single Sheet Feed Jams 16 Cleaning the Housing 17 Section 3 Using Your Printer 19 Control Panel Indicator Lights 19 Control Panel Buttons Print Mode 20 Control Panel Buttons Menu Mode...

Page 6: ...E iv Section 7 Commands 45 Epson FX Commands 45 IBM Proprinter III Commands 47 Okidata MICROLINE Standard Commands 49 FCC IC CE Statements 51 Index 53 Material Safety Data Sheet 57...

Page 7: ...ining precautions against actions which could cause printing problems or damage to the printer are set in italics preceded by the Caution icon For example Leave the ribbon shield on the cartridge Stat...

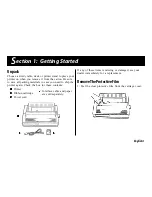
Page 8: ...save all packing materials in case you need to ship the printer again Check the box for these contents Printer Ribbon cartridge Power cord If any of these items is missing or damaged see your dealer i...

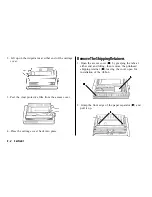
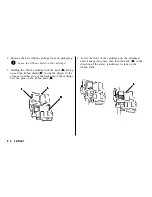
Page 9: ...the access cover 4 Press the carriage cover back into place RemoveTheShippingRetainers 1 Open the access cover by grasping the tabs at either end and lifting then remove the printhead shipping retaine...

Page 10: ...bon Cartridge 3 Be sure to use only ribbons specifically designated for MICROLINE 520 521 printers For the best results use genuine Okidata ribbons Part No 52107001 Caution If you are replacing the ri...

Page 11: ...idge with the knob facing up and the ribbon shield facing the platen fit the grooves on either side at the back end of the cartridge over the pins on the ribbon plate 4 Lower the front of the cartridg...

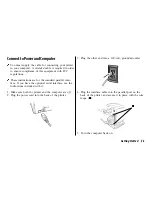
Page 12: ...ions are for the standard parallel inter face If you have the optional serial interface see the instructions included with it 1 Make sure both the printer and the computer are off 2 Plug the power cor...

Page 13: ...Cut Sheet Feeder top feed holds 100 sheets Push and or Pull Tractors for bottom feed of continu ous forms including labels heavy card stock multi part forms 4 See the instructions provided with the o...

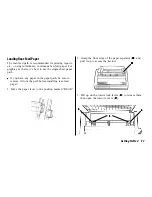
Page 14: ...s best to use the single sheet paper path 4 If you have any paper in the paper path be sure to remove it from the path before installing rear feed paper 1 Move the paper lever to the position marked...

Page 15: ...er of paper holes must be engaged on either tractor in order to ensure proper paper feed 4 The movement of the left tractor is limited to ensure that the paper will always contact the paper sensor whe...

Page 16: ...l up roller assembly 4The wire feed guide keeps paper from curling back into the printer 9 Push the FF LOAD button The paper will automati cally feed into the printer and the ALARM light will go out T...

Page 17: ...the PARK button on the front panel to remove it from the path before load ing single sheets 1 Make sure the printer is turned ON and deselected SEL light off press SEL button to deselect if neces sar...

Page 18: ...and set the printhead gap 4 If the paper doesn t feed in properly the 15 light on the control panel will begin flashing To correct this press the SHIFT and RESET buttons simulta neously then reload t...

Page 19: ...rements TOF higher on page When you re done setting the TOF press the SEL button to reselect the printer Temporarily Changing the Print Start Position To place the print start position lower for one p...

Page 20: ...stop the test before it To stop the test finishes Press SEL Press SEL SelectinganEmulation Your printer has three emulations IBM Proprinter III factory default Epson FX Okidata Microline Standard Cha...

Page 21: ...IBM Proprinter III Emulation Okidata ML 520 1 IBM IBM Proprinter III IBM Proprinter II IBM Proprinter IBM Graphics Printer Epson FX Emulation Epson FX Emulation Epson FX Emulation Epson FX Emulation E...

Page 22: ...ob ClearingRearFeedJams To clear a rear feed paper jam 1 Turn off printer then turn the platen knob to back the paper out of the printer 2 Remove any ripped pieces of paper 3 Reload the paper turn the...

Page 23: ...rings any jammed bits of paper out 6 Back the sheet out 7 Replace the roller assembly 8 Reload regular paper 9 Close the access cover 10 Turn the printer on 11 Press the FF LOAD button ClearingSingleS...

Page 24: ...e the paper from the path 3 Open the access cover and remove the pull up roller assembly 4 Use a clean dry cloth to dust the area around the carriage shaft and platen Be sure to remove any loose parti...

Page 25: ......

Page 26: ...nter selected ready to receive data Flashes printer in Print Suppress mode Not lit printer deselected can t receive data Glows printer in QUIET state Indicate Print Quality selected Glows printer on G...

Page 27: ...s with SHIFT to move TOF down Used with other buttons to set TOF Press with SEL to enter Menu mode Moves continuous form paper up for tear off or back down for printing Press to move paper up a line H...

Page 28: ...t paper out alarm Press with SHIFT button to exit Menu mode Press and hold with LF button on power up to reset Menu to factory defaults Press with SEL button to exit Menu mode Press to advance to next...

Page 29: ...prob lem see page 38 for information on how to correct it SelectingPrintQuality PRINT QUALITY HSD UTILITY NLQ Press the PRINT QUALITY button successively until the light underneath the print quality y...

Page 30: ...20 cpi either non proportional or proportional proportional is selected when both the light under the desired cpi and the light under PROP are lit To reset the character pitch to the factory default 1...

Page 31: ...st exiting any changes you have made in the menu will be lost EnteringTheMenuMode To place your printer in the Menu Mode hold the SHIFT button while pressing the SEL button The MENU light will come on...

Page 32: ...Feed Line Spacing 6 LPI Bottom Feed Form Tear Off Off Bottom Feed Skip Over Perforation No Bottom Feed Page Length 11 Bottom Feed Gap Control Auto Gap Top Feed Line Spacing 6 LPI Top Feed Bottom Margi...

Page 33: ...othic HSD Pitch 10 cpi 12 cpi 15 cpi 17 1 cpi 20 cpi Proportional spacing No Yes Style Normal Italics Size Single Double Symbol Sets Character Set Set I Set II Language Set American French German Brit...

Page 34: ...c Skip Over Perforation No Yes Page Width 13 6 8 Page Length 11 11 2 3 12 14 17 3 3 5 4 5 5 6 7 8 8 5 Gap Control Auto Gap Semi Auto Gap 1 2 3 4 5 6 7 8 9 Top Feed Line Spacing 6 LPI 8 LPI Bottom Marg...

Page 35: ...Right 0 15 mm Right 0 10 mm Right 0 05 mm Right Operator Panel Function Full Operation Limited Operation Reset Inhibit No Yes Print Suppress Effective Yes No Auto LF No Yes Auto CR No Yes Print DEL Co...

Page 36: ...ctory default Canada French Multilingual Portugal or Norway Emulation Mode Choose IBM PPR default for IBM Proprinter III Epson FX or ML for Okidata Microline Standard ExplanationofMenuItems These expl...

Page 37: ...Spacing Change from 6 to 8 lpi lines per inch to get more lines per page Operator Panel Function Change to Limited Operation to deactivate PRINT QUALITY and CHARACTER PITCH buttons when several peopl...

Page 38: ...haracters per inch to be engaged when the printer control panel is set for 10 cpi and the SI command is received SI Select Pitch 12 CPI IBM only Sets the pitch 20 the factory default or 12 characters...

Page 39: ...nter receives data it will move down to the initial printing position This feature is normally turned off To activate it SEL SEL POWER LF FF LOAD TEAR PARK QUIET SHIFT MicroFeed Down TOF MicroFeed Up...

Page 40: ...PRINT Switching Paper Paths To switch to single sheet feed 1 Tear off any printed pages then press PARK 2 Swing the wire guide up into the paper separator and swing the separator upright 3 Move the pa...

Page 41: ......

Page 42: ...ution The printer driver you have engaged does not agree with the emulation selected for your printer To check the emulation selected first make sure paper is loaded then press the SEL and SHIFT butto...

Page 43: ...ng The default setting is 0 If the printing is sometimes lighter change the setting to 1 if it s sometimes darker change it to 1 5 Hold SHIFT button and press SEL button to save setting and exit Menu...

Page 44: ...button to change Form Tear Off to desired setting 500ms 1 sec or 2 sec 10 Hold SHIFT button and press SEL button to exit Menu mode Problem I need to load paper but the Alarm light is not on and I can...

Page 45: ...panel won t work Solution The Operator Panel Function item on the printer MENU can be used to disable these buttons If the printer is part of a customized system or if it is used by a number of people...

Page 46: ...cpl 15 cpi 120 cpl 204 cpl 17 1 cpi 137 cpl 233 cpl 20 cpi 160 cpl 272 cpl Emulations Epson FX IBM Proprinter and Okidata Microline Standard co resident Interface Standard Centronics parallel Optional...

Page 47: ...24 lb max 6 5 to 9 5 continuous feed non overlap type Card stock Bottom only 120 lb max N A Transparencies Top only 8 5 to 11 NM Model 520 WM Model 521 Bar Codes Code 39 UPC A UPC E EAN 8 EAN 13 Inter...

Page 48: ...z 10 5 kg Environmental Requirements Parameter Range Operating Temperature 41 to 104 F 5 to 40 C Storage Temperature 14 to 122 F 10 to 50 C Operating Humidity 20 to 80 RH Storage Humidity 5 to 95 RH E...

Page 49: ......

Page 50: ...orized Sales or Service Dealer To locate an Authorized Okidata Sales or Service Dealer visit http www o idata com In the United States purchase directly from Okidata Via the internet at http www mylok...

Page 51: ...eeder 70022501 Dual Bin Cut Sheet Feeder 70022601 Pull Tractor Top Mount 70023001 Push Tractor Bottom Feed 70022901 Roll Paper Stand 70023301 Model 521 Cut Sheet Feeder 70022701 Dual Bin Cut Sheet Fee...

Page 52: ...elect 12 cpi ESC M 27 77 Select 15 cpi ESC g 27 103 Select 20 cpi ESC SI 27 15 or 15 Cancel 20 cpi DC2 18 Epson Command ASCII Decimal Delete DEL 127 Double Height On ESC w 1 27 119 49 Double Height Of...

Page 53: ...n 1 6 ESC 2 27 50 1 8 ESC 0 27 48 7 72 ESC 1 27 49 Epson Command ASCII Decimal Paper Out Sensor Off ESC 8 27 56 Paper Out Sensor On ESC 9 27 57 Print Quality Font Select HSD Print Mode ESC 0 27 40 48...

Page 54: ...elect 20 cpi ESC SI 27 15 Select Compressed Pitch SI 15 IBM Command ASCII Decimal Character Sets IBM Set I ESC 7 27 55 IBM Set II ESC 6 27 54 Double Width On ESC W 1 27 87 49 Double Width Off ESC W 0...

Page 55: ...r Out Sensor Off ESC 8 27 56 Paper Out Sensor On ESC 9 27 57 Print Quality Select HSD ESC 0 27 35 48 IBM Command ASCII Decimal Print Suppress On ML520 ESC Q STX 27 81 3 Print Suppress On ML521 ESC Q S...

Page 56: ...27 73 Enhanced Printing On ESC H 27 72 Enhanced Printing Off ESC I 27 73 Okidata Command ASCII Decimal Form Feed FF 12 Horizontal Tab Execute HT 9 Initialize Printer ESC CAN 27 24 Italic On ESC 27 33...

Page 57: ...tional Spacing On ESCY 27 89 Off ESC Z 27 90 Reset Clear Print Buffer CAN 24 Software I Prime ESC 0 27 125 48 Subscript Printing On ESC L 27 76 Subscript Printing Off ESC M 27 77 Superscript Printing...

Page 58: ...or television reception which can be determined by turning the equipment off and on the user is encouraged to try to correct the interference by one or more of the following measures Reorient or relo...

Page 59: ...he user to obtain the required shielded cable in order to ensure compliance of this equipment with FCC regulations Changes or modifications not expressly approved by Okidata may void your authority to...

Page 60: ...29 Commands printer 45 50 Continuous forms tear off feature 32 33 jams clearing 15 16 loading 7 9 park feature 33 specifications 40 Continuous forms cont switching to single sheets 33 tear feature 32...

Page 61: ...tem 27 30 Page width menu item 27 30 J Jams paper 15 16 Justification commands 46 L Label specifications 40 Language set menu item 26 30 Letter Gothic typeface 23 39 LF button 20 Lights control panel...

Page 62: ...ors 44 Q QUIET button 20 light 19 R Rear feed paper jams 15 16 Receive buffer size menu item 28 31 Replacement parts 43 Reset button 20 inhibit menu item 28 31 printer commands 46 48 50 Resident fonts...

Page 63: ...7 31 Top of form 12 commands 48 50 Transparency specifications 40 Troubleshooting see also Problem Solving 35 38 paper jams 15 16 Typefaces 23 39 U Underline commands 47 48 50 Unidirectional printing...

Page 64: ...es of water for with eyes for 15 minutes keeping eyelids open with fingers Seek medical attention Contact occurs Wash thoroughly with soap and water with skin HazardousIngredients Carbon Black CAS 133...

Page 65: ...pplicable Unusual Fire and Explosion Hazards None HealthHazardData Routes of Entry Ingestion Eyes Skin Health Hazards None ReactivityData Stability Stable Polymerization Will not occur Hazardous Decom...

Page 66: ...ect incidental conse quential or other damages with respect to the accuracy or completeness of the information contained herein Such information may be without limita tion invalid if the specified mat...

Page 67: ...F MicroFeed Up EXIT GROUP SET PRINT ITEM ALARM MENU MENU 1 Make sure paper is loaded and the printer is turned on 2 Press TEAR If the paper moves up Forms Tear Off is OFF the factory setting If the pa...

Page 68: ...ion 6 To change the tear off position press and hold SHIFT then press LF Micro Feed Up to move the tear off position down or FF LOAD Micro Feed Down to move the tear off position up Next Set the Top o...

Reviews: