background image

CX43-RFAB

This instruction manual is for the B excitation fluorescence illuminator.
To ensure the safety, obtain optimum performance and to familiarize yourself fully with the use of this 
product, we recommend that you study this manual thoroughly before operating this product, and 
always keep this manual at hand when operating this product.
Retain this instruction manual in an easily accessible place near the work desk for future reference.

INSTRUCTIONS

B excitation fluorescence illuminator

A X 8 9 1 6

Optical Microscope Accessory

Summary of Contents for CX43-RFAB

Page 1: ...ith the use of this product we recommend that you study this manual thoroughly before operating this product and always keep this manual at hand when operating this product Retain this instruction man...

Page 2: ...when the product is operated in a commercial environment This product generates uses and can radiate radio frequency energy and if not installed and used in accordance with the instruction manual may...

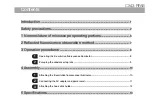
Page 3: ...observation method 7 3 Operation procedures 8 1 Operating the B excitation fluorescence illuminator 8 2 Escaping the condenser top lens 9 4 Assembly 10 1 Attaching the B excitation fluorescence illumi...

Page 4: ......

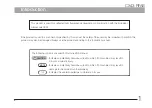
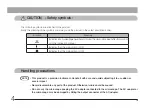
Page 5: ...ls are used in this instruction manual CAUTION Indicates a potentially hazardous situation which if not avoided may result in minor or moderate injury NOTE Indicates a potentially hazardous situation...

Page 6: ...et are connected properly If the product is not grounded our intended electric safety and EMC performance of the product cannot be assured Do not use this product near the sources of strong electromag...

Page 7: ...s basically eye safe However do not look directly at the light from LED for a long time while feeling too bright since it may cause damage to your eyes CAUTION Light from the objective Do not look dir...

Page 8: ...ruction manual Indicates that the main switch is ON Indicates that the main switch is OFF Handling precautions This product is a precision instrument Handle it with care and avoid subjecting it to a s...

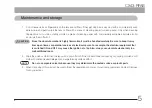
Page 9: ...ully Be sure to keep it away from open flames or potential sources of electrical sparks For example the electrical equipment that is switched ON and OFF may cause the ignition of a fire Also always us...

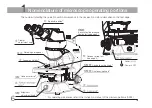
Page 10: ...ocusing knob Aperture diaphragm lever Specimen holder Condenser turret Brightness adjustment knob Diopter adjustment ring Binocular portion Condenser top lens see page 9 Aperture diaphragm Aperture di...

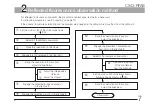
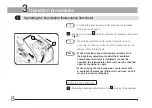
Page 11: ...brightness Set the main switch of the microscope frame to ON Select BF brightfield observation Adjust the interpupillary distance Adjust the diopter 1 2 3 4 5 6 7 Observation Remove the top lens of t...

Page 12: ...ove it from the light path When attaching various intermediate attachments if the brightness adjustment knob of the B excitation fluorescence illuminator is interfered or cannot be operated the interm...

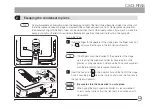
Page 13: ...finger to the aperture of the stage press the finger hook por tion a and move the top lens to the front arrow direction Using the hook stick If the finger cannot be inserted to the aperture of the sta...

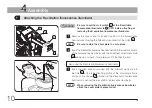
Page 14: ...ion fluorescence illuminator into the insertion portion of the fluorescence illuminator with the brightness adjustment knob c facing up and push it completely until it touches the end Removing the B e...

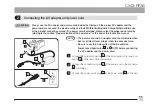
Page 15: ...of the power cord at the end of this instruction manual CAUTION The power cord and AC adapter cord are vulnerable when bent or twisted Never subject them to excessive force Be sure to set the main swi...

Page 16: ...Attaching the hook stick holder It is recommended to attach the provided hook stick holder a to the back of the microscope frame The provided hook stick b can be fixed to the provided hook stick hold...

Page 17: ...orescence and brightfield Selection by IN to or OUT from microscope frame Operating environment Indoor use Altitude Max 2000 meters Ambient temperature 5 to 40 C 41 to 104 F Humidity Max 80 31 C or le...

Page 18: ...non approved power supply cord for Olympus products Olympus can no longer war rant the electrical safety of the equipment Specifications Voltage rating Current rating Temperature rating Length Fitting...

Page 19: ...er supply cord should be certified by one of the agencies listed in Table 1 or comprised of cordage marked with an agency marking per Table 1 or marked per Table 2 The fittings are to be marked with a...

Page 20: ...16 Country Agency Certification mark Country Agency Certification mark Finland FEI Switzerland SEV France UTE United Kingdom ASTA BSI Germany VDE U S A UL Ireland NSAI...

Page 21: ...n mm Black Red Yellow Comite Electrotechnique Belge CEBEC CEBEC HAR 10 30 10 Verband Deutscher Elektrotechniker VDE e V Pr fstelle VDE HAR 30 10 10 Union Technique de I Electricite UTE USE HAR 30 10 3...

Page 22: ...ty of Ireland NSAI NSAI HAR 30 30 50 Norges Elektriske Materiellkontroll NEMKO NEMKO HAR 10 10 70 Asociacion Electrotecnica Y Electronica Espanola AEE UNED HAR 30 10 70 Hellenic Organization for Stand...

Page 23: ......

Page 24: ...153 Korea Distributed by Manufactured by 48 Woerd Avenue Waltham MA 02453 U S A Shinjuku Monolith 2 3 1 Nishi Shinjuku Shinjuku ku Tokyo 163 0914 Japan www olympus global com Distributor Tengrant Inc...

Reviews: