background image

INSTRUCTIONS

DIGITAL VOICE

RECORDER

Thank you for purchasing an Olympus

Digital Voice Recorder.

Please read these instructions for information

about using the product correctly and safely.

Keep the instructions handy for future reference.

To ensure successful recordings, we recommend that

you test the record function and volume before use.

EN

EN

 INSTRUCTIONS

FR

 MODE D’EMPLOI

ES

 INSTRUCCIONES

Summary of Contents for DS-2800

Page 1: ... Please read these instructions for information about using the product correctly and safely Keep the instructions handy for future reference To ensure successful recordings we recommend that you test the record function and volume before use EN EN INSTRUCTIONS FR MODE D EMPLOI ES INSTRUCCIONES ...

Page 2: ...y liability for passive damages or damage of any kind occurred due to data loss incurred by a defect of the product repair performed by the third party other than Olympus or an Olympus authorized service station or any other reason is excluded Trademarks Microsoft and Windows are registered trademarks of Microsoft Corporation Macintosh is a trademark of Apple Inc Intel and Pentium are registered t...

Page 3: ...Table of contents P 4 Safe and proper usage P 5 Getting started P 7 Basic operations P 18 Advanced operations P 32 Managing files on your PC P 48 Other practical use methods P 55 Other information P 56 INDEX INDEX INDEX ...

Page 4: ...o use the menu 34 Selecting folders and files 35 Displaying file information 36 Locking files Lock 37 Index marks 38 Language Language 39 Backlight Backlight 40 LED LED 41 LCD Contrast Adjustment Contrast 42 System sounds Beep 43 Formatting the card Format 44 Check system information System info 46 Changing the USB class USB Class 47 4 Managing files on your PC DSS Player software 48 Installing DS...

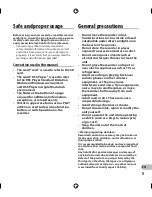
Page 5: ...posed to excessive moisture or dust Do not use organic solvents such as alcohol and lacquer thinner to clean the unit Do not place the recorder on top of or near electric appliances such as TVs or refrigerators Avoid recording or playing back near cellular phones or other wireless equipment as they may cause interference and noise If you experience noise move to another place or move the recorder ...

Page 6: ...reversed If any liquid from a battery gets into your eyes promptly wash it off with clean water and consult your doctor at once There is a hole from which gas escapes on the terminal Do not cover or block it If you notice anything unusual when using this product such as abnormal noise heat smoke or a burning odor 1 remove the batteries immediately while being careful not to burn yourself and 2 cal...

Page 7: ...ing and Insert Recording partial insertion available P 20 P 21 s Supports USB 2 0 High Speed which enables high speed data transmission from the recorder to your computer s Five folders and up to 200 files folder for a maximum of 1000 recordings P 18 s It has a built in Variable Control Voice Actuator VCVA function P 24 s Large LCD screen with backlight s Index mark function which is useful to sea...

Page 8: ...ng it from being accidentally overwritten or erased When the lock function is set will appear on the display 2Index area For writing down information identifying card or content 3Contact area Comes into contact with the recorder s signal read contacts Memory sizes of cards and approximate recording times 1 Memory size QP mode SP mode 512MB 38 hr 79 hr 1GB 77 hr 157 hr 2 2GB 152 hr 2 312 hr 2 4GB 3...

Page 9: ...tely erases the existing data on the card In some cases cards which have been formatted initialized by another device such as a computer cannot be recognized Be sure to format them with this recorder before using The card has a service life When reaching the end of its life writing or erasing data on the card will be disabled In this case replace the card If you use a PC card adapter compatible wi...

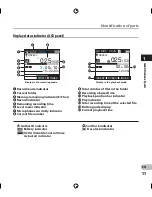
Page 10: ...n 7EAR Earphone jack 8MIC Microphone jack 9Record Play indicator light 0Display LCD panel Volume button Fast Forward 9 button OK MENU button Smart F1 F2 F3 button Rewind 0 button Volume button Built in speaker Battery cover PC USB terminal Cradle connector Battery cover release button 10 1 EN Identification of parts 0 7 8 9 1 2 3 4 5 6 ...

Page 11: ...ar indicator Play indicator Total recording time of the selected file Button guide display Current playback time Author ID indicator Battery indicator VCVA VCVA Variable Control Voice Actuator indicator Card lock indicator Erase lock indicator Identification of parts Display in the recording mode Display in the playback mode 11 1 EN Identification of parts 025 030 DISPLY INFO INDEX DS2800 E QP DIC...

Page 12: ...n close the battery cover Unusable batteries Batteries for which the entire external coating insulating sheath is peeled off naked batteries or those where it has partially been peeled off Insert the batteries in the direction inscribed on the inside of the recorder s battery compartment In addition when inserting the batteries insert them so that the tape is under the batteries as shown in the il...

Page 13: ...header will not be written It is crucial to replace the batteries when one hash mark is shown in the battery icon Be sure to replace both batteries at the same time Never mix old and new batteries or batteries of different types and or brands If it takes longer than 1 minute to replace dead batteries you may have to reset the time when you load new batteries Remove the batteries if you are not goi...

Page 14: ...l switch to power save mode automatically To reactivate the recorder again operate any button or the slide switch Power save setting While the POWER switch on the side of the recorder is in the OFF position none of the buttons or switch on the recorder will be active Move the POWER switch to the ON position to activate the recorder When the recorder is not being used turn the power off to reduce b...

Page 15: ...t is inserted all the way Inserting the card the wrong way or at an angle could damage the contact area or cause the card to jam If the card is not inserted all the way data may not be written to the card Hold the card straight and pull it out If an unformatted card is installed the recorder will automatically display the menu format option P 44 Never use any card in the recorder unless it has bee...

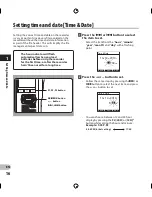
Page 16: ...ll flash automatically when you load batteries before using the recorder for the first time or after the recorder hasn t been used for a long time 1 Press the 9 or 0 button to select the item to set Select the item from the hour minute year month and day with a flashing point 2 Press the or button to set Follow the same steps by pressing the 9 or 0 button to select the next item and press the or b...

Page 17: ...ngs 3 Press the OK MENU button to complete the setting The clock will start from the set date and time Press the OK MENU button according to the time signal Notes If the slide switch is moved to a position other than STOP while setting the time and date the time and date currently being set un finalized time and date will be cancelled and it will revert to the previously set time and date You can ...

Page 18: ... RECORD function is configured to record at the current position overwrite However that can be changed to any of the following settings Append Appends the recording to the end of the current file P 19 Overwrite Overwrites the recording starting at the current position in the file P 20 Insert Inserts the recording at the current position in the file P 21 Recording Recording related settings Recordi...

Page 19: ...witch to the REC s position again Notes A beep will sound when the remaining recording time reaches 60 seconds 30 seconds and 10 seconds while recording When remaining recording time is less than 60 seconds the record play indicator light starts flashing in red When the recording time is decreasing to 30 or 10 seconds the light flashes faster Memory Full or Folder Full will be displayed when the m...

Page 20: ...to the REC s position to start overwriting The record indicator light glows red and Record indicator appears on the display a Recording elapsed time b Total recording time of the selected file 3 Move the slide switch to the STOP 4 position to stop overwriting Note You cannot select a different recording mode QP SP than that of the original file before overwrite recording 2 20 EN 101 133 DISPLY DIS...

Page 21: ... appears on the display Insert Rec and the remaining recording time will alternate on the display 4 Move the slide switch to the STOP 4 position to stop inserting the additional recording Notes The recording time and date of the file is updated to the time and date of the inserted recording You cannot select a different recording mode QP SP than that of the original file before inserting 2 21 EN R...

Page 22: ...ation Low sensitivity mode suited for dictation 3 Press the OK MENU button to complete the setup screen Conference Set or Dictation Set will light up on the display and it will return to the Record Menu screen If you press the 0 or F1 BACK button the setting will be cancelled and it will return to the Record Menu screen Pressing the F3 EXIT button will cancel the contents being set and take you ou...

Page 23: ...d Menu screen Pressing the F3 EXIT button will cancel the contents being set and take you out of the MENU 4 Press the F3 EXIT or 0 button to complete the setting Set recording mode is displayed when creating the new file and during recording The recording mode of file recording is displayed during playback and in stop mode 2 Press the or button to select QP or SP Note Choose QP mode for recording ...

Page 24: ...recording starts and flashes when recording pauses Adjust the start stop actuation level While the recorder is in recording mode press the 9 or 0 button to adjust the actuation level The VCVA level can be set to any of 15 different values The higher the value is the more sensitive the recorder can react to sounds At the highest value even the faintest sound will activate recording The VCVA actuati...

Page 25: ... to the recording while recording is in progress Insert the earphone plug into the earphone jack and use the or button to control the volume level Note Insert the plugs in to the end as shown in the illustration when inserting the earphone or external microphone 2 25 EN Recording monitor ...

Page 26: ...ppears on the display a Play indicator 2 Press the or button to adjust the volume The display shows the volume level You can choose between 00 to 30 b Volume level 3 Move the slide switch to the STOP 4 position at any point you want to stop the playback 2 26 EN 101 133 INSERT SPEED INDEX DS2800 QP DICT 00M 05s 27M 58s a 101 133 INSERT SPEED INDEX DS2800 QP DICT 00M 07s Volume 15 b 2 1 1 3 Playing ...

Page 27: ...will switch Play playback Playback at normal speed Slow Play slow playback Playback speed slows down 50 and Slow play will turn on Fast Play fast playback Playback speed becomes faster 50 and Fast play will turn on Notes If you press the 9 button once while fast forwarding or twice while stopped the recorder will stop at the end of the file F Skip If you press the 0 button once while rewinding or ...

Page 28: ...e recorder is a very simple process 4 Press the button to select Start then press the OK MENU button The display changes to File Erase and erasing will start Notes An erased file cannot be restored Files cannot be erased in the following cases File being set Lock P 37 The SD card lock is turned on P 8 2 28 EN 029 031 EXIT DS2800 QP DICT All Erase File Erase Cancel All Erase File Erase Cancel 029 0...

Page 29: ...multaneously 4 Press the button to select Start then press the OK MENU button The display changes to All Erase and erasing will start Notes The erasing process may take up to 10 seconds Do not interrupt this process Data will be destroyed Files cannot be erased in the following cases File being set Lock P 37 The SD card lock is turned on P 8 2 29 EN Erasing 029 030 EXIT DS2800 QP DICT All Erase Fi...

Page 30: ...ck The confirmation setting of the end position of the partial erase is continuing You can erase a selected file in part 3 Press the ERASE button at the point to end erasing The erase starting point time set in step 2 and the ending point time set in this step will alternate on the display for 8 seconds If you playback to the end of file that will mark the end position for the partial erase automa...

Page 31: ...onds after the Partial Erase Start and Partial Erase End are alternately displayed the recorder will revert to stop status An erased file cannot be restored Files cannot be partial erased in the following cases File being set Lock P 37 The SD card lock is turned on P 8 2 31 EN Erasing 134 134 INSERT SPEED EXIT DS2800 E QP DICT VCVA 1H 20M 35s Partial Erase 134 134 INSERT SPEED EXIT DS2800 E QP DIC...

Page 32: ...f On QP SP Off On On Off Program contrast level 01 12 Default is 06 On Off English Deutsch Français Español Italiano Русском P 37 P 23 P 24 P 40 P 42 P 41 P 39 Device Menu To the next page sMenu setting While the recorder is stopped press the OK MENU button Information The file information is displayed P 36 Mic Sense Dictation Conference P 22 32 3 EN Menu list ...

Page 33: ...Setting Ref page Devices Menu Beep Power Save Time Date USB Class Reset Settings Format Card Info System Info P 43 P 14 P 16 P 47 P 45 P 44 P 9 P 46 File Menu To the page 32 On Off In order of 5 minutes 10 minutes 30 minutes 1hour and Off In order of hour minute year month and day Composite Storage Returns the menu settings to their initial state Initializes the card Remain Capacity Model Name Ver...

Page 34: ...s the OK MENU button to complete the setup screen If you press the 0 or F1 BACK button the setting will be cancelled and it will return to the menu Pressing the F3 EXIT button will cancel the contents being set and take you out of the MENU 2 Press the or button to move to Main Menu item to be set 6 Press the or button to change the setting 8 Press the F3 EXIT or 0 button to complete the setting OK...

Page 35: ... or button to select the folder then press the OK MENU button This will change the folder You can switch folders by pressing the F1 FOLDER button a Current file number b Total number of recorded files in the folder OK MENU button button F1 button 35 3 EN Selecting folders and files FOLDER QP DICT Folder A A B C D E Folder B Folder C Folder D Folder E EXIT FOLDER QP DICT Folder A A B C D E Folder B...

Page 36: ...ing information will be displayed File Name File name Rec Time Time and date the file was recorded Author ID Display the Author ID of file F3 button Note When the file that Work Type or the Option Item is set is transferred from PC to this unit the information will be displayed on the File Information 36 3 EN 029 030 FOLDER INFO DS2800 QP DICT VCVA 3H 00M 00s 15H 22M 40s DISPLY EXIT 029 030 File N...

Page 37: ... return to the File Menu screen If you press the 0 or F1 BACK button the setting will be cancelled and it will return to the File Menu Pressing the F3 EXIT button will cancel the contents being set and take you out of the MENU 3 Press the or button to select On or Off On Locks the file and prevents it from being erased appears on the display Off Unlocks the file and allows it to be erased 5 Press ...

Page 38: ...ches the index mark Clearing an index mark 3 Locate the index mark you want to clear 4 While the index number appears for approximately 2 seconds on the display press the ERASE button The index mark is erased Notes Up to 32 index marks can be set in a file When a file is locked or set to read only or when the SD card lock is enabled index mark cannot be erased Clear the settings before erasing 9 0...

Page 39: ...e Display Menu screen If you press the 0 or F1 BACK button the setting will be cancelled and it will return to the Display Menu screen Pressing the F3 EXIT button will cancel the contents being set and take you out of the MENU 4 Press the F3 EXIT or 0 button to complete the setting Note The selectable language varies depending on the countries where the product was purchased 2 Press the or button ...

Page 40: ... Backlight is disabled 3 Press the OK MENU button to complete the setup screen On Set or Off Set will light up on the display and it will return to the Display Menu screen If you press the 0 or F1 BACK button the setting will be cancelled and it will return to the Display Menu screen Pressing the F3 EXIT button will cancel the contents being set and take you out of the MENU 4 Press the F3 EXIT or ...

Page 41: ...n On Set or Off Set will light up on the display and it will return to the Display Menu screen If you press the 0 or F1 BACK button the setting will be cancelled and it will return to the Display Menu screen Pressing the F3 EXIT button will cancel the contents being set and take you out of the MENU 4 Press the F3 EXIT or 0 button to complete the setting OK MENU button button 9 0 button LED Record ...

Page 42: ...e the setup screen The set contrast level lights up and will return to the Display Menu screen If you press the 0 or F1 BACK button the setting will be cancelled and it will return to the Display Menu screen Pressing the F3 EXIT button will cancel the contents being set and take you out of the MENU 4 Press the F3 EXIT or 0 button to complete the setting OK MENU button button 9 0 button F1 F3 butto...

Page 43: ...plete the setup screen On Set or Off Set will light up on the display and it will return to the Device Menu screen If you press the 0 or F1 BACK button the setting will be cancelled and it will return to the Display Menu screen Pressing the F3 EXIT button will cancel the contents being set and take you out of the MENU 4 Press the F3 EXIT or 0 button to complete the setting 43 3 EN System sounds BA...

Page 44: ... cannot be initialized The initialization of menu items should be set up through DSS Player or the recorder s Reset Settings 1 Select Device Menu at the Format screen then press the OK MENU or 9 button Refer to P 32 regarding each menu item settings 2 Press the or button to select Start option 3 Press the OK MENU button to confirm Start selection 44 3 EN Formatting the card BACK EXIT Device Menu B...

Page 45: ...will damage the data or card Remove the card Remove the batteries When the card is formatted all the stored data including locked files are erased If an unformatted card is inserted the recorder automatically displays the format option in the menu SD cards for which the SD card lock is enabled cannot be initialized Formatting on the recorder will be quick format If you format the card information ...

Page 46: ...screen then press the OK MENU or 9 button Model Name Version Serial will appear Refer to P 33 regarding each menu item settings 2 Press the OK MENU 0 or F1 BACK button 3 Press the F3 EXIT or 0 button to complete the setting 46 3 EN Check system information BACK EXIT Device Menu Time Date 12 USB Class Reset Settings Format Card info System info BACK EXIT System Info Model Name DS 2800 Version 1 00 ...

Page 47: ...ss 3 Press the OK MENU button to complete the setup screen Composite Set or Storage Set will light up on the display and it will return to the Device Menu screen If you press the 0 or F1 BACK button the setting will be cancelled and it will return to the Device Menu screen Pressing the F3 EXIT button will cancel the contents being set and take you out of the MENU 4 Press the F3 EXIT or 0 button to...

Page 48: ...imate 64 bit edition Professional 64 bit edition Home Premium 64 bit edition Microsoft Windows Server 2003 Operating System Microsoft Windows Server 2003 Operating System x64 edition DSS Player software Microsoft Windows Server 2008 Operating System Microsoft Windows Server 2008 Operating System x64 edition CPU Microsoft Windows 2000 XP Intel Pentium III 500 MHz or more Microsoft Windows Vista 800...

Page 49: ...ve space 200 MB or more Drive CD ROM CD R CD RW DVD ROM drive Display 1024 x 768 pixels or more 32000 colors more USB port One or more free ports Notes Macintosh version does not support voice recognition software Currently supported OS are listed on our Web page For the latest information please visit the Olympus Web site at http www olympus global com en global 49 4 EN DSS Player software ...

Page 50: ...t pull down menu and click DSS Player Standard Installation 3 The Install Wizard will begin Once you have consented to the licensing agreement enter your name company name and license ID number serial number The license ID number is printed on the license ID card included inside the recorder package 4 Proceed with the installation according to the instructions on the screen Macintosh 1 Insert Olym...

Page 51: ...ade are stored in the MESSAGE folder If you don t need them delete them You can confirm the location of the MESSAGE folder by clicking on Options in the Tools menu before uninstalling Uninstalling DSS Player software For information on the DSS Player usage and features refer to the Online help To start Online help Window 1 Click the start button then select All Programs Olympus DSS Player Standard...

Page 52: ...d as the respective removable disk drive Disconnecting from your PC Windows 1 Click on the task bar located at the lower right corner of the screen Click Safely remove USB Mass Storage Device The drive letter will differ depending on the PC being used 2 When the safe to remove hardware window appears click OK 3 Disconnect the USB cable Macintosh 1 Move the drive icon for this recorder that is appe...

Page 53: ...the USB port on your PC Do not connect the recorder to a PC by using a USB hub Make sure to connect to a USB port on your PC Make sure to push the cable connector all the way in Otherwise the recorder may not operate properly This is an operational environment for saving the files recorded by this recorder to your PC with USB connection Even if operational environment is satisfied we do not suppor...

Page 54: ...ayer Standard and then click Dictation Module Running DSS Player software Macintosh Disabling automatic start 1 Click the Dock s System Preferences 2 Click Device Detector 3 Turn the automatic startup setting Off Manual start 1 Double click the DSS Player icon for the folder in Application DSS Player All program menu will be displayed 2 Register user information The user s registration screen will...

Page 55: ...opy the data While the data are being written or copied the record play indicator light on the recorder will flash 5 Disconnect the recorder from the PC P 53 Macintosh 1 Connecting the recorder to your PC P 52 When you connect the recorder to a Mac OS it will be recognized by the drive name of the product name on the desktop 2 Double click the product name icon on the desktop Removable disk is dis...

Page 56: ...sary files P 28 Erase Error An error occurred while erasing Erase once again When an Erase Error occurs format the card Card Error An incompatible card was inserted Insert a compatible card P 15 Unsupported Card The card cannot be used with this recorder Please remove the card Memory Full The card has no remaining memory Erase files that are no longer required or insert another card Format Error T...

Page 57: ...t the card P 44 The maximum number of files has been reached Check another folder P 35 The SD card is locked Unlock the SD card lock P 8 No playback tone heard The earphone is connected Unplug the earphones to use the internal speaker The volume level is set to 00 Adjust the volume level P 26 Unable to erase The file is locked Unlock the file P 37 The SD card is locked Unlock the SD card lock P 8 ...

Page 58: ...ck the file P 37 The SD card is locked Unlock the SD card lock P 8 Cannot find the recorded file Wrong folder Switch to the right folder P 35 Cannot connect to a PC Sometimes a connection cannot be made with some PCs running Windows XP or Vista You need to change the PC s USB settings See DSS Player Online help for details P 51 58 6 EN Troubleshooting Troubleshooting ...

Page 59: ...istance while minimizing surrounding noise s PC transcription kit AS 2400 The AS 2400 transcription kit provides you with a PC footswitch a headset and DSS Player Standard Transcription Module for easy transcription of DSS recordings s Connecting cord KA333 Use to connect the microphone jack of this unit to a radio or other sound source s Telephone pickup TP7 Earphone type microphone can be plugge...

Page 60: ...ode Approx 13 h 4 Speaker Built in ø23mm round dynamic speaker 4 MIC EAR jack ø3 5 mm mini jack impedance MIC 2 kΩ EAR 8 Ω or more 4 Maximum working output 3 V DC 250 mW or more 8 Ω speaker 4 Input power requirement Rated voltage 5 V Batteries Two AAA batteries LR03 or R03 or two Ni MH rechargeable batteries 4 External dimensions 113 5 mm 50 0 mm 17 mm without protrusions 4 Weight 100 g Including ...

Page 61: ... U S and Canada distec olympus com s Technical Hotline Number in Europe Toll free number 00800 67 10 83 00 available for Austria Belgium Denmark Finland France Germany Italy Luxemburg Netherlands Norway Portugal Spain Sweden Switzerland United Kingdom Charged numbers for the Rest of Europe 49 180 567 1083 49 40 23773 4899 s User Support E mail address in Europe dss support olympus europa com 61 6 ...

Page 62: ......

Page 63: ...s EU Veuillez ne pas jeter les batteries dans les ordures ménagères Veuillez utiliser les systèmes de collection disponibles dans votre pays pour l enlèvement des batteries usagées Le symbole poubelle sur roue barrée d une croix WEEE annexe IV indique une collecte séparée des déchets d équipements électriques et électroniques dans les pays de L UE Veuillez ne pas jeter l équipement dans les ordure...

Page 64: ...rty OLYMPUS IMAGING AMERICA INC Address 3500 Corporate Parkway P O Box 610 Center Valley PA 18034 0610 U S A Telephone Number 1 888 553 4448 This device Complies with Part 15 of the FCC Rules Operation is subject to the following two conditions 1 This device may not cause harmful interference and 2 this device must accept any interference received including interference that may cause undesired op...

Reviews: