background image

Summary of Contents for Zafira Tourer 2013

Page 1: ......

Page 2: ...Antenna 27 Audio Players 27 CD Player Without Navigation 27 CD Player With Navigation 30 Auxiliary Devices Without Navigation 34 Auxiliary Devices With Navigation 37 Navigation 41 Using the Navigatio...

Page 3: ...Black plate 2 1 Zafira Infotainment System 2013 1st Edition 6 27 12...

Page 4: ...owner s handbook in the vehicle so it will be there if it is needed If the vehicle is sold leave this manual in the vehicle Theft Deterrent Feature The theft deterrent feature works by teaching a por...

Page 5: ...ere with the operation of the engine radio or other systems and could damage them The vehicle has Retained power off With Retained power off the audio system can be played even after the ignition is t...

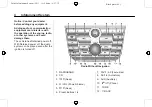
Page 6: ...ntrol O VOL Power Volume Turn to adjust the volume V 8 Phone Press and hold V 8 to mute the infotainment system Press and hold V 8 again or turn the O VOL knob to cancel mute Menu System Controls Z an...

Page 7: ...ess Z to turn the function on or off Entering a Character Sequence 1 Turn Z to highlight the character 2 Press Z to select the character Press the BACK button to delete the last character in the seque...

Page 8: ...alue changes to 0 Press the BACK button to go back to the Tone Settings menu Adjusting the Treble Midrange and Bass 1 Press the TONE button 2 Select Treble Midrange or Bass 3 Select the value Press th...

Page 9: ...ally adjusts the radio volume to compensate for road and wind noise as the vehicle speeds up or slows down so that the volume level is consistent The level of volume compensation can be selected or th...

Page 10: ...elect a destination using various methods and choices Follow turn by turn route and map guidance with voice prompts only if permitted by traffic laws controls and conditions Always be alert and obey t...

Page 11: ...to start primary functions while using the infotainment system F Home See Home Page following in this section SRCE Source Press to change the audio sources such as AM FM Radio CD and AUX s Seek 1 Pre...

Page 12: ...ough the full map and split screens V 8 Phone See Bluetooth Overview on page 64 or Bluetooth Voice on page 67 or Bluetooth Infotainment Controls on page 71 DEST Destination 1 Press to enter a destinat...

Page 13: ...home page that makes accessing many of the features an easy process To select a feature on the home page turn the Z Tune Menu knob until a feature is highlighted then press the outer ring of the Z kn...

Page 14: ...moving Select the Now Playing screen button to display the active source page The sources available are AM FM CD USB iPod and AUX See AM FM Radio Without Navigation on page 16 or AM FM Radio With Navi...

Page 15: ...ge 67 or Bluetooth Infotainment Controls on page 71 Select the Config screen button to display the Config main page From this display you can adjust features such as time and date radio phone navigati...

Page 16: ...track selected See CD Player Without Navigation on page 27 or CD Player With Navigation on page 30 Select the iPod screen button to display the iPod main page and play the current or last track select...

Page 17: ...ss user configurable Favourite Routes Cleaning the Display Notice Using abrasive cleaners when cleaning glass surfaces could scratch the glass Use only a soft cloth and do not spray cleaner directly o...

Page 18: ...s the BACK button to go back to the previous menu RDS Scrolling Text Stations broadcasting RDS will hide the program name to display additional information To prevent additional information being disp...

Page 19: ...d in the two autostore lists The correctly received station is marked by l To store a station manually press the AS 1 2 button to display the autostore list Then press the corresponding station button...

Page 20: ...oo weak To enable this feature 1 Press Z 2 Select DAB settings 3 Select Auto ensemble linking and select On or Off 4 Press the BACK button to go back to the previous menu Auto Linking DAB FM If enable...

Page 21: ...n 1 to 6 until a beep is heard Retrieving Stations Press the FAV 1 2 3 button to open a favourite page or to switch to another favourite page Briefly press one of the 1 to 6 buttons to retrieve the st...

Page 22: ...s 4 Press the BACK button to go back to the previous menu AM FM Radio With Navigation Playing the Radio Audio Source O VOL Power Volume 1 Press to turn the radio on or off 2 Turn to increase or decrea...

Page 23: ...he speakers Setting the Tone To adjust the tone Treble Select or to change the level Middle Midrange Select or to change the level Bass Select or to change the level Adjusting the Speakers To adjust t...

Page 24: ...in this section Turn the Z knob to find a radio station To select a preset station press the corresponding preset button Seeking a Station Press s or to search for a station AM 1 Select the AM screen...

Page 25: ...FM main page 2 From the FM screen turn the Z knob to highlight the Menu screen button Press the outer ring of the Z knob to display the menu options 3 While at the FM Menu display turn the Z knob the...

Page 26: ...eset do the following 1 Press and hold a preset button on the faceplate to store the currently active station After a few seconds a beep will be heard and the new preset information will display on a...

Page 27: ...S 1 Press the CONFIG button 2 Select Radio settings and then RDS options 3 Press Z to turn RDS on or off 4 Press the BACK button to go back to the previous menu RDS Scrolling Text Stations broadcastin...

Page 28: ...urce No maintenance or adjustments are needed Multi Band Antenna The multi band antenna is on the roof of the vehicle The antenna is used for the AM FM radio and GPS Global Positioning System if the v...

Page 29: ...d one CD at a time and keep the CD player and the loading slot free of foreign materials liquids and debris Control Buttons The buttons used to control the CD player are CD Press to use the CD player...

Page 30: ...sing the control buttons Press the s or button to select the previous or next track Turn the Z knob Using the CD Menu 1 Press the Z knob 2 Select Playlists Folders 3 Select the playlist or folder 4 Se...

Page 31: ...be increased skipping difficulty in recording tracks difficulty in finding tracks and or difficulty in loading and ejecting If these problems occur check the disc for damage or try a known good disc T...

Page 32: ...d Album information displays when available Use the following controls to play the disc s Seek Up Press to seek to the next track Press and hold to fast forward through a track Release the button to r...

Page 33: ...ic navigator works with these menus MP3 Music Menu Select the Menu screen button while that source is active to access the menu Turn the Z Tune Menu knob to highlight any of the following buttons on t...

Page 34: ...er When the CD only contains compressed audio files without any folders or playlists all files are under the root folder File System and Naming The song titles artists albums and genres are taken from...

Page 35: ...Input Jack Connect a 3 5 mm 1 8 in cable to the 3 5 mm 1 8 in auxiliary input jack to use a portable audio player Playback of an audio device that is connected to the 3 5 mm 1 8 in auxiliary input ja...

Page 36: ...r Off then press the BACK button to return the main screen On Repeats the current track Off Starts playing from the beginning of the current track after the last track finishes Connecting and Controll...

Page 37: ...can safely disconnect the device appears Connecting a USB Drive Connect the USB drive to the USB port Searching for a Track It is normal for the search feature to take some time to display the informa...

Page 38: ...he Home Page then turn the Z Tune Menu knob to highlight Source Press the outer ring of the Z knob to display the audio sources Turn the Z knob to cycle through all of the available audio source scree...

Page 39: ...is selected While the USB source is active use the following to operate USB function s Seek 1 Press to seek to the next track 2 Press and hold to advance quickly through playback Release to return to...

Page 40: ...re Select a song from the list to begin playback Folders Select to open a folder list to access the files within the folder structure File System and Naming The song titles artists albums and genres a...

Page 41: ...m 1 8 in stereo cable iPod Menu Turn the Z Tune Menu knob to highlight any of the following buttons on the iPod Menu then press the outer ring of the Z knob to make the selection Shuffle Songs Select...

Page 42: ...o play the desired podcast Composers 1 View the composers stored on the iPod 2 A composer name to view a list of all songs by that composer 3 The desired song from the list to begin playback Playing f...

Page 43: ...e are three indicator settings 2D North Up Displays North at the top of the map screen regardless of the direction the vehicle is travelling 2D Heading Up Displays the direction the vehicle is travell...

Page 44: ...n the map Switch Route Time Destination Select to customise the Arrival Travel time and Waypoint Destination information that is displayed in the main map screen Current Position Information Select to...

Page 45: ...abase The maps are stored on a Secured Digital SD card that is used in the navigation system Detailed Areas Road network attributes are contained in the map database for detailed areas Attributes incl...

Page 46: ...nt symbol marks one or more set waypoints A waypoint is a stopover destination point added to the planned route The estimated time and distance to the destination are displayed If waypoints have been...

Page 47: ...symbol to change to 3D mode The 3D symbol is the same as the Heading up symbol but the map is in 3D The No GPS symbol appears when there is no Global Positioning System GPS satellite signal This symb...

Page 48: ...when available display on the navigation screen as alpha numeric keyboards The alpha keyboard displays when data needs to be entered QWERTY or ABCDEF Turn the Z Tune Menu knob to highlight then press...

Page 49: ...able If there are more than six there is a match counter with a number of available streets Select the List screen button to view the list and select the street 3 Enter the house number 4 Select the D...

Page 50: ...the Z knob to highlight the Points of Interest screen button located on the Destination Entry page Press the outer ring of the Z knob to display several options to plan a route The POI entry list allo...

Page 51: ...owing 1 Select the Home Page Destination or press the DEST faceplate button 2 Enter an address using any of the destination methods Address Entry POI Entry etc 3 On the Destination Confirmation screen...

Page 52: ...Latitude and Longitude screen button to display the screen above 2 Enter the Latitude and Longitude coordinates for the destination in degrees minutes and seconds 3 Select the Done screen button if t...

Page 53: ...t the Home Page Destination Entry or press the DEST faceplate button to display the Favourite Routes screen button Select this button to display the list of available favourite routes 2 Select the Edi...

Page 54: ...layed destination Show on Map To switch to the map view with the displayed destination centred on the map Route Options To modify your route options See Navigation Settings under Using the Navigation...

Page 55: ...t of roads A maximum of eight avoided segments are allowed Avoid List Select Avoid List to display a list of avoided road segments with the option to remove the avoided items from the list Detour Sele...

Page 56: ...n be started 3 To add more waypoints select Add Waypoint to add the waypoint in the order desired on the route To delete a waypoint 1 From the Destination menu select Waypoint List 2 Select Delete Way...

Page 57: ...the outer ring of the Z knob to display the languages The vehicle supports English Time and Date Settings From the Time Date Settings screen button select to display the Time Date Settings menu Set T...

Page 58: ...e Startup Volume Select to set the maximum volume level for startup that will be used even if a higher volume had been set when the radio was turned off Radio Favourites Select to set the number of FA...

Page 59: ...ons Turn the Z Tune Menu knob to highlight various route option preferences press the outer ring of the Z knob to select the desired preferences Preferences are Fastest Shortest or Other Select one of...

Page 60: ...erts Select to enable the guidance alert pop up to be viewed on the map or on the main screens such as audio phone etc A checkmark appears to indicate the guidance alert mode is on Vehicle Settings Se...

Page 61: ...k the vehicle to view this type of media WARNING Taking your eyes off the road for extended periods could cause a crash resulting in injury or death to you or others Do not give extended attention to...

Page 62: ...y the upper and lower bar Global Positioning System GPS The position of the vehicle is determined by using satellite signals various vehicle signals and map data At times other interference such as th...

Page 63: ...is not received A roof carrier is installed on the vehicle Tyre chains have been installed The tyres are replaced or worn The tyre pressure for the tyres is incorrect This is the first navigation use...

Page 64: ...on has changed Contact your Opel Dealer for more information on ordering a new SD card Database Coverage Explanations Coverage areas vary with respect to the level of map detail available for any give...

Page 65: ...an be used while the ignition is in ON RUN or ACC ACCESSORY The range of the Bluetooth system can be up to 9 1 m 30 ft Not all phones support all functions and not all phones work with the Bluetooth s...

Page 66: ...nge the volume level The adjusted volume level remains in memory for later calls The system maintains a minimum volume level Operation Minimise taking your eyes off the road while driving Become famil...

Page 67: ...ssage select Write new message Messages are limited to 70 characters Receiving Calls When receiving a call a menu will appear on the infotainment display to accept or decline a call Received Call Func...

Page 68: ...Hands Free Profile V 1 5 and is specified in accordance with the Bluetooth Special Interest Group SIG For further information about the specification see the Bluetooth web site For security reasons a...

Page 69: ...tooth Obtain information on available telephone specific adapters from your dealer For information on the Bluetooth function see the operating instructions for the mobile telephone Bluetooth Connectio...

Page 70: ...uetooth PIN or a similar request appears on the display of the mobile telephone 7 Using the keypad on the mobile telephone enter the same Bluetooth PIN as for the infotainment system and confirm it wi...

Page 71: ...IM card must be entered Connecting Mobile Phone Saved in Device List 1 Press CONFIG Button 2 Select Device list 3 Select mobile phone and then select the option Select in the menu display The system w...

Page 72: ...locking incoming calls For more information see the mobile phone s owner s manual or contact the network provider Reset Phone to Factory Settings 1 Press CONFIG Button 2 Select Phone settings then sel...

Page 73: ...highlighted number by pressing the b g button Infotainment System Controls For information about how to navigate the menu system using the navigation system controls see Navigation V 8 Phone Press to...

Page 74: ...onnected to the vehicle before it can be used See the mobile phone manufacturer s user guide for Bluetooth functions before pairing the mobile phone Pairing Information Up to five mobile phones can be...

Page 75: ...l mobile phones Viewing All Paired and Connected Phones To view all available mobile phones that are paired to the UHP system 1 Press the CONFIG button 2 Select Phone Settings or touch Phone on a navi...

Page 76: ...can vary depending on the size of the phone book and call list stored on the mobile phone When a mobile phone supports the phone book and call list features the Phone Book and Call Lists menus are au...

Page 77: ...rn the Z knob to Answer and press or press the b g button on the steering wheel controls To decline the incoming call turn the Z knob to decline and press or press the b g button on the steering wheel...

Page 78: ...ou to operate several functions of the mobile phone using your voice The UHP system uses voice commands to control the system and dial phone numbers After input of the command the infotainment system...

Page 79: ...time The command is unrecognised after three tries Main Menu Commands The UHP system has a set of main menu commands that are available when voice control is first started After the voice control is...

Page 80: ...hone and follow the instructions on the mobile phone and enter the four digit code provided by the system Voice output Do you want to pair the device User Yes Voice output Paired ending session Select...

Page 81: ...of 25 digits To be able to make a call abroad you can say the word Plus at the beginning of your number The plus allows you to call from any country without knowing the prefix for calls made abroad i...

Page 82: ...phone number in the telephone book under as a name tag The name entered must be repeated once The pitch and pronunciation must be as identical as possible for both name inputs otherwise the voice cont...

Page 83: ...oud is selected Delete the entry of the voice tag last read aloud is deleted Trademarks and Licence Agreements End User Licence IMPORTANT To protect your own interests please read these terms and cond...

Page 84: ...to prevent any of the events in 2 3 above occurring or any unauthorised copying or use of the Whereis Data and immediately notify Sensis if you become aware of any of the events or activities describ...

Page 85: ...hereis Data that are unable to be excluded No other terms apply B Subject to C Sensis accepts its liability to you for breach of these terms and conditions or negligence under the principles applied b...

Page 86: ...is to do so or providing the Licence becomes illegal or Sensis believes on reasonable grounds that it may become illegal 7 3 Your rights under this Licence will end as soon as this Licence is cancelle...

Page 87: ...lack plate 86 1 Zafira Infotainment System 2013 1st Edition 6 27 12 86 Infotainment System 8 3 A reference to a person in this Licence includes a reference to a firm corporation or other corporate bod...

Page 88: ...Menu 55 Configuring Network Services 71 Connecting and Controlling a PlaysForSure Device PFD or Zune 35 Connecting and Controlling a USB Drive 36 Connecting and Controlling an iPod 34 Connecting Mobi...

Page 89: ...22 Navigation Settings 57 Navigation Settings Button 57 O Operating UHP Using Voice Control 77 Operation 6 65 67 Other Information 67 71 Overview Infotainment System 3 9 P Pairing 73 Phone Bluetooth 6...

Page 90: ...s Navigation 45 System Infotainment 3 System Needs Service If 63 System Settings 8 T Telephone Connection 68 Time and Date Settings 56 Turning the System On or Off 5 U UHP Controls 72 Updates Map Data...

Page 91: ...Black plate 4 1 Zafira Infotainment System 2013 1st Edition 6 27 12 i 4 INDEX 2 NOTES...

Page 92: ......

Reviews: