background image

Infant Car Seat + Car Seat Base

This product meets or exceeds FMVSS213 (US Federal Motor Vehicle Standards)

Summary of Contents for G5

Page 1: ...InfantCarSeat CarSeatBase This product meets or exceeds FMVSS213 US Federal MotorVehicle Standards ...

Page 2: ...on Choosing an Installation Method Overview Installing with the LATCH UAS Anchorage System Need Help Securing Your Car Seat and Car Seat Base 17 21 22 26 26 31 Choosing Installation Options Installing the Car Seat Base Overview Installing with the Car Seat Base With LATCH UAS Un installing the Car Seat Base With LATCH UAS Installing the Car Seat Base With Vehicle Seat Belt Un installing the Car Se...

Page 3: ... Harness Using the Infant Head Support Using the Soft Carrier Handle Using the Sunshade Terms You Need to Know Stroller Using the Car Seat on the Stroller Terms You Need to Know Rocker Using the Car Seat on the Rocker Using the Car Seat on an Aircraft Removing the Upholstery and Sunshade Cleaning the Upholstery and Sunshade Re installing the Upholstery and Sunshade Other Cleaning Instructions Limi...

Page 4: ...eat Car Seat Base reads it carefully as well Not all photos in this manual include the most up to date product specifications Terms You Need to Know Your Child s Safety Depends on You Product Information and Expiration Date Registering Your Products and Recall Information This child restraint system conforms to all applicable Federal Motor Vehicle Safety Standards This Restraint is Certified For U...

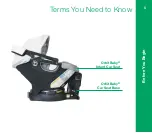
Page 5: ...Terms You Need to Know Before You Begin 5 Orbit Baby Infant Car Seat Orbit Baby Car Seat Base ...

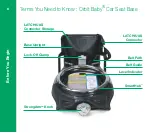
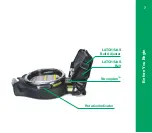
Page 6: ...Terms You Need to Know Orbit Baby Car Seat Base Before You Begin 6 LATCH UAS Connector Storage Base Upright Lock Off Clamp StrongArmTM Knob LATCH UAS Connector Belt Path Belt Guide Level Indicator SmartHub ...

Page 7: ...Before You Begin 7 LATCH UAS Belt Adjuster LATCH UAS Belt StrongArmTM Rotation Indicator ...

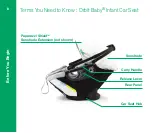
Page 8: ...Terms You Need to Know Orbit Baby Infant Car Seat Before You Begin 8 Paparazzi ShieldTM Sunshade Extension not shown Sunshade Carry Handle Release Lever Rear Panel Car Seat Hub ...

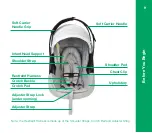
Page 9: ...ps Crotch Belt and Adjuster Strap Before You Begin 9 Soft Carrier Handle Grip Adjuster Strap Lock under opening Infant Head Support Shoulder Strap Restraint Harness Crotch Buckle Crotch Pad Adjuster Strap Soft Carrier Handle Shoulder Pad Chest Clip Upholstery ...

Page 10: ...Orbit Baby and take note of the expiration date For your records enter the serial number and date manufactured on page 13 Orbit Baby will help you keep track of safety updates and product recalls when you register with us 1 Select a seating location in your car An important overview of vehicle seating locations is in the Usage Recommendations section There you can find information about air bags a...

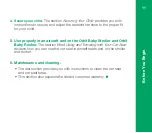
Page 11: ...ction provides you with instructions to clean the car seat and car seat base This section also explains the limited customer warranty 4 Use properly in an aircraft and on the Orbit Baby Stroller and Orbit Baby Rocker The section titled Using and Traveling with Your Car Seat reviews how you can use the car seat in aircraft seats and on the stroller and rocker 5 Maintenance and cleaning 6 ...

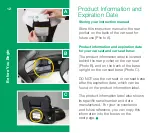
Page 12: ...e car seat base Photo C DO NOT use the car seat or car seat base after the expiration date which can be found on the product information label The product information label also shows its specific serial number and date manufactured For your convenience and future reference you can copy this information into the boxes on the next page Before You Begin 12 A B C Storing your instruction manual Produ...

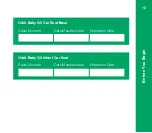
Page 13: ...Before You Begin 13 Orbit Baby G5 Car Seat Base Orbit Baby G5 Infant Car Seat Serial Number Serial Number Date Manufactured Date Manufactured Expiration Date Expiration Date ...

Page 14: ...icle Safety Hotline at 1 888 327 4236 TTY 1 800 424 9153 or go to www NHTSA gov For recall information in Canada call Transport Canada at 1 800 333 0510 or go to www tc gc ca log onto log mail log call log e mail www orbitbabyusa com register Orbit Baby P O Box 699 Ventura CA 93002 1 888 829 8427 register orbitbabyusa com Before You Begin 14 For customers in the United States For recall informatio...

Page 15: ...Before You Begin 15 ...

Page 16: ... Recommendations for Your Child 21 Choosing a Vehicle Seating Location 22 Choosing an Installation Method Overview 26 Installing with the LATCH UAS Anchorage System Need Help Securing Your Car Seat and Car Seat Base 17 21 22 26 26 30 Usage Recommendations 16 ...

Page 17: ...e is required DO NOT let others install or use the car seat or car seat base without reading all the instructions first Keep this instruction manual for future use Store it inside the rear pocket of the car seat If the instruction manual is missing visit www orbitbabyusa com support to download a copy U S customers can email family orbitbabyusa com or call 1 888 829 8427 for a replacement Usage Re...

Page 18: ...e more than 2 5 cm 1 in in any direction If not properly secured your child can be injured in a vehicle even if you are not in a crash Sudden braking and sharp turns can injure your child if the car seat or car seat base are not properly installed or if your child is not properly secured in the car seat Car seat and car seat base must be secured at all times even when not occupied The car seat and...

Page 19: ...e is required When installing the car seat on the car seat base check the level of the car seat base as shown in this manual When installing the car seat without the car seat base check the level of the car seat as shown in this manual Never leave your child unattended in the car seat SUFFOCATION HAZARD The car seat can roll over on soft surfaces and suffocate child NEVER place the car seat on bed...

Page 20: ...odify your car seat or car seat base Only use products and accessories approved by Orbit Baby to ensure the safety of your child Follow the accompanying instruction manuals for these products and ac cessories carefully Contact Orbit Baby for replacement parts Do not allow any re use of the car seat or car seat base after a motor vehicle collision of any kind A collision can cause damage to the chi...

Page 21: ... to the weight and height requirements your child must also meet the shoulder and harness requirements As each child s body is different proper fit is critical to ensure the safety of your child Please refer to the light green Securing Your Child section of this manual for more information about how your child should fit in the car seat For smaller newborns including lower birth weight babies Orbi...

Page 22: ...e the risk of serious injury or death DO NOT place rear facing child seat on front seat with air bag DEATH OR SERIOUS INJURY can occur The back seat is the safest place for children 12 and under Some seating positions in your vehicle may not be safe for this child restraint especially those with side airbags Check your vehicle owner s manual Some vehicles do not have any seating positions where a ...

Page 23: ... with either a lower anchorage system if your vehicle is equipped with the LATCH UAS system LATCH is a term used in the United States and stands for Lower Anchors and Tethers for Children LATCH is also referred to as the lower Universal Anchorage System UAS in Canada In this manual this system will be known as LATCH UAS a vehicle seat belt If your vehicle does not have LATCH UAS you must install t...

Page 24: ... Never secure this car seat rear facing in a seating location with a front air bag Figure A Check your vehicle owner s manual regarding all other air bag locations and compatibility with child restraints Never secure the car seat in a vehicle seating location unless recommended by the vehicle owner s manual Only install the car seat in forward facing vehicle seats Never install car seat in side fa...

Page 25: ...er s manual and the instructions in this manual for installation using LATCH UAS or a vehicle seat belt Installation in this seating location is permitted by the vehicle manufacturer LATCH UAS belt or vehicle seat belt provides a secure installation and remains tightly adjusted around the car seat The vehicle seat contour allows the car seat to be properly leveled once installed If the vehicle sea...

Page 26: ...or Serious Injury Can Occur Never attach two LATCH UAS connectors to one LATCH UAS anchorage in a vehicle unless recommended by the vehicle owner s manual for your vehicle If the LATCH UAS belt does not remain tight or the car seat base can move more than 2 5 cm 1 in in any direction do not use this seating location Your child could be seriously injured in a sharp turn sudden stop or crash Never u...

Page 27: ...ts of the vehicle LATCH UAS system are the two lower anchorages horizontal bars located in the vehicle seat bight between the seat back and the seat cushion These anchorages are normally indicated by the symbol below or the word ISOFIX This car seat can be installed with the car seat base using the LATCH UAS belt and connectors LATCH UAS belt and connectors are included with the car seat base and ...

Page 28: ... Injury Can Occur LATCH UAS connectors must be secured to the vehicle LATCH UAS anchorages only Connections to other vehicle components could result in an unsafe installation of the car seat Lower LATCH UAS anchorages identified by this symbol Seat Bight Usage Recommendations 28 ...

Page 29: ...etween 280mm and 500mm 11 and 20 inches and this use is approved by the vehicle manufacturer In Canada the nominal spacing on all approved UAS anchorages is 280mm To Secure To Remove Slide LATCH UAS connector completely onto the vehicle LATCH UAS anchorage You should hear a CLICK when the connector locks onto the LATCH UAS anchorage Check that the LATCH UAS connector is locked onto the vehicle LAT...

Page 30: ...Notes Usage Recommendations 30 ...

Page 31: ... S contact Orbit Baby at family orbitbabyusa com or 1 888 829 8427 Your vehicle dealer may help you locate a child safety seat inspection station in your area Visit www NHTSA gov and select Child Passenger Safety Call 1 866 SEAT CHECK 1 866 732 8243 or visit www seatcheck org A certified child passenger safety technician in your area Usage Recommendations 31 ...

Page 32: ... Base Overview Installing the Car Seat Base With LATCH UAS Un installing the Car Seat Base With LATCH UAS Installing the Car Seat Base With Vehicle Seat Belt Un installing the Car Seat Base With Vehicle Seat Belt Installing the Car Seat on the Car Seat Base Overview Docking the Car Seat on the Car Seat Base Rotating and Removing the Car Seat from the Car Seat Base 33 34 35 40 41 47 48 49 52 Instal...

Page 33: ...uded LATCH UAS belts or with a vehicle seat belt following instructions in the Installing the Car Seat Base section The car seat can then be locked onto the car seat base following the instructions in the Installing the Car Seat on the Car Seat Base section WARNING Death or Serious Injury Can Occur DO NOT place rear facing child seat on front seat with air bag DEATH OR SERIOUS INJURY can occur The...

Page 34: ...eat base The car seat base can be installed using either LATCH UAS or a vehicle seat belt See Installing the Car Seat Base With LATCH UAS See Installing the Car Seat Base With Vehicle Seat Belt See Installing the Car Seat Base With Vehicle Seat Belt 1 With LATCH UAS 2 With lap shoulder vehicle belt 3 With vehicle lap belt Installing the Car Seat Base and Car Seat 34 ...

Page 35: ... not turn the StrongArm knob counterclockwise until the zero line is visible Remove the LATCH UAS connectors from their storage locations by pressing the red buttons and pulling the connectors upward Photo C For ease of installation extend the LATCH UAS belt to its maximum length by pressing the grey button on the belt adjuster and pulling on the belt Position the LATCH UAS belt through the belt g...

Page 36: ...seat back into the upright position Center the car seat base on the vehicle seat between the vehicle LATCH UAS anchorages Photo F making sure theareas between the vehicle LATCH UAS anchorages and the areas under and behind the car seat base are clear of obstructions CHECK that car seat base is level by looking at the level indicator The window in the level indicator must be green Photo G If red ap...

Page 37: ...ghtens the car seat base into place Install the car seat base in a different vehicle seating position Seek assistance from one of the resources in the Need Help Securing Your Car Seat and Car Seat Base section 1 2 3 A A G H I WARNING Death or Serious Injury Can Occur To prevent ejection the car seat base must be properly reclined The level indicator in the car seat base must be green when installe...

Page 38: ...e LATCH UAS belt loop to remove the slack Photo K from both sides of the lockoff clamp Make sure the car seat base is not loose Turn the StrongArm knob at the front of the car seat base clockwise to activate the StrongArm mechanism Photo L As you re turning the knob the StrongArm mechanism is amplifying your strength and tightening the car seat base into the vehicle Each installation varies slight...

Page 39: ...g to make sure that the car seat base installation is secure a CHECK that the car seat base installation is not loose It should not move by more than 2 5 cm 1 in in any direction b CHECK that the car seat base is level by making sure that window in the level indicator is green Photo N If the car seat base is loose or if the level indicator window shows red Photo O remove and re install the car sea...

Page 40: ...ull it off the vehicle LATCH UAS anchorage Photo B Store the LATCH UAS connectors as shown Photo C Using both hands to support the weight of the base remove it carefully from the vehicle To un install the car seat base and remove it from your vehicle 1 2 3 Un installing the Car Seat Base With LATCH UAS A A A B C Installing the Car Seat Base and Car Seat 40 ...

Page 41: ...b counterclockwise until the zero line is visible If the LATCH UAS belt is routed through the belt guides remove from belt guides Note The belt is permanently routed behind the lockoff clamp Store the LATCH UAS connectors in their storage location when they are not in use Photo C Each connec tor will click securely into its own storage slot If the vehicle seat back is adjustable 1 2 3 4 Before you...

Page 42: ...tion a rolled towel under the car seat base Photo G making sure the front of the car seat base contacts the vehicle seat The towel should be compressed as the StrongArm tightens the car seat base into place b Install the car seat base in a different vehicle seating position c Seek assistance from one of the resources in the Need Help Securing Your Car Seat and Car Seat Base section 5 6 Installing ...

Page 43: ... lap shoulder vehicle belt 7 8 9 10 WARNING Death or Serious Injury Can Occur To prevent ejection the car seat base must be properly reclined The window indicator in the car seat base must be green when installed If using a lap shoulder vehicle belt to secure the car seat base continue to Step 7 If using a vehicle lap belt skip to Step 14 If using a lap shoulder vehicle belt A A G H I Installing t...

Page 44: ...mly upon both belts by flipping the top closure down into place Photo J Continue on to Step 21 The vehicle lap belt must be secured in place by the lock off clamp To secure the belt in place Open the lock off clamp Thread the vehicle lap belt through the belt guides and lock off clamp Photo K Buckle the vehicle lap belt Make sure the belt is not twisted and lies flat across the belt path and acros...

Page 45: ... N 19 20 21 As you re turning the knob the StrongArm mechanism is amplifying your strength and tightening the car seat base into the vehicle Each installation varies slightly but typically the knob can turn 10 full revolutions After 10 full revolutions check the car seat base for a tight installation You know that you have reached the optimal tightness setting when you tug on the belt guides Photo...

Page 46: ...ed Photo Q remove and re install the car seat base beginning at Step 2 Lap shoulder vehicle belt systems in some vehicles have an Auto Locking Mode which locks the shoulder portion of the belt and keeps it from becoming a hazard to older children or siblings To engage this mode which we recommend pull the shoulder portion of the belt out completely from the vehicle then let go You should hear a so...

Page 47: ...ehicle seat belt and guide it back through the belt guides Photo C Using both hands to support the weight of the car seat base remove it carefully from the vehicle 1 2 3 Un installing the Car Seat Base A With Vehicle Seat Belt To un install the car seat base and remove it from your vehicle A A B C Installing the Car Seat Base and Car Seat 47 ...

Page 48: ...eat Base WARNING Death or Serious Injury Can Occur Never operate your vehicle unless the car seat is LOCKED into the rear facing position Check both rotation indicators on the car seat base If either rotation indicator is red re secure the car seat to properly lock into the car seat base When a release lever on the car seat is pulled the car seat is not secured properly to the car seat base Only u...

Page 49: ...on the Car Seat Base Ensure that your child s fingers and hands are clear of release levers soft carrie handle and other moving parts When installing the car seat make sure the hands of other vehicle occupants are clear of the SmartHub area Securing the car seat to the car seat base requires first lowering the car seat to snap into the SmartHub then rotating the car seat to lock into the rear faci...

Page 50: ... position The car seat will only lock when rotated into the rear facing position Photo D Note that it will only lock when the release levers are not pulled 3 WARNING Death or Serious Injury Can Occur The car seat must always be locked in the car seat base in the rear facing position when the vehicle is in motion For increased comfort and ease of use the car seat can be docked onto the car seat bas...

Page 51: ...ontact Orbit Baby RECHECK that the car seat is locked into the rear facing position by pushing down firmly onboth sides of the car seat and pull ing in several directions Photo G to be certain it is locked It should not rotate out of the rear facing position If it does do not use the car seat and contact Orbit Baby 4 5 NOTE A small amount of rotational movement is normal but the car seat should no...

Page 52: ...e still squeezing the release lever s lift the car seat out of the car seat base Photo C and remove it carefully from the vehicle 1 2 3 WARNING Death or Serious Injury Can Occur FALL HAZARD Grasp the car seat by BOTH carry handles when removing it from the car seat base PINCH HAZARD Clear your child s fingers and hands from the carry handle area before removing the car seat A A A B C Installing th...

Page 53: ...Notes Installing the Car Seat Base and Car Seat 53 ...

Page 54: ...the instructions and refer to the criteria set forth in this section for more information about how your child should fit in the car seat For smaller newborns including lower birth weight babies Orbit Baby s Lower Birth Weight Fit Kit may improve the fit for such children The Lower Birth Weight Fit Kit is available free of charge Please contact family orbitbabyusa com for more information Sizing t...

Page 55: ...ing the Car Seat on the Car Seat Base It is important to check the position of the shoulder straps periodically The straps must be properly positioned on your child s shoulders and thighs Photo A Shoulder straps must be below the top of the child s shoulders Photo B and Figure C The shoulder straps must be below the top of the child s shoulders The restraint harness must be snugly adjusted to your...

Page 56: ...ap slots are below the child s shoulders Photo B The shoulder straps can be adjusted using the adjuster strap lock It is located under the upholstery opening at the front of the car seat Shoulder Straps MUST be below the top of your child s shoulders Figure C Shoulder straps positioned in slots above the shoulders will not hold your child securely in a sudden stop or crash Securing Your Child 56 ...

Page 57: ...nt harness by pressing the adjuster strap lock and pulling on the shoulder straps Photo D Open the rear panel of the car seat and pull the panel up Pull on the restraint harness to pull the two splitter plates up along with the two shoulder straps Photo F Unhook each shoulder strap loop from its metal splitter plate Photo G From the front of the car seat pull the shoulder straps out from their slo...

Page 58: ...entirely onto its corresponding splitter plate Photo K CHECK that the straps are secure by pulling on the shoulder straps from the front CHECK that the upholstery around the shoulder strap slots do not interfere with the free movement of the restraint harness Close and secure the rear panel of the car seat and secure all upholstery 5 6 7 8 9 strap through the correct upholstery slots and correspon...

Page 59: ... stop or crash PINCH HAZARD When buckling make sure all fingers and hands are free from chest clip and buckle tongues STRANGULATION HAZARD Never leave child in car seat when restraint harness is loose or undone Securing Your Child with the Restraint Harness The shoulder straps must be below the top of the child s shoulders The restraint harness must be snugly adjusted to your child Securing Your C...

Page 60: ...child into the car seat making sure both the child s back and bottom are fully supported by the seating surfaces Position the restraint harness around the child s shoulders and thighs The crotch pad should be between the child and the crotch buckle CHECK that there are no twists in the restraint harness straps Photo C Insert both buckle tongues into the crotch buckle Photo D You should hear and fe...

Page 61: ... the lap section of the restraint harness Photo E CLICK the chest clip pieces together and position the chest clip at armpit level as shown Photo F Slowly pull the adjuster strap to snugly adjust the restraint harness onto the child Photo G CHECK again that the restraint harness is not twisted Photo C CHECK that the restraint harness is snug on shoulder and thighs Do not allow more than one finger...

Page 62: ...tively straight line without sagging It does not press on the child s flesh or push the child s body into an unnatural position Loosen the restraint harness by pressing and holding the adjuster strap lock while pulling out on the shoulder straps Photo I Open the chest clip by squeezing the tabs Photo J Unbuckle the crotch buckle by pressing the red button Photo K 1 2 3 I J H Securing Your Child 62...

Page 63: ...K Children have STRANGLED in loose or partially harness straps Fully restrain the child even when carrider is used outside the vehicle WARNING Securing Your Child 63 ...

Page 64: ...ant head support from your car seat once your child s head no longer fits comfortably in the rolled padding Pull apart the hook and loop fasteners at the outer ends of the two slots of the infant head support Photo B 1 WARNING Death or Serious Injury Can Occur To prevent ejection shoulder straps must be routed through the shoulder strap slots in both the upholstery and infant head support B C A Se...

Page 65: ...ound the shoulder straps by fastening the hook and loop fasteners Photo C CHECK that the infant head support does not interfere with the movement of the shoulder straps CHECK that the infant head support does not interfere with a snug fit of the restraint harness against your child s shoulders once secured and snugly adjusted 1 2 3 4 Securing Your Child 65 ...

Page 66: ...r Handle Using the Sunshade Terms You Need to Know Stroller Using the Car Seat on the Stroller Terms You Need to Know Rocker Using the Car Seat on the Rocker Using the Car Seat on an Aircraft 67 69 71 72 74 75 76 Using and Traveling with Your Infant Car Seat 66 ...

Page 67: ... parts VEHICLE COLLISION HAZARD Always lower the soft carrier handle fully when the car seat is in your vehicle otherwise driver visibility may be impaired ALWAYS secure your child with the restraint harness When using the soft carrier handle secure the tab through the red D ring before lift ing to prevent tipping Never try to lift the car seat by only one side of the soft carrier handle A Using a...

Page 68: ...ft carrier handle grip Photo C Check to ensure the soft carrier handle is locked in place by trying to move the soft carrier handle grip To carry the car seat position the soft carrier handle grip in the crook of your arm to keep the infant s weight close to your body Photo A Undo the hook and loop fasteners and lower the soft carrier handle to be flush with the top of the upholstery when not in u...

Page 69: ...r seat by grasping the sunshade The sunshade could detach and the seat could fall injuring your child STRANGULATION HAZARD To avoid choking or entanglement stow the sun shade extension back into its pocket when not in use VEHICLE COLLISION HAZARD Always lower the sunshade fully when the car seat is in your vehicle otherwise driver visibility may be impaired Using and Traveling with Your Infant Car...

Page 70: ...hoto B To use the Paparazzi Shield sunshade extension pull it out of the sunshade pocket Photo C Secure the sunshade extension by wrapping the elastic over the foot end of the car seat Photo D Stow the sunshade and sunshade extension when not in use extension into its pocket then push the of the upholstery 1 2 3 1 2 B C A Using and Traveling with Your Infant Car Seat 70 ...

Page 71: ...Terms You Need To Know Stroller sold separately Orbit Baby Infant Car Seat Orbit Baby Stroller Stroller SmartHubTM Parking Brake Using and Traveling with Your Infant Car Seat 71 ...

Page 72: ...p hands and fingers clear of moving parts the release levers and the SmartHub Always fully support the car seat by firmly grasping both carry handles when docking and undocking from the stroller Always make sure the car seat is securely locked into the SmartHub of the stroller Only rotate the car seat when the stroller is stationary and the parking brakes are locked Always make sure that the car s...

Page 73: ...il you hear and feel a CLICK Photo B Rotate the car seat to a locking position CHECK the security of the docking by pull ing up on the car seat To rotate the car seat grasp the carry han dle pull the release lever and rotate to the next locking position Photo C Lock the parking brakes on the stroller Grasp the car seat firmly by both carry handles Squeeze either release lever upwards Lift the car ...

Page 74: ...at with the rocker Refer to the instruction manual that accompanied your Orbit Baby Rocker for complete instructions on using and maintaining your rocker PINCH HAZARD Keep hands and fingers especially of children clear of moving parts and the SmartHub Orbit Baby Infant Car Seat Rocker SmartHubTM Orbit Baby Rocker Using and Traveling with Your Infant Car Seat 74 ...

Page 75: ...into the SmartHub until you hear and feel a CLICK Photo B Rotate the car seat to a locking position CHECK the security of the docking by pulling up on the car seat To rotate the car seat grasp the carry handle pull the release lever and rotate to the next locking position Photo C Lock the anti rock arms on the rocker Grasp the car seat firmly by both carry handles Squeeze either release lever upwa...

Page 76: ...use The Orbit Baby Infant Car Seat is certified for use in aircraft when installed on its own WITHOUT the car seat base It cannot be used with the car seat base To secure the car seat rear facing in an aircraft seat Make sure that the aircraft seat belt can be tightly secured around the car seat If the aircraft lap belt is too short ask your flight attendant for a belt extender Do not use the car ...

Page 77: ...Notes Using and Traveling with Your Infant Car Seat 77 ...

Page 78: ...r Seat Removing the Upholstery and Sunshade Cleaning the Upholstery and Sunshade Re installing the Upholstery and Sunshade Other Cleaning Instructions Limited Customer Warranty United States 79 80 81 84 86 78 Maintaining Your Car Seat ...

Page 79: ... fasteners on each side and at the top of the center panel Photo B Pass the shoulder straps under neath the upholstery through the center panel Remove the crotch pad Pull the crotch buckle through the slot in the upholstery Photo C This completely frees the upholstery from the car seat Unzip the sunshade from around the sunshade spar to free the sunshade from the car seat The upholstery can be eas...

Page 80: ...ed DO NOT USE BLEACH Lay the upholstery flat to dry Do not machine dry Machine drying may cause excessive shrinkage and result in the upholstery not fit ting the car seat properly Re install the upholstery once cleaned and completely dried DO NOT use the car seat without the upholstery The sunshade may be spot cleaned with Orbit Baby s Spot Treatment or a damp sponge and mild soap Do not machine w...

Page 81: ... panel of the upholstery CHECK that the shoulder straps are threaded thought slots in the upholstery and seat shell that are at the same height Photo A Thread the lap portions of the straps through the slots at the sides of the bottom of the center panel Photo B Pull the crotch buckle through the outer slot in the upholstery Photo C If using the foam insert from the Orbit Baby Lower Birth Weight F...

Page 82: ...cor ners into place CHECK that the shoulder straps are not twisted CHECK that the upholstery around the shoulder strap slots does not interfere with the free movement of the restraint harness Attach the end of the adjuster strap onto the upholstery Photo F Attach the end of the sunshade to the back edge of the upholstery slot in the upholstery 6 7 8 9 10 11 E F D 82 Maintaining Your Car Seat ...

Page 83: ...Notes 83 Maintaining Your Car Seat ...

Page 84: ...after spot cleaning contact Orbit Baby for further instructions Do not disassemble the restraint harness Adjuster lock and strap Periodically check the adjuster lock to be sure it is clean and free of food coins dirt and other objects If debris is present it must be removed to prevent interference with the adjuster mechanism Brush away loose debris and sponge clean using warm water and mild soap T...

Page 85: ...p the car seat base s SmartHub and rotational indicators clean and free of foreign material Do not allow any liquids or particulate matter such as sand or soil to enter any of these areas be cleaned with a damp cloth or removed and thoroughly rinsed with warm water Towel dry Test the crotch buckle by fastening and unfastening until a positive click is heard when inserting the buckle tongues If a c...

Page 86: ...ized service representatives or alteration of the product 2 defects resulting from use with covers inserts accessories tightening devices or other components not supplied by or expressly approved in writing by Orbit Baby 3 defects resulting from misuse including any use not in accordance with the product instructions abuse accident neglect improper maintenance or handling or normal wear and tear 4...

Page 87: ...w state law applies This limited warranty gives you specific legal rights and you may have other rights which vary from State to State What you must do to get service under this limited warranty To make a claim under this limited warranty you must first contact Orbit Baby warranty extends to repaired and replacement products and components only through the end of the original limited warranty peri...

Page 88: ...ormation labels located in the rear pocket on the car seat and on the back of the car seat base In the United States contact customer service U S Pat No s 7 740 313 7 887 129 7 891 732 8 182 033 8 256 841 D545 074 and D594 678 The system including the seat and base are covered by U S Patent No 7 338 122 7 559 606 and 8 235 465 Other U S Patents Pending European Patent Application No 05751808 6 Orb...

Reviews: