background image

EN

1

CONTENTS

Introduction .............................................................. 2

Product Overview .................................................... 3

Front View .............................................................. 3

Back View .............................................................. 4

Table Stand and Wall Mount .................................. 5

Remote Sensor (RTGR328N) ................................ 7

Getting Started ......................................................... 8

Batteries ................................................................. 8

Change Settings .................................................... 9

Remote Sensor ......................................................... 9

Set Up Thermo / Hygro Sensor (RTGR328N) ....... 9

Sensor Data Transmission .................................. 10

Search for Sensor ................................................ 11

Clock and Calendar ............................................... 11

Radio-Controlled Clock ........................................ 11

Turn Radio-Controlled Clock ON / OFF ............... 12

Set Clock ............................................................. 12

Switch Clock Display ........................................... 12

Alarms ..................................................................... 13

Set Daily Alarm .................................................... 13

Set Pre-Alarm ...................................................... 13

Activate Alarm ...................................................... 14

Snooze ................................................................ 14

Barometer ............................................................... 14

View Barometer Area ........................................... 14

Select Measurement Unit .................................... 14

View Barometer History ....................................... 14

Set Altitude ........................................................... 14

Weather Forecast ................................................... 15

Weather Forecast Icons ....................................... 15

Temperature and Humidity .................................... 15

View Temperature and Humidity Area ................. 16

Select Measurement Unit .................................... 16

Select Sensor Channel ........................................ 16

Minimum / Maximum Records ............................. 16

Temp, Humidity & Pressure Trend ....................... 16

Comfort Zone ....................................................... 17

Backlight ................................................................. 17

Reset System ......................................................... 17

Safety and Care ...................................................... 17

Warnings ................................................................. 17

Troubleshooting ..................................................... 18

Specifications ......................................................... 18

About Oregon Scientific ........................................ 20

EU-Declaration of Conformity ............................... 20

Wireless Weather Station

Model: BAR816HG

USER MANUAL

Summary of Contents for BAR816HG

Page 1: ...t Daily Alarm 13 Set Pre Alarm 13 Activate Alarm 14 Snooze 14 Barometer 14 View Barometer Area 14 Select Measurement Unit 14 View Barometer History 14 Set Altitude 14 Weather Forecast 15 Weather Forec...

Page 2: ...ool you can use from the convenience of your home In this box you will find Main unit Remote sensor RTGR328N Batteries The main unit is compatible with the following sensors THGR228N THGR328N THR228N...

Page 3: ...5 Barometer Area Barometric pressure readings and trend lines 6 Clock Alarm Calendar Area Radio controlled clock alarms calendar 7 MODE Switch areas change settings display View alarm status set alar...

Page 4: ...EN 4 1 2 3 4 5 6 7 BACK VIEW 1 Wall mount 2 Ventilation holes 3 Table stand 4 C F switch 5 RESET button 6 mb inHg switch 7 Battery compartment cover off...

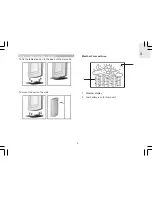
Page 5: ...EN 5 TABLE STAND AND WALL MOUNT To fix the table stand on to the base of the main unit To mount the unit on the wall Weather Forecast Area 1 Weather display 2 Low battery icon for main unit 1 2...

Page 6: ...MIN humidity 9 Humidity 10 Comfort levels Barometer Area 1 Barometric pressure trend 2 Barometric pressure reading 3 Barometric pressure history e g 1 means barometric pressure value one hour ago 2 m...

Page 7: ...7 1 2 3 1 4 5 6 7 2 3 REMOTE SENSOR RTGR328N 1 LCD display 2 LED status indicator 3 Ventilation duct 1 Signal reception 2 Channel number 3 Low battery icon 4 Time 5 Temp C or F 6 Humidity 7 Temp Humid...

Page 8: ...supplied with this product Main unit 3 x UM 3 AA 1 5V Remote unit 2 x UM 3 AA 1 5V Insert batteries before first use matching the polarity as shown in the battery compartment For best results install...

Page 9: ...Hygro Sensor The main unit can collect data from up to 5 Thermo Hygro Sensors The main unit is compatible with the following sensors THGR228N THGR328N THR228N THR328N THWR288 Additional sensors are s...

Page 10: ...metallic or electronic objects Position the sensor close to the main unit during cold winter months as below freezing temperatures may affect battery performance and signal transmission The transmiss...

Page 11: ...signals are collected by the remote sensor RTGR328N whenever it is within 1500 km 932 miles of a signal NOTE Initial reception takes 2 10 minutes and is initiated when you first set up the unit and w...

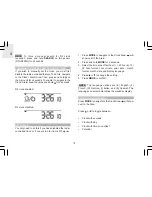
Page 12: ...isabled the radio controlled clock or if you are too far from a RF signal NOTE 1 Press MODE to navigate to the Clock Area will show next to the Area 2 Press and hold MODE for 2 seconds 3 Select the ti...

Page 13: ...minutes before the Daily Alarm It will sound whenever the recorded temperature from Channel 1 Sensor falls to 2 C 35 6 F or below For example if you set the alarm to 7 00 AM and the Pre Alarm to 45 m...

Page 14: ...barometric pressure history measurements are recorded by the main indoor unit VIEW BAROMETER AREA Press MODE to navigate to the Barometer Area SELECT MEASUREMENT UNIT Slide the mb inHg switch in the...

Page 15: ...When the Channel 1 sensor records a temperature of 2 C 35 6 F or lower the RAINY icon becomes SNOWY TEMPERATURE AND HUMIDITY The weather station can display the following information from any of the...

Page 16: ...etween sensors press and hold CH for 2 seconds Each sensor s data will be displayed for 3 seconds To end auto scan press CH or MEM with the Temperature Humidity Area selected If you select a sensor th...

Page 17: ...cloth and alcoholfree mild detergent Avoid dropping the product or placing it in a high traffic location WARNINGS This product is designed to give you years of service if handled properly Oregon Scie...

Page 18: ...tdoor Range 20 C to 60 C 4 F to 140 F Resolution 0 1 C 0 2 F Memory Min Max Relative Humidity Range 25 to 95 Resolution 1 Memory Min max TROUBLESHOOTING PROBLEM SYMPTOM REMEDY Barometer Strange readin...

Page 19: ...minute Channel No 1 2 3 4 or 5 Unit C or F Radio Controlled Clock Synchronization Auto or disabled Clock display HH MM SS Hour format 12hrAM PM MSF format 24hr DCF format Calendar DD MM or MM DD Day...

Page 20: ...need on our website however if you re in the US and would like to contact the Oregon Scientific Customer Care department directly please visit www2 oregonscientific com service default asp OR Call 1 8...

Reviews: