
EN
INtroductIoN
Thank you for selecting the Oregon Scientific™ Projection In/Out Thermo
Clock. This device bundles precise time keeping, alarm, and temperature
monitoring features into a single tool you can use from the convenience
of your home. Keep this manual handy as you use your new product.
It contains practical step-by-step instructions, as well as technical
specifications and warnings you should know.
Product INtroductIoN
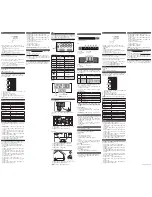
Lcd display
Weather
Forecast
Indicator
Indoor Temperature
Display
Outdoor Temperature
Display
Time Display
Lcd display
Symbol
Description
Function
Radio signal reception to
outdoor unit (RTHN129)
Indicates the strength of the
radio reception
Low battery
Indicates low battery power of
outdoor unit (RTHN129)
Alarm 1 on
Alarm 2 on
Appears when an alarm is
activated
RF antenna icon
Appears when RF clock data
received
OUT 12345
Outdoor sensor reading
Shows outdoor temperature of
selected sensor.
IN
Indoor sensor reading
Shows indoor temperature
ZONE
Time zone
Indicates selected time zone
Sunny
Weather forecast indicator
Rainy
Weather forecast indicator
Snowy
Weather forecast indicator
Projection
Time Display Outdoor Temperature Display
(channel 1 only)
NOTE
Focus length (1.5m – 2m)
GEttING startEd
connecting the main unit to power supply
Connect the power cable to the Micro USB jack and plug the power
adaptor into a suitable power outlet.
Inserting batteries into remote thermo sensor
• Slide the battery compartment cover open and insert 2 “AAA” batteries,
matching the polarity as shown, then replace the cover.
• Press
rEsEt
inside the sensor after each battery change.
Placement of the main unit
Getting started - Line Drawing
Unpacking the product
Placement of the main unit
Connecting the main unit to power
Inserting batteries into remote thermo sensor
Max 1.5m
Max 50m
• Place the device as far as possible from computers and microwaves to
avoid interference with reception.
• Only use this device indoors in a dry location.
• Leave space around the device for ventilation purposes, so that the
warm air can escape freely.
• To ensure for good sound quality, do not cover the speaker.
Placement of the remote thermo sensor (rtHN129)
Getting started - Line Drawing
Unpacking the product
Placement of the main unit
Connecting the main unit to power
Inserting batteries into remote thermo sensor
Max 1.5m
Max 50m
• Ideal placements for the sensor would be in any location outside the
home at a height of not more than 5 ft (1.5 m), shielded from direct
sunlight or wet conditions.
NOTE
Depending on conditions, the maximum radio signal reach is 50 m.
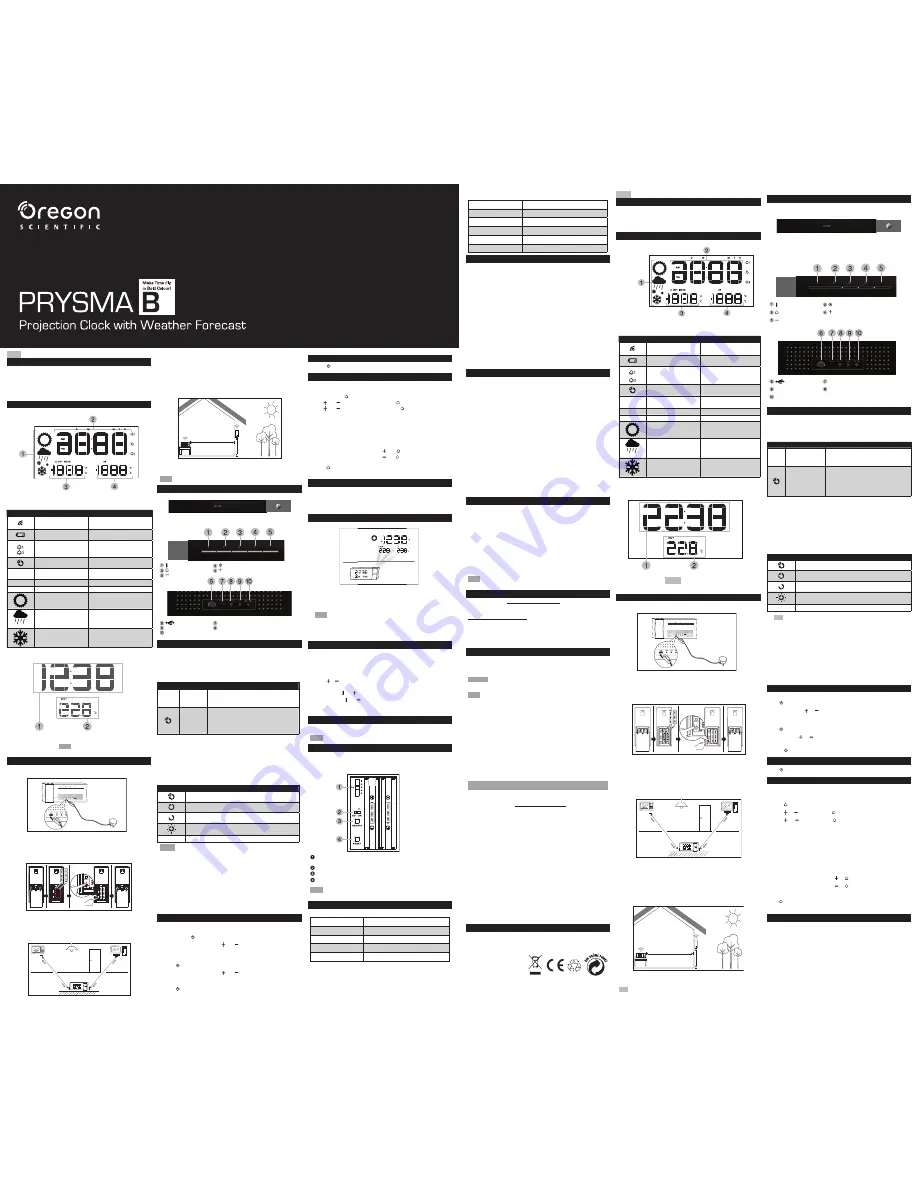
KEy dEscrIPtIoNs
top
sNooZE
(Backlight / Projection) button
Back
Temperature button
Clock button
Set/Alarm button
button
button
Micro USB jack
reset
button
°c / °F
button
Light
button
Flip 180°
button
radIo rEcEPtIoN
This product is designed to automatically synchronize its calendar and
clock when brought within the range of the radio signal. When the unit
is receiving the signal, the radio reception symbol (RCC) starts to blink.
Depending on the strength of the signal, the connection process takes
2 to 10 minutes. If the signal is weak, it could take up to 24 hours to
receive a valid signal.
Symbol Description
Function
RF antenna
icon off
The icon is turned off to indicate that the
main unit has not received RF clock data for
at least 1 hour and 15 minutes.
RF antenna
icon on
The icon is turned on when the main unit has
received RF clock data.The icon will turn off if
no data is received for 1 hour and 15 minutes,
or the clock time is adjusted manually.
The main unit is able to receive RF clock data from remote sensor in DCF
(EU) MSF (UK) and WWVB (US) format:
• DCF (EU) and MSF (UK): The time zone settings within the range of -23
to 23 reference to time zone 0 of the DCF/MSF broadcasting signal.
• WWVB (US): The time zone settings 0/1/2/3 reference to time zones
P/M/C/E of the WWVB broadcasting signal.
clock signal reception indicator:
Symbol
Description
Strong signal
Weak signal
No signal
Receiving signal
Radio reception disabled
NOTE
Reception can be affected by a number of factors. For best
reception, place the device away from metal objects and electrical
appliances. Other causes of signal interference include electrical
transmission towers, steel reinforced construction and metal siding.
Reception is ideal when the unit is placed near a window.
Enabling/disabling radio reception
sEarcH
button (located inside the outdoor receiver)
• Press
sEarcH
to enable the RCC search function. The LED will flash
twice to indicate that search function is enabled.
• Press and hold
sEarcH
to disable the RCC search function. The LED will
flash three times to indicate that search function is disabled.
sEttING tImE maNuaLLy
• Press and hold
sEarcH
(button is located inside the outdoor
receiver) to disable signal reception.
• Press and hold . The screen displays
ZoNE
and the number flashes.
• Press once or press and hold and to adjust the setting. For EU/
UK, the time-zone offset sets the clock up to +/- 23 hours from the
received clock signal time. For US, the time-zone setting is
0
(P),
1
(M),
2
(C),
3
(E).
• Press to confirm.
• Press once or press and hold and to adjust the setting for 12/24h
hour format, hour, minute, year, calendar format (month-day/day-
month), month, date and temperature unit (°C/°F).
• Press again to confirm.
dIsPLayING tImE aNd datE
• Press to toggle between time and date display.
aLarm FuNctIoN
You can set two different alarm times with this clock.
setting/adjusting alarm time
• Press and hold .
• Use and to adjust the hour and press to confirm.
• Use and to adjust the minute and press to confirm.
• The alarm time is displayed. The alarm sound will stop after 2 minutes.
snooze function
• To use the
sNooZE
function, press the
sNooZE
(light) button on
top of the clock when the alarm sounds. The alarm will stop and start
again after 8 minutes. You can repeat this function three times.
displaying the alarm time
By default the clock will show the current time and date.
• To display Alarm 1 for 5 sec, press and .
• To display Alarm 2 for 5 sec, press and .
activating/deactivating the alarm
• Press
to activate/deactivate alarm in sequence:
Alarm1 > Alarm 2 > Both ON > Both OFF.
BacKLIGHt
• Press the Light button to toggle the desired backlight display
brightness level.
• To activate the projection and the brightest backlight display for 5
seconds, press the Snooze (light) button.
ProjEctIoN
The projector displays the time on your ceiling for easy viewing in a
darkened room.
• To activate the backlight and projection function for 5 seconds, press
the
sNooZE
(light) button.
NOTE
This function only works when the projection function is turned OFF.
• To turn projection ON and OFF press and hold
Light
to toggle
between options. (The default setting is ON)
• To flip the projection content by 180°, press
Flip 180
°.
tEmPEraturE FuNctIoN
The temperature is measured in °C or °F.
• Press °C / °F to toggle between Centigrade (°C) and Fahrenheit (°F).
The current indoor temperature is always displayed in the lower right
corner of the LCD display. To receive outdoor temperature information, you
can connect up to 5 remote sensors to the main unit:
• Press & to toggle between channels (1 to 5) and display the
outdoor temperature of different sensors.
• Press and hold and for 2 seconds to start searching for remote sensors.
• Press and hold and for 2 seconds to enable auto-scan function for
the 5 channels. Information from Channel 1,2,3,4,5 will automatically
be displayed in sequence.
rEsEttING tHE cLocK
Whenever the clock is not behaving as expected, press Reset with the
point of a blunt object such as a stylus or ball point pen.
NOTE
This will return all settings to default values.
rEmotE sENsor
The main unit can collect temperature data from up to 5 sensors, and
should be placed within 98 ft (50 m) of the main unit. The amber LED
Indicator on the front of the sensor will blink to indicate that the unit is
transmitting a signal.
s
cH
Channel 1-5. If more than one sensor is being used, make sure
each one has a different channel number.
Eu/uK/us
: Select your region for RCC.
sEarcH
Press to search for RCC function.
rEsEt
Press if the sensor is not working correctly or if the batteries
have been replaced.
NOTE
Before placing the remote sensor outdoors, check that the battery
compartment door is closed properly,
sPEcIFIcatIoNs
maIN uNIt
L x W x H
22 x 200 x 80 mm
Weight
224 g without batteries
Operating range
-5.0 °C to +50.0 °C (23.0 °F to 122.0 °F)
Temperature resolution
0.1 °C (0.2 °F)
Temperature unit
°C/°F
BAA223PNH
rEmotE tHErmo sENsor (rtHN129)
L x W x H
125 x 50 x 19.5 mm
Weight
59 g without batteries
Operating range
-20 ºC to +60 ºC (-4 ºF to 140 ºF)
Temperature resolution
0.1 ºC (0.2 ºF)
No. of channel selectable 5
RF Transmission range
50 m
saFEty
Please observe the following safety precautions when setting up and
using this product.
• The manufacturer assumes no liability for possible damages that may
have been caused by incorrect usage or mishandling of the device.
• Prior to using the device for the first time, check to make sure that
your household power supply corresponds to the voltage listed on
the device.
• LCD panel - The LCD panel is made of glass and may break if the unit
is dropped or impacted.
• Heat sources - Keep the product away from heat sources such as
radiators, stoves, heaters and other heat-generating products.
• Water and moisture - Do not use the unit in or near water or in high
moisture areas such as bathrooms.
• Power cord - If the power cord is damaged, it must be replaced by
the manufacturer, its service agent or similarly qualified persons in
order to avoid a hazard.
• Repair - Do not attempt to repair or modify the unit yourself.
Contact the retailer or a qualified repairman if the product requires
servicing. Only use replacement parts that are recommended by the
manufacturer.
• Danger of suffocation! Keep all packaging material away from children.
carE
This product is designed to give you years of service if handled properly.
Oregon Scientific will not be responsible for any deviations in the usage of
the device from those specified in the user instructions or any unapproved
alterations or repairs of the product. Observe the following guidelines:
• Attention! Before cleaning disconnect the power plug from the socket.
• Cleaning - Use a damp cloth to wipe the unit. Do not use liquid
cleaning agents, benzene, thinner or aerosols.
• Projector lens - A dirty lens can result in a blurred projection. From time
to time, check to see if dust or other dirt has collected on the lens. Dust:
blow the dust from the lens with a brush/blower made for cameras
(available at an authorised dealer). After that, brush the lens lightly with
the brush and then blow dust off the lens again.
Fingerprints: If the lens does not become clean by using the brush/
blower, use a cotton swab, dipped in a special cleaning solution and
remove the dirt beginning from the middle and proceeding to the outside.
• Do not scratch the LCD display with hard objects.
• Never immerse the product in water. This can cause electrical shock
and damage the product.
• Do not subject the main unit to extreme force, shock, or fluctuations in
temperature or humidity.
• Do not tamper with the internal components.
• Ventilation - The vents and other openings are designed to keep the
unit cool and should not be blocked or covered. Preventing ventilation
can lead to overheating and may damage the unit.
advIcE rEGardING BattErIEs
• Do not expose batteries to extreme heat like direct sunlight, fire, etc.
• Batteries do not belong in household waste! Expired batteries must
be disposed of in an environmentally friendly way and according to
the applicable legal regulations.
• Batteries are very dangerous if swallowed. Please keep expired
batteries away from children at all times. If a battery is swallowed,
seek medical attention immediately.
• Batteries must not be recharged or activated with another means,
dismantled, thrown into fire or short-circuited.
• Do not mix new and old batteries or batteries of different types.
• Do not use rechargeable batteries with this product.
• Remove the batteries if storing this product for a long period of time.
• The batteries must be removed prior to disposing of the device.
NOTE
The technical specification of this product and contents of this user
guide are subject to change without notice. Images not drawn to scale.
aBout orEGoN scIENtIFIc
Visit our website www.oregonscientific.com to learn more about
Oregon Scientific products.
For any enquiry, please contact our Customer Services at
info@oregonscientific.com.
Oregon Scientific Global Distribution Limited reserves the right to interpret
and construe any contents, terms and provisions in this user manual and
to amend it, at its sole discretion, at any time without prior notice. To the
extent that there is any inconsistency between the English version and
any other language versions, the English version shall prevail.
Fcc statEmENt
This device complies with Part 15 of the FCC Rules. Operation is subject
to the following two conditions: (1) This device may not cause harmful
interference, and (2) This device must accept any interference received,
including interference that may cause undesired operation.
WARNING
Changes or modifications not expressly approved by the
party responsible for compliance could void the user’s authority to
operate the equipment.
NOTE
This equipment has been tested and found to comply with the
limits for a Class B digital device, pursuant to Part 15 of the FCC Rules.
These limits are designed to provide reasonable protection against
harmful interference in a residential installation.
This equipment generates, uses and can radiate radio frequency energy
and, if not installed and used in accordance with the instructions, may
cause harmful interference to radio communications. However, there is
no guarantee that interference will not occur in a particular installation.
If this equipment does cause harmful interference to radio or television
reception, which can be determined by turning the equipment off and on,
the user is encouraged to try to correct the nterference by one or more of
the following measures:
Reorient or relocate the receiving antenna.
Increase the separation between the equipment and receiver.
Connect the equipment into an outlet on a circuit different from that to which
the receiver is connected.
Consult the dealer or an experienced radio / TV technician for help.
dEcLaratIoN oF coNFormIty
The following information is not to be used as contact for support or sales.
Please call our customer service number
(listed on our website at www.oregonscientific.com),
or on the warranty card for this product for all inquiries instead.
We
Name:
Oregon Scientific, Inc.
Address:
10778 SW Manhasset Dr.
UNIT B-2 Tualatin,
OR 97062 USA
Telephone No.:
1-800-853-8883
declare that the product
Product No.:
BAA223PNH
Product Name:
Projection Clock
Manufacturer:
IDT Technology Limited
Address:
Block C, 9/F, Kaiser Estate,
Phase 1, 41 Man Yue St.,
Hung Hom, Kowloon, Hong Kong
is in conformity with Part 15 of the FCC Rules. Operation is subject
to the following two conditions: 1) This device may not cause harmful
interference. 2) This device must accept any interference received,
including interference that may cause undesired operation.
Eu-dEcLaratIoN oF coNFormIty
Hereby, Oregon Scientific, declares that this Projection Clock
(Model: BAA223PNH) is in compliance with EMC directive 1999/5/
EC. A copy of the signed and dated Declaration of Conformity is
available on request via our Oregon Scientific Customer Service.
sc
产品描述
谢谢阁下选购Oregon Scientific
TM
PRYSMA B 稜光溫度投影時計。
此装置集精确时计、闹钟及温度监察功能于一身,十分适合于家居中
使用。使用新产品时,请将此手册存放于当眼的地方。手册中包含各
步骤的使用说明,以及你需要留意的技术规格及警告。
产品简介
LCD 显示屏
天气预报
显示
户内温度显示
户外温度显示
时间显示
LCD显示屏符号
符号
描述
功能
户外装置 (RTHN129)的
无线电讯号接收
指示无线电讯号接收的强度
电量不足
表示户外装置 (RTHN129)
的电量不足
闹钟 1 已开启
闹钟2 已开启
当闹钟启动时,
此图标便会显示
调频图标
当收到调频的时钟数据时,
此图标便会显示
OUT
12345
户外传感器读数
显示所选传感器的户外温度
IN
户内传感器读数
显示户内温度
ZONE
时间区域
显示所选的时间区域
天晴
天气预报显示
下雨
天气预报显示
下雪
天气预报显示
投影器
显示时间
显示户外温度 (只限频道 1)
注意:
距离范围(1.5 米 – 2 米)
开始使用
将电源连接至设备
把电源线连接至Micro USB 端口,然后把电源插头插入适合的电源
插座中。
把电池装入远程热能传感器
• 滑动电池槽盖以开启,并如图示般配合极性来放入2 粒「AAA」电
池,然后放回电池槽盖。
• 每次更换电池后,请按下传感器中的
RESET
(重置) 键。
放置主装置
• 把装置尽量放置得远离计算机及微波炉,以避免接收障碍。
• 只在户内的干燥环境中使用此装置。
• 请在装置周围预留空间以作通风之用,以令暖空气得到流通。
• 要确保声音质量良好,请勿遮盖扬声器。
放置远程热能传感器(RTHN129)
Max 1.5m
Max 50m
• 放置传感器的理想地方,是家居户外任何不高于5 英呎(1.5 米)的位
置,并需避免放置在阳光直射和潮湿的环境下。
注
视乎环境而定,无线电讯号传输最远可达50米。
按钮描述
顶部
小睡 (背面灯 / 投影) 按钮
背面
温度按钮
时钟按钮
设置/闹钟按钮
按钮
按钮
Micro USB 插头
重置按钮
°c/°F
按钮
灯光按钮
180°
转向按钮
无线电接收
当此产品在无线电讯号范围时,它可自动同步行事历及时钟。当装
置接收讯号时,无线电接收符号 (RCC) 会开始闪动。视乎讯号的强
度,连接程序需时2 至10 分钟。如果讯号弱,装置可能需要24 小时
来接收有效的讯号。
符号
描述
功能
无调频天线图标
此图标不显示,表示主装置已至少1 小
时15 分钟没有收到调频的时钟数据
调频天线图标亮
着亮起
此图标亮起表示主装置已收到调频的
时钟数据。
如主装置在1 小时15 分钟都没有数据,
或时钟时间以手动方式来调敎,此图示
便会不显示。
主装置可以从远程传感器,接收调频的时钟数据 (格式为DCF (欧洲)、
MSF (英国)及WWVB (美国):
• DCF (欧洲)及MSF (英国):参照DCF/MSF 广播讯号的时区0,时间
区域的设置在-23 至23 的范围内。
• WWVB (美国):参照WWVB 广播讯号的时区P/M/C/E,时间区域
的设置为0/1/2/3。
时钟讯号接收指示器:
符号
描述
强讯号
弱讯号
没有讯号
l
正在接收讯号
已关闭无线电接收
•
注
接收会受到几个原因所影响。要得到最好的接收,请把装置
远离金属对象及电器用品。其他讯号阻碍的原因包括电力传输塔、
钢筋施工及金属壁板。如希望得到最佳的接收效果,请把装置放
于窗边。
开启/关闭无线电接收
SEARCH (搜索) 按钮(位于户外接收器中)
• 按下SEARCH (搜索) 来开启RCC 搜索功能。LED 灯会闪动两次,表
示搜索功能已开启。
• 长按SEARCH (搜索)来关闭RCC 搜索功能。LED 会闪动三次来表
示功能已关闭。
手动设置时间
• 长按SEARCH (搜索) (按钮位于户外接收器中) 以关闭讯号接收。长
按
。画面会显示ZONE (区域),号码会闪动。
• - 按一次或长按
及
来调整设置。对于欧洲/英国,时区偏移会从
接收到的时钟讯号时间,来设置时钟最多为+/- 23 个小时。至于美
国,时区设置为0(P)、1(M)、2(C)、3(E)。
• 按
以确定。
• -单击或长按
及
来调教 12/24 小时格式、小时、分钟、年份、
行事历格式 (月-日/日-月)、月份、日期及温度单位 (°C/°F).
• 再按
以确定。
显示时间及日期
• 按
以在时间和日期显示之间切换。
闹钟功能
利用此时钟,你可以设置两个不同的响闹时间。
设置/调敎响闹时间
• 长按
.
• 使用
及
来调教小时并按
来确定。
• 使用
及
来调教分钟并按 来确定。
• 装置会显示响闹时间,而响闹声音会于2 分钟后停止。
贪睡回叫功能
• 要使用SNOOZE (贪睡回叫) 功能,请当响闹响起时,在时钟的顶部
按SNOOZE (light) (贪睡回叫(灯光))按钮。8 分钟后响闹会停止并再
次开始。你可以重复此功能三次。
显示响闹时间
默认下,时钟会显示现时时间及日期。
• 要持续5秒来显示响闹1,请按
及 。
• 要持续5秒来显示响闹2,请按
及 。
启动/关闭闹钟
• 按 以启动/关闭闹钟,次序为:
闹钟 1 >闹钟2 > 同时开启两个闹钟 >同时关闭两个闹钟。
背面灯
• 按Light(灯)按钮,以将背面灯的光暗度切换成喜欢的显示程度。
• 如要将投影功能及最高光暗度的背面灯启动5秒,请按Snooze
(light)(小睡(灯))按钮。


